Hi there,
NRF 52840 Preview DK
nRF5_SDK_15.2.0_9412b96
IAR for ARM 7.60.1
I need some information on how to do Serial DFU (UART/USB) with Bootloader, without Soft Device. From all the information I've gathered, including:
devzone.nordicsemi.com/.../getting-started-with-nordics-secure-dfu-bootloader
infocenter.nordicsemi.com/index.jsp
and few more...?
I get very confused with all the mangling steps. And, it doesn't work properly at the end >.<. So, can you please clarify if my steps are correct?
So, I followed the infocenter's "Test the Serial Secure DFU Bootloader application by performing the following steps:"
1) I don't want to create my own firmware for now. So I'll use:
My Work\Nordic\nRF5_SDK_15.2.0_9412b96\examples\dfu\secure_dfu_test_images\uart\nrf52840\ blinky_mbr.hex
since it's already built at 0x1000. I generated public and private keys though, since otherwise step 3 will stall unless I have keys.
Generating keys:
nrfutil.exe keys generate private.key
nrfutil keys display --key pk --format code private.key --out_file public_key.c
Then I generate my own zip file:
nrfutil pkg generate --hw-version 52 --application-version 1 --application blinky_mbr.hex --key-file private.key --sd-req 0 my_blinky_mbr.zip
2) Install micro-ecc - done
3) Compile the bootloader. -> Should I use "secure_bootloader_uart-mbr_pca10056"? Or "secure-bootloader_usb_mbr_pca10056" ? Debug? no Debug?
I've decided to use: secure_bootloader_uart_mbr_pca10056 no debug. and change the public key with the ones generated from step 1.
Build ran OK.
4) If you generated a bootloader settings HEX file, flash it using the following command:
nrfjprog --program --sectorerase settings.hex
I followed another page to generate a basic setting:
nrfutil settings generate --family NRF52840 --application blinky_mbr.hex --application-version 1 --bootloader-version 1 --bl-settings-version 1 settings.hex
nrfutil settings display settings.hex
Then I merged the bootloader settings with bootloader:
mergehex --merge settings.hex secure_bootloader_uart_mbr_pca10056.hex --output output.hex
5) Program the HEX file.
I used nrfConnect's programmer and programmed the following 3 files:
mbr.hex - from C:\Users\cwati\Documents\My Work\Nordic\nRF5_SDK_15.2.0_9412b96\examples\dfu\secure_dfu_test_images\uart\nrf52840
output.hex - from step 4
blinky_mbr.hex - from C:\Users\cwati\Documents\My Work\Nordic\nRF5_SDK_15.2.0_9412b96\examples\dfu\secure_dfu_test_images\uart\nrf52840
6. Make sure that the device enters DFU mode. DFU mode is indicated by LED 3 being lit. If a valid application is installed on the device, hold Button 4 during startup to prevent the bootloader from starting the application and force it to enter DFU mode instead.
When power cycled I see LED cycling from 1,2,3,4 as expected.
When I hold Button 4 while power cycling, I see LED 1,3 light up. I suppose this is expected.
7. Use either nrfutil or a mobile app to perform the DFU:
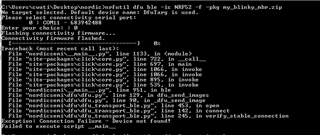
I power cycled while holding down Button 4 so that LED stops (DFU mode) and ran:
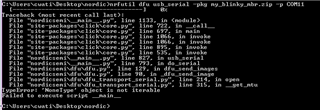
nrfutil dfu ble -ic NRF52 -f -pkg my_blinky_mbr.zip
and got error below.
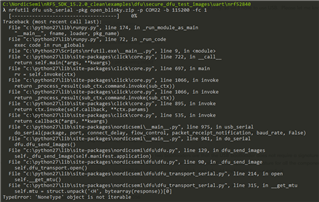
Then it won't even run the application after power cycle (no LED cycling), and the memory layout got messed up. When seen with nrfConnect I see Softdevice at 0x1000 to 0x1EBF0 and the app at 0x1F000. See below.
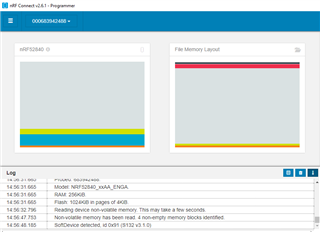
The right side is the original memory layout, and I expect to update just the application part, but why is there softdevice programmed now? Why is the app moved to 0x1F000?
More questions:
1) Does this example "Secure DFU Bootloader over Serial Link (UART/USB)" expect us to use the UART or USB example? Or will either one work?
For running either of those 2 examples, do I need to connect the USB cable on 52840 DK Board to the JLINK port, or to the nRF USB port?
And, when it's in DFU serial mode, do I expect to see, on the Device Manager, something other than "JLINK" on the COM PORT? Because I only see "JLINK" for now.
2) How many hex files do I need to program for an empty DK eval? I think I need to program:
MBR.Hex (resides at 0x0000)
Application (such as blinky_mbr.hex) starting from 0x1000
output.hex, which consists of Bootloader Settings + Bootloader
Am I missing anything else?
3) I use the mbr.hex from the example folder, but will we ever have the need to generate or modify mbr.hex?