

A common thing to do is to use the Nordic UART Service for quick prototyping.
Often the example itself is used as a starting point (ble_app_uart). But sometimes we use other starting points, and want to include parts of another example in our application.
In this blog post, we will add the Nordic UART Service (NUS) into the Health Thermometer Service example project (ble_app_hts).
When we are done you can use the BLE UART app in nRF Toolbox (available for iOS and Android) to send commands to the Health Thermometer Example.
In this case we will just send two trivial commands, one to toggle a led, and one to disconnect.
I uploaded the project to GitHub and attempted to have a clean diff between the original SDK 15.0.0 files, and the needed modifications. Observing the files themselves can perhaps be just as educational as following the steps below.
Let's go! Start from the Health Thermometer Application in SDK 15.0.0 (<SDK>\examples\ble_peripheral\ble_app_hts):
1. Add and include needed files
Add the include in the top of main
#include "ble_nus.h"
Add ble_nus source file to you project and the header file to your include path.
(ble_nus.c and ble_nus.h are located in <SDK>/components/ble/ble_services/ble_nus)
NUS was using the Link Context Manager. That was not being used by the Health Thermometer Example (ble_app_hts).
Attempting to compile with just NUS would quickly reveal this.
Go ahead and add the source file to the project files and the header file path to our project's include path.
(ble_link_ctx_manager.c and ble_link_ctx_manager.h are located in <SDK>\components\ble\ble_link_ctx_manager\)
2. Changes to sdk_config.h
find BLE_NUS_ENABLED and change from 0 to 1
BLE_NUS_ENABLED 1
NUS will add a Vendor Specific UUID, so we must increase the NRF_SDH_BLE_VS_UUID_COUNT from 0 to 1.
At run time this would be revealed by ble_nus_init() returning NRF_ERROR_NO_MEM from sd_ble_gatts_service_add().
NRF_SDH_BLE_VS_UUID_COUNT 1
3. Add needed NUS elements in the ble_app_hts main
They can be copied in part from the ble_app_nus main file.
In the top of main after all the defines, we declare our instance of NUS, m_nus and add the instance as an observer to SoftDevice events.
BLE_NUS_DEF(m_nus, NRF_SDH_BLE_TOTAL_LINK_COUNT);
in services_init() we add the following:
ble_nus_init_t nus_init;

// Initialize NUS.
memset(&nus_init, 0, sizeof(nus_init));

nus_init.data_handler = nus_data_handler;

err_code = ble_nus_init(&m_nus, &nus_init);
APP_ERROR_CHECK(err_code);
We must move services_init() above advertising_init().
Since we add a vendor specific UUID in ble_nus_init(), it must be added before the advertising module encodes advertising data, or else it will not be recognized.
(NRF_ERROR_INVALID_PARAM would be returned from the advertising module at runtime).
Add the nus_data_handler() as posted below. I have modified it compared to ble_app_nus.
here we look for the text "disconnect" to trigger a disconnect, and the text "LED" to toggle LED 4 on the development board.
static void nus_data_handler(ble_nus_evt_t * p_evt)
{

    if (p_evt->type == BLE_NUS_EVT_RX_DATA)
    {
        NRF_LOG_DEBUG("Received data from BLE NUS.");

        if((memcmp(p_evt->params.rx_data.p_data,"disconnect", p_evt->params.rx_data.length) == 0))
        {
		        sd_ble_gap_disconnect(p_evt->conn_handle, BLE_HCI_REMOTE_USER_TERMINATED_CONNECTION);
		    }
        if((memcmp(p_evt->params.rx_data.p_data,"LED", p_evt->params.rx_data.length) == 0))
        {
		        bsp_board_led_invert(BSP_BOARD_LED_3);
		    }
    }
}
4. Adjust the RAM allocated to the SoftDevice
Since NUS added another Vendor Specific UUID the SoftDevice needs more RAM to account for this. Go your the project settings and change the Application RAM Start from 0x20002210 to 0x20002220.
This amount can always depend on your device. The size of application ram must be changed correspondingly (For my project, the size had to be decreased from 3DDF0 to 0x3DDE0)
The best way of finding your required Application RAM start is to run the project and observe the RTT output. Or set a breakpoint close to sd_ble_sd_ble_enable and observe the ram_start variable.
In general, the RAM use of the SoftDevice can often require your attention when modifying BLE projects.
5. Testing with phone and PC.
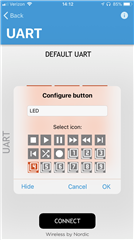
Using the nRF Toolbox app for iOS and Android, go to the UART application and add commands for "disconnect" and "LED".

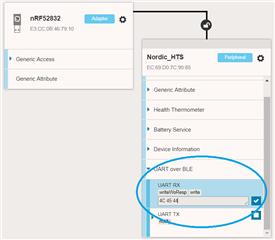
You can also use nRF Connect. below is a screenshot from the PC version where I write "LED" (in hex) to the nRF52. You could also use nRF Connect for iOS and Android to write to the UART RX characteristic.
Now we have shown using parts of one service in another application.
Stay tuned for my next blog post if you are interested in merging two examples more completely.


