

Motivation
Very often, while working with Bluetooth LE devices, we encountered a problem having to repeat a sequence of operations to test or demonstrate some functionality. Writing a mobile app every time to show couple of buttons that interact with a device was costly and boring. A more generic and easy to use solution was required.
Automated tests
Our first approach, the automated tests, allowed to prepare an XML script with sets of operations that were automatically performed producing a report as a result. Automated tests appeared in nRF Connect for Android (known back then as nRF Master Control Panel) in version 2.0, on September 18th, 2014. Despite many features they are difficult to use and require a phone to be connected to a PC. A proper script has to be written on a PC, often with help of the documentation.They are good for testing, but completely not user friendly. And they still don't support GATT server operations, like sending notifications.
nRF Toolbox UART
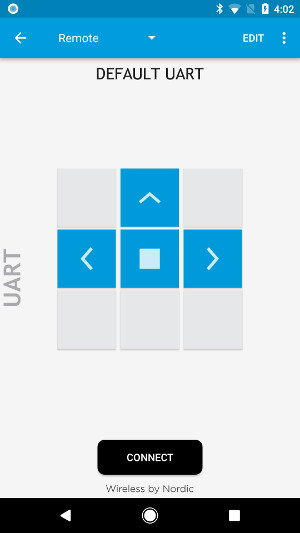
Few weeks later we improved the UX by implementing the UART profile in nRF Toolbox 1.10 with a set of user customizable buttons, each sending a command to a device with Nordic UART Service. Such configuration can be exported to XML and imported on another device. UART profile, without the sharing option, is also available for iOS.
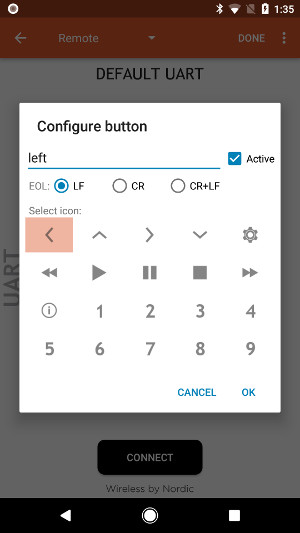
This feature was a very good first step, but had a lot of limitations. It supported only UART service and allowed only to write data. Worked well with a remote controled a car, but were useless if an operation had to be performed as a result of a notification or after a delay.
Macros
The concept of macros isn't new. Macros allow users to record and replay actions. You may find them in many programs, including Microsoft Office applications, Sublime Text, etc. The main advantage of macros is that they can be easily recorded by performing normal operations, without doing any extra work.
nRF Connect introduced macros in version 4.4. Since then they were updated several times. Macros solve most of the problems we had. They are easy to use, have wide range of supported operations and a nice user interface. The main features are:
- User friendly design
- Client and server operations supported
- Option to record a macro in the app just by performing operations as usual
- Option to write or update a macro definition on the PC and import it again
- Option to share recorded macro between devices
- Mirroring macros
First steps
To start using macros connect to a device and click the red FAB (Floating Action Button,  ) at the bottom. A bottom sheet with a list of macros and folders will pop up. Click a folder (for example Tutorial) to show its content.
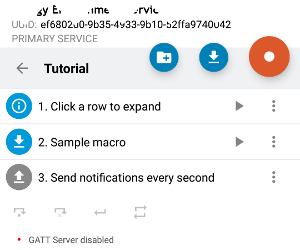
nRF Connect initially creates 3 simple predefined macros in the Tutorial folder. Read them to get some basics. You may have noticed, that the last macro (3. Sending notifications every second) is grayed. That means that the client or server configuration didn't pass validation. In other words, macro was recorded using using some characteristic that are not present on the device you connected to, or on the local GATT Server in nRF Connect. Each row can be expanded by clicking it. A blue (valid) macro displays list of operations' descriptions. A grayed row displays the validation message, in that case that GATT server must be enabled. Open navigation drawer and tap Configure GATT server, then select Sample configuration from the drop down at the top. Had you selected any other configuration with different services, the error message would have changed to "To tun this tutorial enable 'Sample configuration' in GATT Server configuration. Service validation failed on server".
You may now play the macros by clicking PLAY button. Only one macro can be played at a time to avoid race conditions. You may click the PAUSE button to stop playing macro and start another.
Basics
When macro expanded, several operations become available, as shown on the figure below.
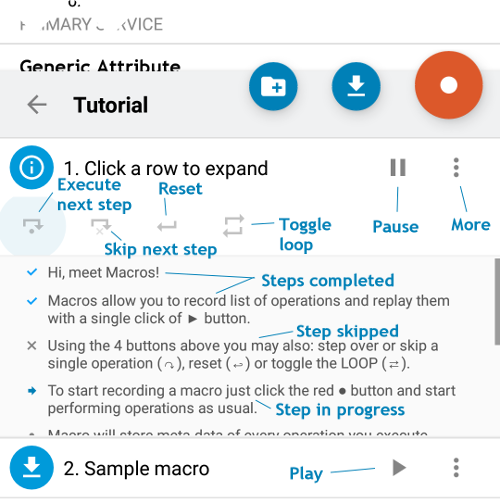
The rounded icons at the top can be used to Create a new folder in the current folder, to Import a macro from an XML file to the current folder, or to Record a new macro.
The MORE button can be used to Share, Export, Rename, Move or Mirror a macro.
To Remove a macro swipe it to the left or right. It must be reset before deleting.
Recording a macro
In this section you master you macro-recording skills. We will use Thingy:52 as a device. A Thingy, among other features, has a RGB LED, a button, and a speaker that could easily be used with macros. You may first try completing the task on your own before checking the solution.
Task: Create a macro that will blink LED for 200 ms.
Solution:
- Connect you your Thingy.
- Open macros sheet and click the REC button. You will notice, that the bottom sheet collapsed giving you more space to work with your device. Also, the Import a macro button changed to Add delay.
- Find Thingy User Interface Service and the Thingy LED Characteristic inside.
- Write value 0x01FF0000 to the Thingy LED Characteristic. This will set the LED mode to constant (0x01......) and set the color to red (0x..FF0000) (see Thingy documentation). You may expand the macros sheet by dragging the bar up to see the newly recorded operation.
- Add 200 ms delay by clicking the
 button.
 - And finally disable the LED by writing 0x00 to the same characteristic again.
- When done, click red STOP button, name it "Blink" and set an icon of choice.
Try your macro by pressing PLAY button. It blinked once and stopped. This is because you have to toggle the Loop. Turn loop on and try again.
Now, let's try something more difficult.
Task: Create a macro, that will make your Thingy blink its LED for 200 ms every 2 seconds when button is released and very quickly when button is pressed.
Solution:
- Start recording.
- This time, as we rely on the button, we have to enable Thingy Button Characteristic notifications. Click the Enable notifications icon
 on the characteristic's row.
 - Notice, that a new icon showed up next to the Disable notifications icon
 . It allows to add a conditional sleep: sleep-if or sleep-until.
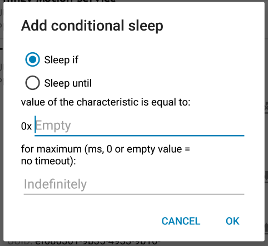
- Switch radio button to Sleep until and set the value to (0x)01 (button pressed). As we want to blink every 2 seconds (and a blink will take 200 ms), set the timeout to 1800 ms. Leaving this field empty would disable the timeout.
- Now it's time to blink the LED. You may do it again like in the first task, but you may actually simply play the "Blink" macro while recording. It will sent blink commands and each operation will be automatically added to your new recording.
- Click STOP button and assign a name and an icon.
Try your macro by pressing PLAY button. Remember about toggling the Loop. Congratulations! Here's what you should get:
Note: A macro can only perform a single path of operations. Conditional operations are not possible, with a small exception (sleep-if and sleep-until operations). It's important to understand, that you can't program a macro that will behave differently for example based on a notification value. A running macro will just wait until a notification from given characteristic is received and, if specified, will assert it's value and display a OK or a warning, but the macro will go on. That means, that the simplest values the characteristic has, the better. For example, it's easy to rely on a Button Characteristic when the value changes from 0x00 to 0x01 on click, but hard on Gravity Vector where the values can be pretty much any and they are sent very often.
Sample macros
When you connect to a Thingy for the first time using nRF Connect 4.12+ a set of sample macros are added to Thingy Demo folder. The sample macros (also available here) work with LED, Button and Sound characteristics.
Advanced
Using macros you may also do more advanced operations, for example:
- Use server services (send notifications or indications, set characteristics' values to be read by a remote device, wait until a remote device read a value, etc.)
- Record a macro by playing another one, or by doing step by step operations. For example, when you failed at step 100 when recording your new macro, you don't have to repeat again from scratch, but instead save what you recorded, start recording a new macro and play 99 steps of the previous one. You may also skip some steps that way.
- Mirror a macro. This creates a second macro, as seen from the remote device point of view. If you enable notifications, it will wait for a descriptor write operation, etc. Keep in mind, that sometime it will produce a NOTE, instead of an operation. For example, when you wait for button to be clicked, the corresponding operation is "Note: other side is waiting for..." so you may need to edit the macro on the PC.
- Record macros simultaneously on 2 Android devices. Set up GATT server on 2 phones, start advertising as a connectable device on one of them and connect to if using the other one. Then start recording macros on both phones and start performing Bluetooth LE operations on both phones. You will see some corresponding operations to show up on both phones.
Links
- nRF Connect on Google Play: https://play.google.com/store/apps/details?id=no.nordicsemi.android.mcp
- Automated tests and macros documentation: https://github.com/NordicSemiconductor/Android-nRF-Connect/tree/master/documentation
- nRF Toolbox on Google Play: https://play.google.com/store/apps/details?id=no.nordicsemi.android.nrftoolbox
- nRF Toolbox source code: https://github.com/NordicSemiconductor/Android-nRF-Toolbox
- Thingy:52: http://www.nordicsemi.com/thingy

