

Thingy:52 Node.js Raspberry Pi Interface
This blog post is a follow up to the Nordic Thingy:52 node.js/Raspberry Pi demos blog post, and will described how you can run and what to expect from each of the Node.js examples that have been provided in the GitHub repository. It will also described an additional example of how you can use the Node.js library to post a tweet based on sensor data.
If you are looking for a Python interface instead of Node.js, please have a look at the following blog post for some more information: https://devzone.nordicsemi.com/blogs/1162/nordic-thingy52-raspberry-pi-python-interface/.
Raspberry Pi Setup
To setup the Raspberry Pi so that it matches the setup used for this blog post, please follow the instructions as found on this link: https://www.raspberrypi.org/help/noobs-setup/2/, and install the Raspbian operating system when booting the RPi. If you install Raspbian directly onto the SD card as described under "Setup Raspbian" in the Nordic Thingy:52 Node.js Github respository; https://github.com/NordicSemiconductor/Nordic-Thingy52-Nodejs/blob/master/RASPBERRYPI.md, you might save some time as the installation from NOOBS takes some time on first boot.
Summary of installing NOOBS: * Format SD card using tool, * download NOOBS offline and network install, * extract folder and drag them onto the SD card, * eject, * insert SD into RPi, * boot up and install Raspbian, * set up keyboard, time and date, etc through Preferences, Raspberry Pi Configuration, * change password, * and I would suggest enabling SSH as this makes developing a lot easier when you don't have a separate monitor/keyboard setup.
When Raspbian has been setup, follow the last steps as explained under "Setup Raspbian" in the Nordic Thingy:52 Node.js github repository; "apt-get update, curl latest version of Node.js, apt-get extra packages".
Node.js Install using GitHub
Once the Raspbian OS is setup, you are ready to get started testing the Node.js examples. In order to make it easier to alter and add our own examples, I suggest following the "Install using Github" approach as listed in the RASPBERRYPI.md; "git clone, cd repo, npm install noble-device, cd examples".
Running the Node.js examples
As mentioned in the instructions on GitHub, some of the examples requires extra npm packages to be installed before they can be run. I will go through running all the examples and the packages needed should be listed as part of that walkthrough.
Please note that to run the examples, you should use the "sudo" command.
BLE Issues on the RPi
If you some time during the example testing experience any problems with the Bluetooth connection on the Raspberry Pi, and the Thingy seems to be working just fine (it still connects to the iPhone Thingy app, for example), the problem might be that the BLE on the RPi has gotten stuck in an unknown state. I have found that the best way to check if the BLE interface on the RPi is still up and running is to simply call "$ sudo hcitool lescan" and see that it scans and finds the Thingy advertisement (it should say "LE SCAN ...", and then list all the BLE devices it finds. "Thingy" should be one of them). If this command does not work, the BLE on the RPi has probably stopped working somehow and I suggest restarting the RPi as that was the most reliable approach I found to get the BLE up and running again. After a restart, everything is hopefully working as it should; if not, I suggest googling your error codes to see if there is a fix available. If you do find a solution to this issue, please feel free to post it as a comment and I will include it in this blog post :)
@@ Testing btn_led.js @@
This example does not require installing any additional packages (the noble-device package is needed, but this should have been installed already as part of the "Install using GitHub" steps).
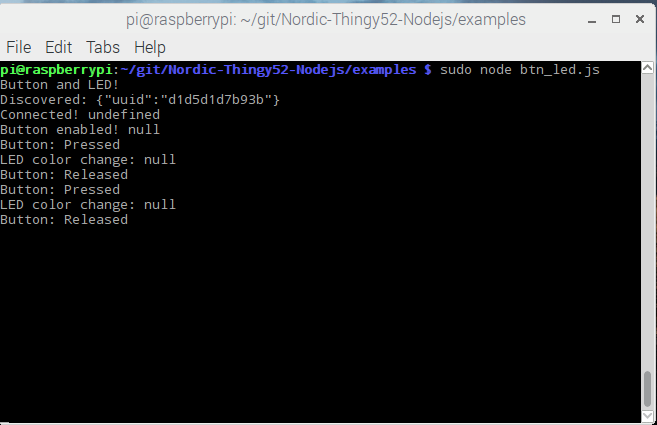
Make sure your Thingy is ON and advertising (blue LED should be breathing). Enter the example folder and run
pi@raspberrypi:~/git/Nordic-Thingy52-Nodejs/examples $ sudo node btn_led.js
The terminal should say "Button and LED!" together with some other text. When the button on top of the Thingy is pressed, the terminal will say "Button: Pressed", and it will change the color of the LED. See screen capture below for terminal output of the example (capture using 'scrot' command on RPi). Hit "Ctrl + c" to exit the execution.
@@ Testing color_calib.js @@
This example does not require installing any additional packages to be installed.
Enter the example folder and run by typing the following
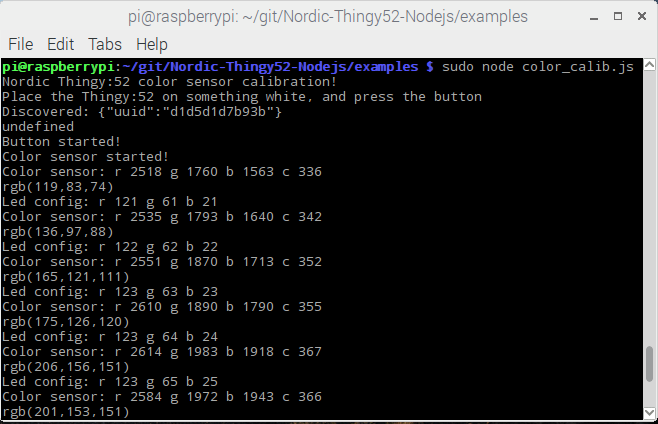
$ sudo node color_calib.js
The terminal will tell you to place the Thingy on something white and then press the button to calibrate the sensor. Once this is done, the Thingy will start pushing color sensor readings to the RPi and they can be seen in the terminal window. Screen capture of the terminal is added below.
@@ Testing environment.js @@
This example does not require installing any additional packages to be installed.
Enter the example folder and run by typing the following
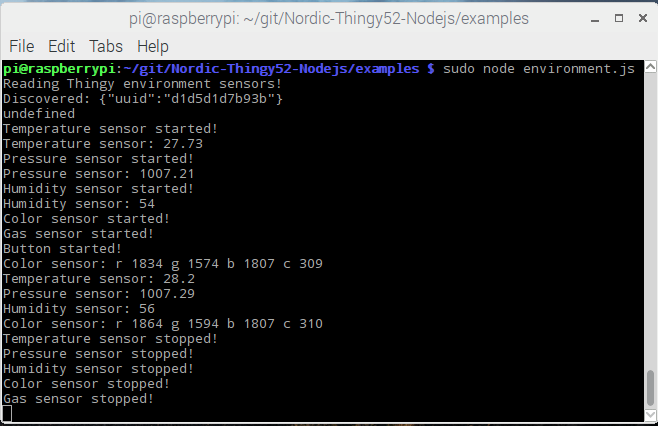
$ sudo node environment.js
The terminal will print "Reading Thingy environment sensors!", and then start printing sensor data. If you click the button on the Thingy it will stop reading and sending the data until the button is pressed again. Screen capture of the terminal is added below.
@@ Testing microphone.js @@
This example requires installing the "speaker" package using npm. In the GitHub repository there is a description on how to set up the Raspberry Pi running Raspbian and Google Assistant using the Thingy:52 as microphone input: https://github.com/NordicSemiconductor/Nordic-Thingy52-Nodejs/blob/master/GOOGLE_ASSISTANT.md. As the speaker package will need to be patched, I suggest looking into this description for how that can be done/tested.
@@ Testing radio.js @@
Testing the radio.js example on the Raspberry Pi with the built-in BLE radio will not yield good quality audio, so this is not recommended and you should have a BLE USB Dongle if you plan to make any applications similar to this. Regardless, if you just want to make sure it works, testing the example requires ‘icecast’, ‘lame’, and ‘util’ packages which are installed by typing “$ npm install [package name]”.
Enter the example folder and install the three packages with the command as described above. Then run the example by typing
$ sudo node radio.js
You should now be hearing choppy audio coming from the Thingy:52. "Ctrl + c" to exit. The reason the audio is choppy is because the BLE connection between the Thingy and the RPi is not optimal. Using a BLE dongle should solve this issue.
@@ Testing firebase.js @@
This example requires the packages 'util', and 'firebase' to be installed using the 'npm install' command as described earlier. This example also requires you to have a firebase/google account in order to receive the sensor data.
If you have never heard of Firebase before, here is a quick summary: “Firebase is Google’s mobile platform that helps you quickly develop high-quality apps and grow your business”. It will handle the backend infrastructure, user engagement, and monetization, while you build the app for your users. In this example we will simply use it as a database for the sensor data and show how the data can be passed to the server and displayed there.
Setting up the Firebase database
There are several tutorials on setting up Firebase and getting started with it; such as https://rominirani.com/firebase-iot-tutorial-46203a92f869. I will described the approach I took below which should be sufficient to get this example up and running.
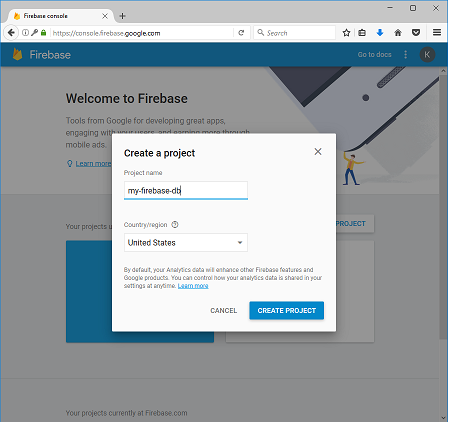
In order to get started with the Firebase database, go to https://console.firebase.google.com and log into your google account if you are not already logged in. Click the "Add project" button, and you will be prompted to "Create a project". Choose a fitting project name, such as "my-firebase-db" and select your country/region.
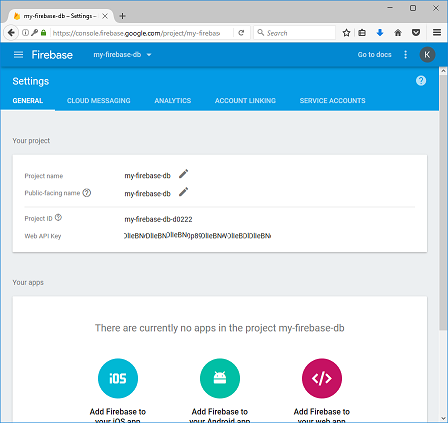
Once the project has been created, go to "Project settings" through the gear icon in the menu. Take note of the "Project ID" as well as the "Web API Key", as we will need these later on.
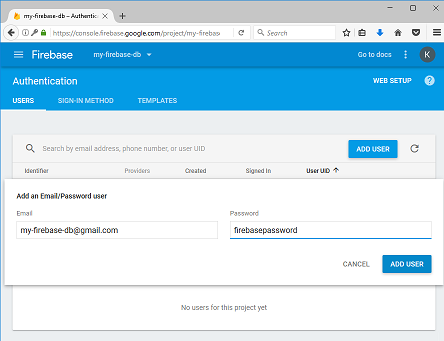
To test this example, you can set up an authentication method. Go to "Authentication" in the menu, then click on "SIGN-IN METHOD". Enable "Email/Password" sign-in, and then click the "USERS" tab and "ADD USER". Add a user with any random email address and password and take note of this as we will use it in the example later on.
Now that we have set up the database and user access, we can go ahead and alter the firebase.js file to include the necessary information for publishing to the database. Edit the two variables in 'firebase_login' to use the user login email and password that we just created. Then edit the four variables in 'firebase_config' to include the project ID and Web API Key that we found in the firebase project settings.
var firebase_login = {
    email : "[email protected]",
    pass : "firebasepassword"
};

var firebase_config = {
    apiKey: "AIzaAIzaAIzaAIzaAIzaAIza-AIzaAIzaAIzaAIza",
    authDomain: "my-firebase-db-d0222.firebaseapp.com",
    databaseURL: "https://my-firebase-db-d0222.firebaseio.com",
    storageBucket: "my-firebase-db-d0222.appspot.com",
};
Running the example
Once this is all done, run the example by typing
$ sudo node firebase.js
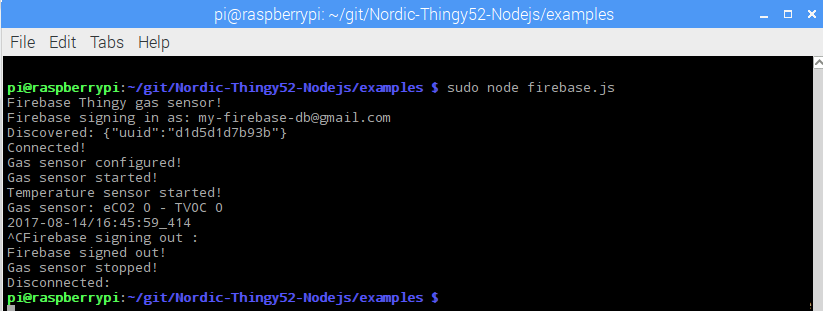
The terminal should look as shown below. Please note that it might take some time before the first data has been published to the database (The line with date and time shows when it publishes; it might take 1 second, or 1-2 minutes based on your gas sensor settings). To stop the execution, press "Ctrl + c" and you should see Firebase sign out as well as the gas sensor readings being stopped.
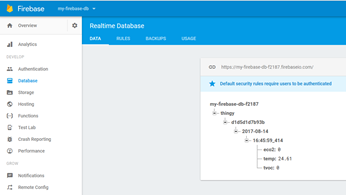
If you now open your Firebase console webpage again and click the Database option in the menu, you should see that some data has been added to the database along with a date and time for when the data was posted; please see screenshot below. This concludes the explanation of this example and shows how you would get data passed into your Firebase server.
@@ Testing ifttt_gas.js @@
This example requires the packages 'util', and 'request' to be installed using the 'npm install' command as described earlier. This example also requires you to have a IFTTT account in order to receive and take an action based on the event.
If you have never used IFTTT before, here is a brief summary: "IFTTT is a free platform that helps you do more with all your apps and devices". IFTTT stands for 'If This Then That'. It is a free web-based service that people use to create chains of simple conditional statements, called applets. For example, and applet may send an e-mail message to someone if a user tweets using a specific hashtag. Reference, IFTTT Wiki.
Setting up the IFTTT account and the event trigger
If you have never used IFTTT before, please read through the following steps to set up the required Webhook. If you know how to use IFTTT, set up the Webhook to receive an event (you will pass the name of the event to the Node.js application as an argument) and take an action based on that event; also note down your Webhook key (this key is passed into the Node.js application as an argument).
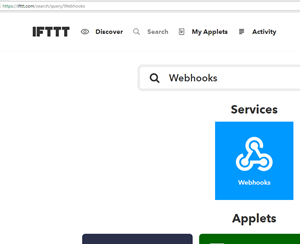
Go to https://ifttt.com/ and Sign up, or log into your existing IFTTT account. Once logged in, click the “Search” tab at the top and search for “Webhooks”. Click the blue “Webhooks” button under Services, and then click Connect to connect this service to your account.
Once the Service has been connected to your account, click the Documentation button up right on the screen (see screenshot below). This should open a new tab that says: "Your key is: abcdefghijk_123456789" (your key will of course be different then mine). Take note of this Key as we will use it later on when calling the Node.js application. You can now close that Documentation tab; if you ever need to find it again, click the "My Applets" tab at the top of your IFTTT homepage, click Services, and search for Webhooks, then click the blue Webhooks button to get back to the homepage of the Webhooks service.

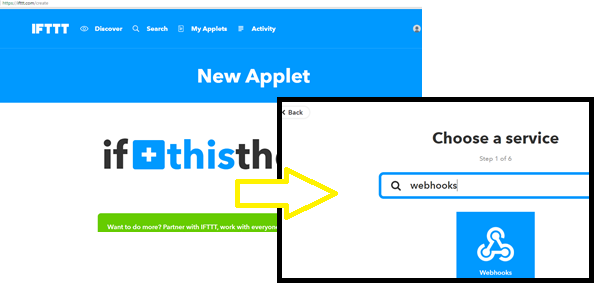
Next step is to activate an Applet that is triggered from the event that our RPi will send. Click "My Applets" and then "New Applet".

On the screen that appears, click the blue “+this” icon. This will take you to a page where you can search for services. Search for “Webhooks”, and select it.
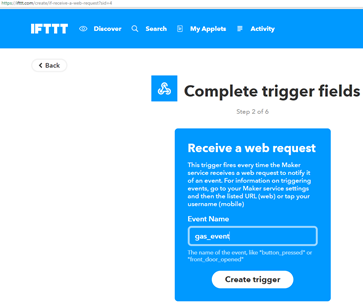
When you click the Webhooks service it will take you to a page that says Choose trigger (it will say “Connect Webhooks” if this is your first time using the Webhooks service and you did not connect it earlier from the Search menu. Click “Connect” and you should be set). Click the “Receive a web request” button, and you will be prompted to enter the Event Name that should trigger the action we are going to add later. Enter the name “gas_event” and click “Create trigger”. This event name will later be passed to the Node.js application as an argument.
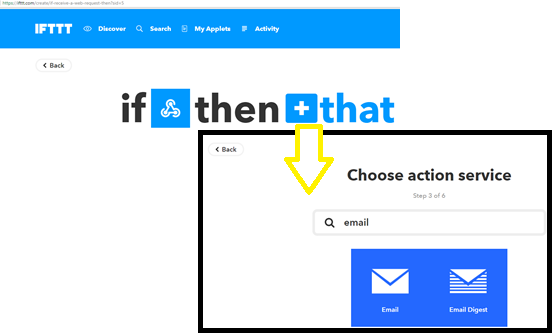
We are now done setting up the trigger for this Applet. Next, click the blue “+that” button on the screen that has appeared. When you click this, you will be prompted to "Choose action service". To make this simple, search for email and click the blue "Email" button to select this action.
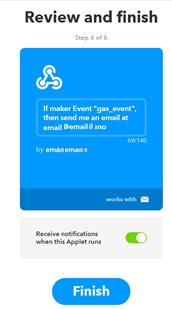
On the next page, click the blue “Send me an email” button and leave it at the default entries, or change it to something funny, then click “Create Action”. On the next page, make sure the email address is correct, activate the “Receive notifications when this Applet runs” option, then click finish. Your Applet is not set up and ready to be triggered by the event that we will send from the RPi.
Running the example
To run the example on the Raspberry Pi, we need the event name that we set up on IFTTT, as well as the Webhooks Key that we read out from the Webhooks Documentation page. Run the example by typing as described below (remember to replace the -e, and -k arguments with the corresponding name and key that you have for your setup). Note: This is where my BLE interface got stuck the first time and I had to restart the Raspberry Pi as mentioned at the top of this blog post. If you run into the same problems, try restarting the RPi and see if that solves the issue.
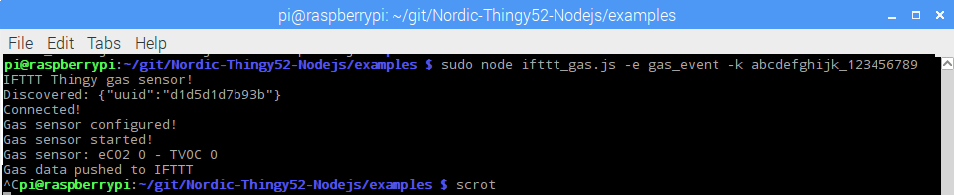
$ sudo node ifttt_gas.js -e gas_event -k abcdefghijk_123456789
You should not see the terminal print "IFTTT Thingy gas sensor!", ..., "Gas sensor started!". The application is then ready to send the event whenever the gas sensor is sent from the Thingy to the RPi. To make sure the Thingy is configured to send the gas data, you might want to connect via the Thingy app on an iPhone or Android and make sure the settings of the gas sensor is set so that it sends gas data every 10 seconds. If not, you might have to wait 1 minute for the gas sensor data to be passed over the BLE connection and for anything to appear in the terminal.
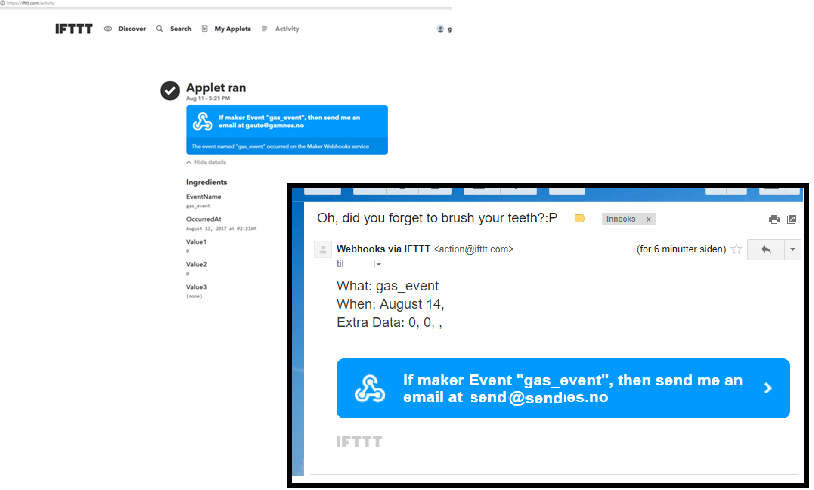
To make sure the event triggered the webhook on IFTTT, go to the IFTTT webpage, and click the “Activity” tab near the top. This will take you to an activity log and if you enabled the notifications on the webhook as mentioned earlier, you should see the log “Applet ran” printed on the screen as well as some details on what it did. You can then check your email and you should have gotten an email specifying what you wrote when the webhook was created. See image below.
@@ Testing motion.js @@
This examples requires packages 'console.table' to be installed.
Enter the example folder and run by typing the following
$ sudo node motion.js
The terminal will print "Reading Thingy Motion sensors!", and then start printing sensor data. If you click the button on the Thingy, it will stop reading all sensors. If clicked again, it will enable all motion sensors and send the data. This might cause disconnect if using the onboard RPi BLE as far as I have seen.
Node.js Twitter Post Based On Sensor Data
As part of a Raspberry Pi Jam in Kirkenes, Norway (https://twitter.com/BarentsRJam), I made an example of using the Thingy:52 and the Raspberry Pi to post a message including sensor data on Twitter when the button on the Thingy was pressed.
GitHub Clone
UPDATE: This example has now been included in the master repository, and there is no need to checkout the gamnes branch any longer.
--Note: This is not needed anylonger-- If you would like to test this example on your own, clone the repository https://github.com/gamnes/Nordic-Thingy52-Nodejs.git, or simply copy the https://github.com/gamnes/Nordic-Thingy52-Nodejs/blob/master/examples/twitter_environment.js file and run it after installing the required packages.-
NPM Packages
This example requires the 'twit' package to be installed using npm. The example also requires some Twitter keys to be included in order to make posting possible. These keys should never be shared online as it might provide others with access to your twitter account, so please do not include these keys in your repository if you are pushing it online.
Twitter Account Applications Setup
To allow posting twitter message from your RPi, your twitter account needs to be set up to allow applications to post tweets. Please follow this tutorial https://videlais.com/2015/02/28/how-to-create-a-basic-twitterbot-in-node-js-using-twit/, and when you are done you should be able to find your 'Consumer Key', 'Consumer Secret', 'Access Token', and 'Access Token Secret' under 'Keys and Access Tokens'. These keys will be used to test this example and they have to be added to the twitter_environment.js file. Summary of steps from tutorial: * Go to apps.twitter.com and register the app; * change permissions from read-only to read and write; * read Consumer Key and Consumer Secret, * generate Access Token and read out this as well as the Access Token Secret. * Take note of all four keys so that they can be included in the example.
Running the Example
The twitter_environment.js example is made such that the four keys noted from the previous step have to be added to the file itself for the example to run. In the file, there are four ‘INSERT_KEY’ strings that needs to be replaced with the four keys you should have taken note of. Add the corresponding key to the correct variable, and save the file; Then run the example by typing
$ sudo node twitter_environment.js
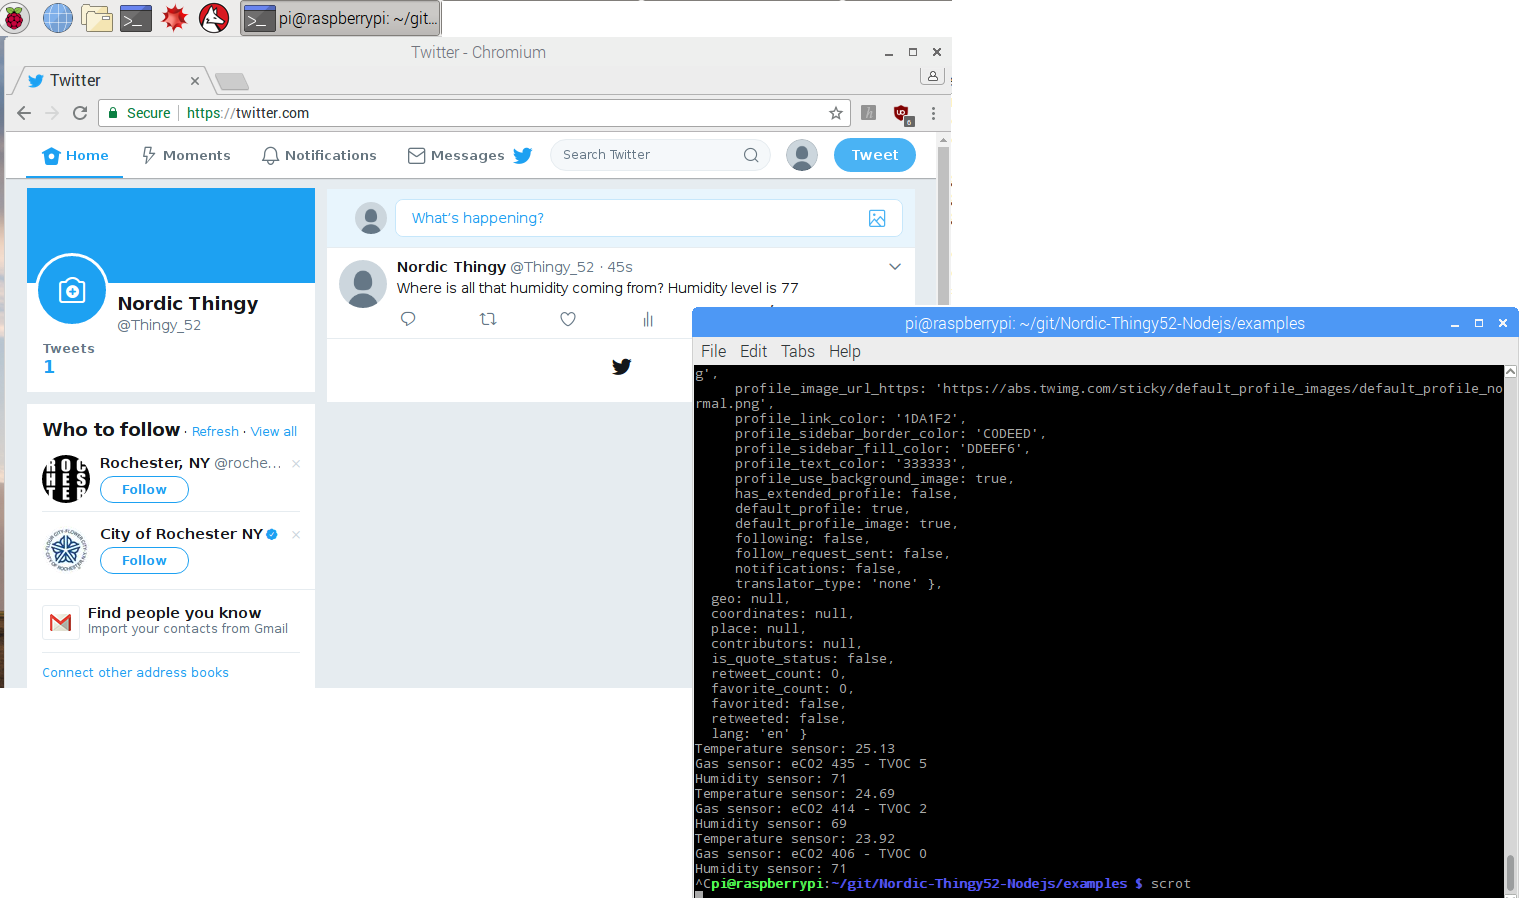
The example should run and start printing all the sensor data in the terminal. To post on Twitter, press the button on top of the Thingy and you should see some twitter post logging in the terminal. Based on the sensor readings, your twitter account should now have posted a message including data from one or more of the sensor. See screen capture below as an example.
That concludes the walkthrough of all the Node.js examples. Feel free to post any questions/comments down below.

-

dansam
-
Cancel
-
Vote Up
0
Vote Down
-
-
Sign in to reply
-
More
-
Cancel
Comment-

dansam
-
Cancel
-
Vote Up
0
Vote Down
-
-
Sign in to reply
-
More
-
Cancel
Children