Thingy:52 Python Raspberry Pi Interface
This blog is a follow up to both the Nordic Thingy:52 node.js/Raspberry Pi demos and the https://devzone.nordicsemi.com/blogs/1160/walkthrough-of-nordic-thingy52-nodejs-raspberry-pi/ blog posts. It will go through how you can set up and develop Python Thingy:52 applications on the Raspberry Pi.
Raspberry Pi Setup
Please follow the setup as explained in Node.js walkthrough to make sure the Raspberry Pi is setup as assumed for this blog post. We will be running the Raspbian operating system.
Running the Example
GitHub Clone
UPDATE: The Thingy:52 Raspberry Pi python implementation is now included in the https://github.com/IanHarvey/bluepy implementation. To run the example, please clone/fork the repository and work from there, or install the library using pip install --upgrade bluepy.
Installation
If using pip, the library should have already been installed and no further action should be required.
Follow the “install the source and build locally” installation instructions from the Github repo. Summary of steps; * apt-get git build-essentials libglib2.0-dev, * clone the github repo, * enter the bluepy folder and run setup.py build, * then run sudo setup.py install.
Testing
When the “Installation” instructions "To install the source and build locally" have been completed, the easiest way to run the Thingy:52 Python example is to enter the bluepy folder within the bluepy folder, and then run (replacing MAC_ADDRESS with your actual mac address):
$ python thingy52.py MAC_ADDRESS --speaker --humidity
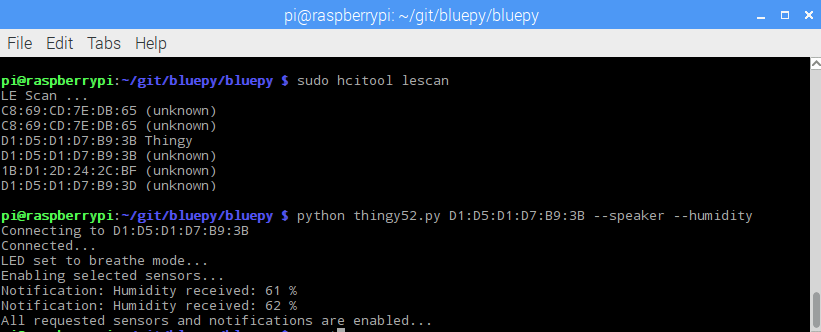
Your MAC_ADDRESS can easily be found using the hcitool lescan command:
$ sudo hcitool lescan
Given your thingy is ON and advertising, it should show up along with its MAC Address. Copy this address ('Ctrl + Shift + v' / 'Ctrl + Shift + c') and add it as part of the python command used to run the example.
The example will make the LED on the Thingy go Red, play a sample sound, as well as print some humidity sensor data in the terminal. See below how the terminal should look something like.

The example above can be run using both Python 2.7 (tested with 2.7.9), and Python 3.4 (tested with 3.4.2). To run the example with Python 3, you need to run the following commands from the top-level bluepy folder to make sure it finds the necessary modules.
$ python3 setup.py build
$ sudo python3 setup.py install
Development
When running setup.py install, it will install the module so that it can be used from python scripts - which is why you have to run it for both Python 2 and Python 3 separately when testing. Once this command has been run, we can start using the module as any other python module.
Simple Connection
Make a new file called thingy_example.py in some folder on the Raspberry Pi, For example, make a folder called thingy_testing in Documents, then create a file within that folder. In this file, write
from bluepy import btle, thingy52
MAC_ADDRESS = "d1:d5:d1:d7:b9:3b"  # This has to be changed to match your Thingy's MAC!
thingy = thingy52.Thingy52(MAC_ADDRESS)
thingy.sound.enable()
thingy.sound.configure(speaker_mode=0x03)  # 0x03 means sample mode, ref FW doc
thingy.sound.play_speaker_sample(1)
thingy.disconnect()
When you run this, your RPi will connect to the Thingy and play sound sample 1 and then disconnect.
A MAC_ADDRESS is required as an argument to initialize the Thingy52 object with the Thingy52() call. The example then enables the sound service using sound.enable() (this basically means the object will request and find the different characteristics of this service and store those internally), and the speaker is configured to run in sample mode by writing the value 0x03 to its configuration function configure(). Sound sample 1 is then played by calling play_speaker_sample(1), and it then disconnects from the Thingy through disconnect().
Firmware/Configuration Documentation
For more information on the configuration of this service and others along with the meaning of the different configuration values, please have a look at the firmware architecture documentation here: https://nordicsemiconductor.github.io/Nordic-Thingy52-FW/documentation/firmware_architecture.html.
Nofications
If you would like to use and receive notifications, you have to tell the library which notification handler to use. This can either be the provided example handler thingy52.MyDelegate(), or you can create your own handler and pass this. The notification handler is set through calling the Thingy52 function setDelegate(). See below for examples on either using the default handler or making your own.
thingy = Thingy52(MAC_ADDRESS)
thingy.setDelegate(thing52.MyDelegate())  # This sets the notification handler to be the default one
thingy.setDelegate(newDelegate())  # This sets the notification handler to be your own, newDelegate has to be implemented in your own script
There is an example python script ("thingy_example_auto.py") uploaded to this blog which uses the bluepy btle scanner functionality to find a Thingy advertisement, which it then connects to. It also implements its own notification handler. It will enabled temperature and button_press notifications, and then wait for 3 notifications to arrive. Please note that more notifications might arrive because the temperature notifications are enabled before the button notifications are, and thus the temperature notifications might be arriving whilst the button notification is being activated. Also note that this example has to be run as 'sudo' because it is utilizing some elevated commands when scanning for BLE devices. Run by typing the following
$ sudo python thingy_example_auto.py
That's all I had for this blog post. Please feel free to post questions/comments down below, and have fun testing out the Thingy:52 together with the Raspberry Pi! :D


