

micro_esb_wireless_uart.zip----------
Proprietary protocols on the nRF51
Although Bluetooth Smart is designed for low power operation and is a great way of connecting your things to a phone or other Bluetooth-enabled device, in the case where you are using an nRF51 in both ends of the wireless link, the use of proprietary protocols becomes an option. Proprietary protocols can give you a higher throughput, increased range, or more optimized power consumption. Or maybe you need a different network topology (and being willing to spend development effort). Note that proprietary protocols can be run concurrently with BLE (using the timeslot API), but this topic is not covered by this blog post.
The radio on the nRF51 can be configured in a number of ways, from the low-level packet layout, to the on-air datarate. The nRF51 SDK offers a couple of protocol libraries that take advantage of this, Gazell and Enhanced ShockBurst (ESB).

Gazell and ESB are provided as compiled libraries in the SDK, and there is an light-weight open source implementation of ESB available on GitHub .
Enhanced ShockBurst (ESB)
ESB was originally created as a simple, but powerful, link layer for the nRF24L series chips. This protocol is implemented in hardware on the nRF24L, while the nRF51 implementation is in software.
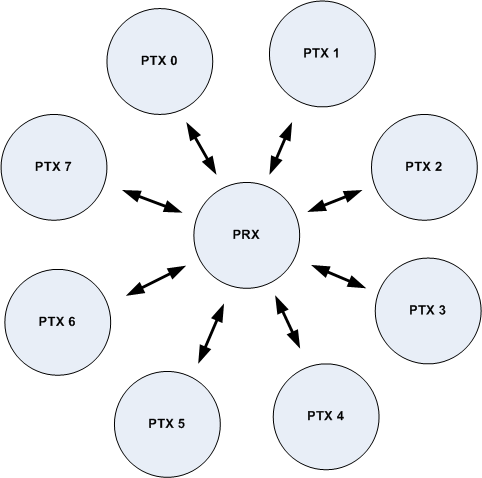
ESB in its basic form is a star topology link layer, which implements retransmissions and acknowledgements between a Primary Transmitter (PTX) and a Primary Receiver (PRX). As the name suggest, the PRX is listening for incoming packets from the PTX. When a packet is received, the PRX can be configured to send an acknowledgement back to the PTX. If the PTX does not receive an acknowledgement, it will attempt to retransmit the packet. This provides a layer of reliability and flow control.
The nRF51 radio hardware can listen for up to 8 PTX device addresses at the same time. More PTX device can be listened to, by facilitating time sharing in software.
To summarize the features ESB gives us:
- Abstraction layer from the radio hardware
- Acknowledgements
- Retransmissions
On the other hand, ESB does not natively do:
- Channel hopping
- Timeslot synchronization
- Non-star topologies
However, the simple nature of ESB lends itself as a building block for more advanced features. The Gazell protocol, for example, is a more full-fledged FHSS protocol built on top of ESB. Because one can move between PRX and PTX roles at any given time, there's the option of creating more advanced network topologies (at the cost of increased complexity).
micro-ESB example
In this example we'll use micro-ESB to set up a wireless UART link.
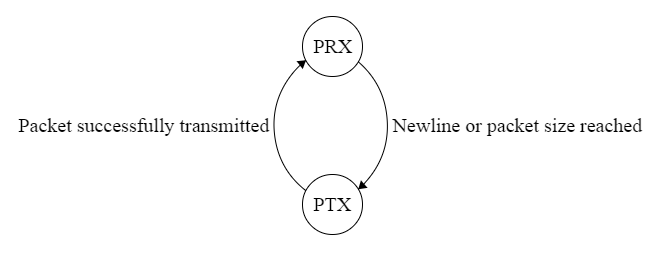
The basic principle is very simple: receive characters via UART. Wirelessly transmit the received UART characters when a newline character is received, or the ESB packet size has been reached. To allow communication to go both ways, we need to make sure that devices are normally able to receive the wireless UART data, and only changing state during transmission of the wireless UART data. In terms of ESB states, the application should operate according to the state machine figure below.
We'll configure the UART using simple_uart from the nRF51 SDK. However, on top of simple_uart we'll add UART interrupt handling. This way we don't have to spin while waiting for received characters.
void UART0_IRQHandler(void)
{
    if (NRF_UART0->EVENTS_RXDRDY != 0)
    {
        uint8_t rxd_char;

        NRF_UART0->EVENTS_RXDRDY = 0;

        rxd_char = (uint8_t) NRF_UART0->RXD;

        fifo_put_char(&s_uart_fifo, rxd_char);

        // Send data packet when newline character is detected or when packet size has been reached
        if (rxd_char == '\n' || fifo_num_elem_get(&s_uart_fifo) >= UESB_CORE_MAX_PAYLOAD_LENGTH)
        {
            uint8_t  char_buf[UESB_CORE_MAX_PAYLOAD_LENGTH];
            uint32_t char_buf_len;
            uint32_t err_code;

            char_buf_len = sizeof(char_buf);
            fifo_get_pkt(&s_uart_fifo, char_buf, &char_buf_len);

            err_code = app_sched_event_put(char_buf, char_buf_len, uesb_send_pkt_evt_handler);
            APP_ERROR_CHECK(err_code);
        }
    }
}

static void uart_config(void)
{
    simple_uart_config(RTS_PIN_NUMBER, TX_PIN_NUMBER, CTS_PIN_NUMBER, RX_PIN_NUMBER, false);
    // Enable interrupt on UART RX
    NVIC_ClearPendingIRQ(UART0_IRQn);
    NVIC_SetPriority(UART0_IRQn, 3);
    NVIC_EnableIRQ(UART0_IRQn);
    NRF_UART0->INTENSET = UART_INTENSET_RXDRDY_Enabled << UART_INTENSET_RXDRDY_Pos;
}
UART settings are as follows:
- 38400 baud
- 8 bits data, 1 stop bit
- No parity
- No flow control
In short, the UART code is set up to put received characteris in a FIFO buffer. When a newline is detected or the ESB packet size is reached, it schedules an ESB transaction.
The following code configures ESB.
static void uesb_config(void)
{
    uint8_t rx_addr_p0[] = UESB_PIPE0_ADDR;
    uint8_t rx_addr_p1[] = UESB_PIPE1_ADDR;
    uint8_t rx_addr_p2   = UESB_PIPE2_ADDR;

    uesb_config_t uesb_config       = UESB_DEFAULT_CONFIG;
    uesb_config.rf_channel          = 5;
    uesb_config.crc                 = UESB_CRC_16BIT;
    uesb_config.retransmit_count    = 10;
    uesb_config.retransmit_delay    = 500;
    uesb_config.dynamic_ack_enabled = 0;
    uesb_config.protocol            = UESB_PROTOCOL_ESB_DPL;
    uesb_config.bitrate             = UESB_BITRATE_2MBPS;
    uesb_config.event_handler       = uesb_event_handler;

    uesb_init(&uesb_config);

    uesb_set_address(UESB_ADDRESS_PIPE0, rx_addr_p0);
    uesb_set_address(UESB_ADDRESS_PIPE1, rx_addr_p1);
    uesb_set_address(UESB_ADDRESS_PIPE2, &rx_addr_p2);
}
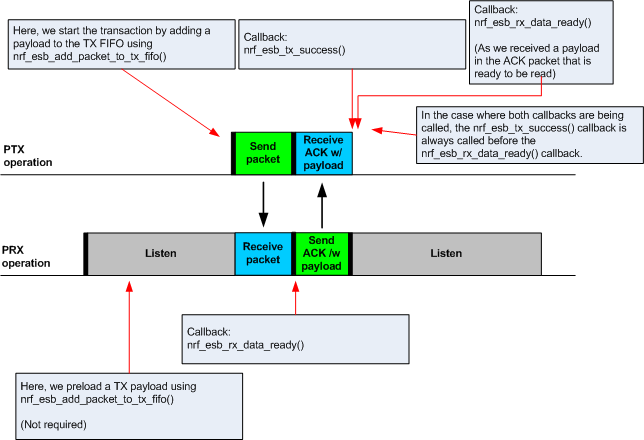
Like the SoftDevices, ESB generates events upon successful/failed packet transmissions and packet receptions. The event handler looks like this:
void uesb_event_handler()
{
    static uint32_t rf_interrupts;
    static uint32_t tx_attempts; // Retries attempted by ESB

    uesb_get_clear_interrupts(&rf_interrupts);

    if(rf_interrupts & UESB_INT_TX_SUCCESS_MSK)
    {
        uint32_t err_code;

        // Data successfully sent. Start RX again
        err_code = app_sched_event_put(0, 0, uesb_start_rx_evt_handler);
        APP_ERROR_CHECK(err_code);
    }

    if(rf_interrupts & UESB_INT_TX_FAILED_MSK)
    {
        // Data failed to be sent: TODO: try again later
        uesb_flush_tx();
    }

    if(rf_interrupts & UESB_INT_RX_DR_MSK)
    {
        uint32_t       err_code;
        uesb_payload_t payload;

        // Data has been received: schedule printout
        uesb_read_rx_payload(&payload);

        err_code = app_sched_event_put(payload.data, payload.length, uart_print_evt_handler);
        APP_ERROR_CHECK(err_code);
    }

    uesb_get_tx_attempts(&tx_attempts);
}
The following code changes ESB role from PRX to PTX and initiates the wireless data transfer:
static void uesb_send_pkt_evt_handler(void * p_event_data, uint16_t event_size)
{
    uesb_payload_t payload;

    APP_ERROR_CHECK_BOOL(event_size <= UESB_CORE_MAX_PAYLOAD_LENGTH);

    payload.pipe  = UESB_TX_PIPE;
    payload.length = event_size;
    memcpy(payload.data, p_event_data, event_size);

    // Stop RX
    uesb_stop_rx(); // Ignore possible UESB_ERROR_NOT_IN_RX_MODE return code

    uesb_write_tx_payload(&payload); // Ignore possible errors
}
To avoid race conditions and data access issues app_scheduler is used to print received ESB packets, enter PRX mode, and trigger ESB transmissions (PTX).
The follow main() function is used to set everything in motion:
int main(void)
{
    // Set 16 MHz crystal as our 16 MHz clock source (as opposed to internal RCOSC)
    NRF_CLOCK->EVENTS_HFCLKSTARTED = 0;
    NRF_CLOCK->TASKS_HFCLKSTART = 1;
    while(NRF_CLOCK->EVENTS_HFCLKSTARTED == 0)
    {
        // Wait
    }

    // Initialize the scheduler module
    APP_SCHED_INIT(APP_SCHED_EVENT_SIZE, APP_SCHED_QUEUE_SIZE);

    // Initialize fifo
    fifo_init(&s_uart_fifo);
    // Configure micro ESB
    uesb_config();
    // Configure UART
    uart_config();

    simple_uart_putstring((const uint8_t*)"\r\n Wireless UART example\n");

    // Start listening for incoming transmissions
    uesb_start_rx();

    while (true)
    {
        app_sched_execute();

        // Let the CPU sleep until the next interrupt comes along
        __WFE();
        __SEV();
        __WFE();
    }
}
The project code, including micro-ESB, is attached to this blog post. Although it's based on SDK 7.1.0, it should work fine with newer SDK's as well.


