

Introduction
This blog will aim to give you an understanding of the zip package required to perform a Device Firmware Upgrade of your device. This blog will apply to the newest tools available to do this, including the SDK, the mobile app, or the master control panel for Windows.
This blog is based on this document on creating the INIT file for DFU found on github.
Required Tools
- Master Control Panel 3.9.0.6 or newer
- Keil 5.14 or newer
ZIP-file
With a bootloader in place, it is possible to perform a Device Firmware Upgrade of either the application, softdevice, or the bootloader itself. It is also possible to upgrade a combination of these at the same time. In order to do this, a common format has been adopted regarding the package used to perform the upgrade. This is done so that the same package can be used with any method, for example using the android app, or master control panel on Windows. Since it is also possible to upgrade several things at the same time, some additional meta-data about the package is required. This meta-data is in the form of an init file that is included in the same zip file with the binaries.
Hex file
When Keil successfully compiles your project a .hex and a .axf(ELF) image is created, these are typically located in the same folder as your µVision5 project, e.g. "..\pca10028\dual_bank_ble_s110\arm5_build".
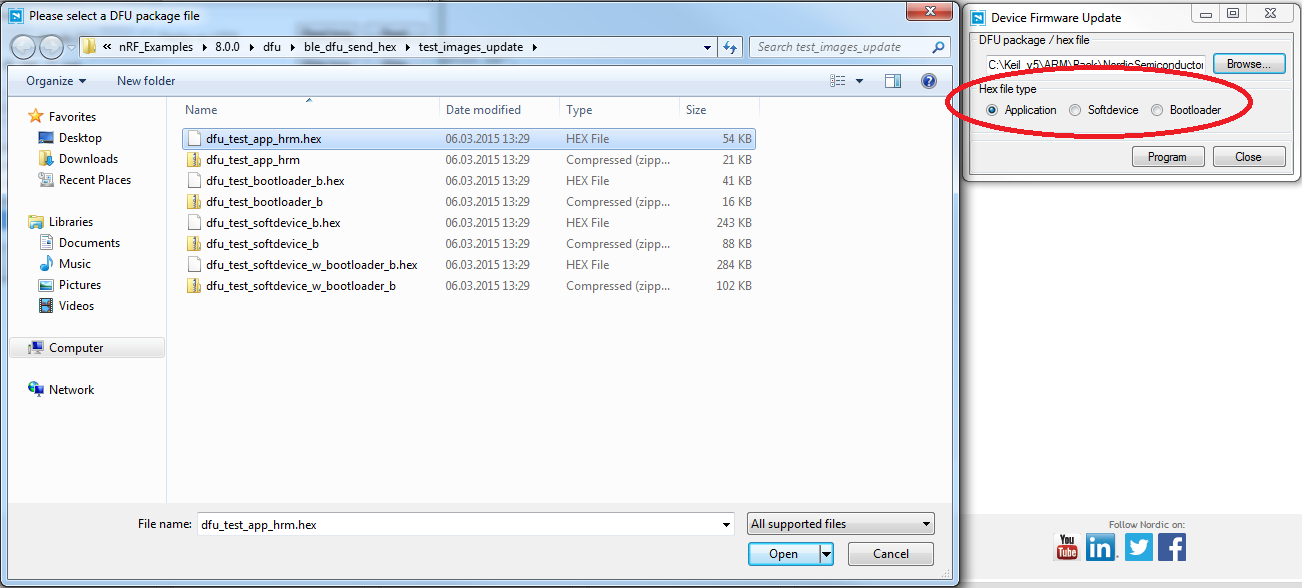
New in Master Control Panel version 3.9.0 is the option of applying DFU directly from the .hex file of our application/bootloader/softdevice to the device with an automatically created init file. However if we want to update more than one of these at the same time we still have to use the .zip structure.
Binary file
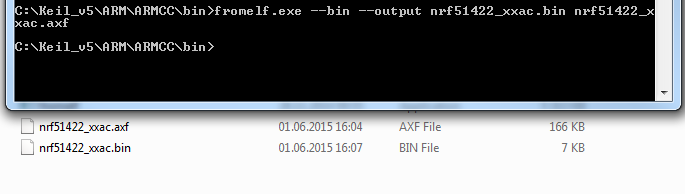
We now have hex and AXF(ELF) versions of our application, however to create our ZIP-file we can also make a binary .bin version. This is done using the command line tool fromelf.exe. Make sure that you are running your command line with administrator privileges. This tool is located in the "KeilFolder\ARM\ARMCC\bin" folder. Call fromelf.exe to convert an AXF(ELF) image to a binary file like this(without quotations):
"Keil-folder"\ARM\ARMCC\bin\fromelf.exe --bin --output "outfile.bin" "infile.axf"
Successfull output, no errors, and .bin file has been generated in our folder.
When doing this with a bootloader update, due to a UICR error the output from fromelf.exe will be a folder with two files in it, example shown below.
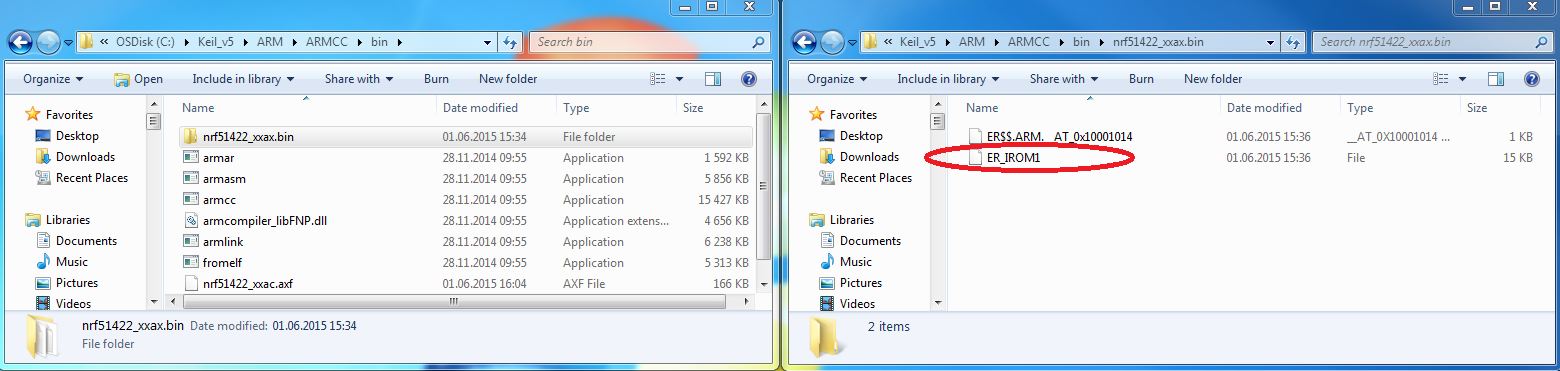
Working with our example a simple workaround is to rename the circled file to "mybinary.bin", and then use this file.
Init file
The init file is not only telling the bootloader what files are being updated, but it works as a safety mechanism to ensure that the transferred files are compatible, and have been received correctly. When performing a DFU, the init packet is transferred first, and the binary is then checked to see if it is correct. The contents of the init packet are presented below:
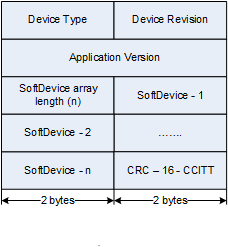
- Device type: A 2-byte value specified by the developer that identifies the device type, for example Heart Rate Belt.
- Device revision: A 2-byte value that can be used to restrict the update to be accepted only on devices with a defined revision number.
- Application version: A 4-byte value identifying the version of the application that is being transferred. This value can be used to allow only software upgrades and prevent downgrades. No example code is provided for this feature.
- Supported SoftDevices: A list of 2-byte values identifying the SoftDevices that are compatible with the application, for example, S110 v7.1 or S110 v8.0.
- Checksum: A 2-byte CRC-16-CCITT for the image to transfer.
Creating this init file can be difficult, but fortunately there is a tool that creates the entire zip package. the nrf.exe tool which comes with the master control panel can be used for this. The program is located in "C:\Program Files (x86)\Nordic Semiconductor\Master Control Panel\version\nrf" and its usage is explained here.
The input it takes is a binary or hex of the application, softdevice, or bootloader you wish to upgrade. Other parameters include the desired settings above. It will then calculate a CRC value, create an init file that matches the binary, and place the binary and the init file in a zip-file.
The init file, called manifest.json, will contain all the necessary meta-data for the bootloader. A typical file will look like this:
{
    "manifest": {
        "application": {
            "bin_file": "application.bin",
            "dat_file": "application.dat",
            "init_packet_data": {
                "application_version": 4294967295,
                "device_revision": 65535,
                "device_type": 65535,
                "firmware_crc16": 4837,
                "softdevice_req": [
                    65534
                ]
            }
        }
    }
}
Creating the ZIP-file
You can add the following firmware images in binary or hex format to the zip file:
- application image.bin: a binary or hex image of an application
- bootloader image.bin: a binary or hex image of a bootloader
- softdevice image.bin: a binary or hex image of a SoftDevice
You can also combine several images in one zip file.
In addition to the images, you must specify the information that will be added to the init packet:
- application-version version: the version of the application image, for example, 0xff
- dev-revision version: the revision of the device that should accept the image, for example, 1
- dev-type type: the type of the device that should accept the image, for example, 1
- sd-req sd_list: a comma-separated list of FWID values of SoftDevices that are valid to be used with the new image, for example, 0x4f,0x5
Here is an example call of the nrf.exe ZIP-creating tool, with input and output files placed in the same folder nrf.exe as, note that you can also use pointers to different locations. Again, make sure that you are running your command line with administrator privileges.
\Nordic Semiconductor\Master Control Panel\"version"\nrf\nrf.exe dfu genpkg example.zip --bootloader ex_bootloaderimage.hex --application-version 0xff --dev-revision 1 --dev-type 1 --sd-req 0x4f,0x5
Command line success message:

Final notes
It is highly recommended to use the DFU from hex feature from Master Control Panel v. 3.9, as it significantly reduces the workload when working with your device.


