This post is older than 2 years and might not be relevant anymore
More Info: Consider searching for newer posts

Replace S132 with S112

My application is a BLE peripheral and will only allow a single connection to a BLE central. Hardware will be nRF52832. My test application was based on a Nordic example that uses S132. It looks like I could save some flash if I use S112 instead of S132. Would this work and is this a good choice.

  • I did not get that far. I am back at step 1 where I am just burning hex images to flash. I use the DFU boot loader, S132, and DFU application. That combination will boot normally. But if I replace S132 with S112 the application does not run. It just boots into the boot loader. 

    Below is the console output when I use S132.  When I use S112 there is no output on the console at all.

    <info> app: Setting vector table to bootloader: 0x00072000
    <LF><info> app: Setting vector table to main app: 0x00026000
    <LF><info> app: Buttonless DFU Application started.
    

    Also, I understand your comments about the ZIP package and nrfutil. When I use S132 I have no problem creating ZIP package and executing the DFU. And I understand I need to change the SD version number to B0 when I use S112. However at this point I cannot event get the DFU application to boot when I use S112.

    Another data point:  I replaced S132 6.1.0 with S132 6.1.1 and everything worked including the DFU with ZIP package. I used --sd-req 0xB7 for this test.  

  • Hi.

    Sorry for the late reply, I tried to answer you yesterday, but the reply got very long, so here it is today.

    I can try to clarify more:

    If you have a bootloader and an application you wish to use for a DFU, the right settings for this DFU .zip file must be given when you create it.

    With that in background, there should not be any issues if your application runs standalone, and your bootloader also runs standalone, to use this application as the upgrade firmware. But, if the DFU Packet is generated with the wrong settings, the bootloader will have a bad time running the application. It might not know what the application start address is, or the end address. Since this is dependent on the SoftDevice. Therefore, it is essential that if you wish to do a DFU where you change SoftDevice version you include this when you generate the DFU packet.  Also, if the SoftDevice version is to be changed, a bootloader with the SoftDevice version of the new firmware is required.

    So, I will try to walk you through the process a bit more:

    To do a DFU where we change the applications SoftDevice we require 3 items in our DFU packet:

    • Bootloader with SoftDevice S112 v6.1.0
    • Application with SoftDevice S112 v6.1.0
    • SoftDevice S112 v6.1.0


    We also need a bootloader with SoftDevice S132 v6.1.0.

    So lets start.

    1. Bootloader with SoftDevice S132 v6.1.0

    I used the bootloader project found in nRF5_SDK_15.2.0_9412b96\examples\dfu\secure_bootloader\pca10040_ble

    You need to have a key which you use to verify the DFU packet.

    This can be created by doing the following, which is explained on the infocenter:

    1. Use the nrfutil command:

    nrfutil keys generate private.pem

    In a command window. This command will create a key file.

    Open the bootloader project. And create a new file called dfu_public_key.c in the Application folder, if its there already you dont have to create a new one.

    Use the nrfutil command:

    nrfutil keys display --key pk --format code private.pem

    To display the content of the key file in your command window, like this:

    You should now copy the output from the keys display command and replace it with the existing code in dfu_public_key.c, In my case this was the code I pasted and replaced the code in dfu_public_key.c:

    /* This file was automatically generated by nrfutil on 2018-11-29 (YY-MM-DD) at 14:43:06 */
    
    #include "sdk_config.h"
    #include "stdint.h"
    #include "compiler_abstraction.h"
    
    #if NRF_CRYPTO_BACKEND_OBERON_ENABLED
    /* Oberon backend is changing endianness thus public key must be kept in RAM. */
    #define _PK_CONST
    #else
    #define _PK_CONST const
    #endif
    
    
    /** @brief Public key used to verify DFU images */
    __ALIGN(4) _PK_CONST uint8_t pk[64] =
    {
        0xb4, 0xbf, 0x71, 0x80, 0x25, 0x9f, 0x6c, 0xaf, 0x88, 0xd5, 0xfd, 0x03, 0xcf, 0x64, 0xa1, 0x87, 0xef, 0x79, 0xf0, 0x4f, 0xf1, 0x63, 0x36, 0x23, 0xea, 0xd9, 0xff, 0x9f, 0xc9, 0xd9, 0x92, 0x3d,
        0x88, 0xa6, 0xd1, 0xf2, 0x7f, 0xd6, 0xbc, 0x6d, 0x83, 0x78, 0xb7, 0xc7, 0xd3, 0xb1, 0xb3, 0xbe, 0x73, 0x5c, 0x3f, 0x89, 0xd5, 0xbe, 0x39, 0x07, 0xed, 0x2f, 0x25, 0xa4, 0xc2, 0xc7, 0x65, 0x68
    };


    NOTE: Do not use the code I have pasted here, you have to use the code generated from your own key.

    You can now compile the project, and the project should compile without errors. You have no made a bootloader which requires a private key, and the bootloader is using SoftDevice S132 v6.1.0.

                2. Create the Application which uses SoftDevice S112 v6.1.0

    I used the UART example project, but you can use whatever you like

    I just compiled the project found in the folder nRF5_SDK_15.2.0_9412b96\examples\ble_peripheral\ble_app_uart\pca10040\s112

    The projects found in pca10040\s112 folders are setup for nRF52832 Boards and uses SoftDevice S112 v6.1.0.

    If you would like to use a project which does not have a pca10040\s112 folder, you have to set this up yourself by doing the following:

    Copy the pca10040\s132 folder, and open your preferred IDE and do the following modifications:

    1. Change two of the include paths from:

    ../../../../../../components/softdevice/s132/headers
    ../../../../../../components/softdevice/s132/headers/nrf52

    To:

    ../../../../../../components/softdevice/s112/headers

    ../../../../../../components/softdevice/s112/headers/nrf52

    2. Change the SoftDevice included to:

    nRF5_SDK_15.2.0_9412b96/components/softdevice/s112/hex/s112_nrf52_6.1.0_softdevice.hex

    3. Edit the preprocessor definition S132 to S112

    4. Edit the Section Placement Macros to:

    FLASH_PH_START=0x0

    FLASH_PH_SIZE=0x80000

    RAM_PH_START=0x20000000

    RAM_PH_SIZE=0x10000

    FLASH_START=0x19000

    FLASH_SIZE=0x67000

    RAM_START=0x20002500

    RAM_SIZE=0xdb00

    It should now compile without any errors

                3. Create the Bootloader which uses SoftDevice S112 v6.1.0

    Here, I used the secure_bootloader project (nRF5_SDK_15.2.0_9412b96\examples\dfu\secure_bootloader\pca10040_ble) and did the same thing as I would have done above if I had used a project which did not have a pca10040\s112 folder, That is:

    Copy the pca10040\s132 folder, and open your preferred IDE and do the following modifications:

    1. Changed two of the include paths from:

    ../../../../../../components/softdevice/s132/headers
    ../../../../../../components/softdevice/s132/headers/nrf52

    To:

    ../../../../../../components/softdevice/s112/headers

    ../../../../../../components/softdevice/s112/headers/nrf52

    2. Changed the SoftDevice included to:

    nRF5_SDK_15.2.0_9412b96/components/softdevice/s112/hex/s112_nrf52_6.1.0_softdevice.hex

    3. Edit the preprocessor definition S132 to S112

    4. Edit the Section Placement Macros to:

    FLASH_PH_START=0x0

    FLASH_PH_SIZE=0x80000

    RAM_PH_START=0x20000000

    RAM_PH_SIZE=0x10000

    FLASH_START=0x19000

    FLASH_SIZE=0x67000

    RAM_START=0x20002500

    RAM_SIZE=0xdb00

    It should now compile without any errors

    1. Create the DFU packet

    Make sure you have the latest nrfutil, by running the command pip install nrfutil in your preferred command window.

    I use the information about generating a DFU packet found on the infocenter to write the following command:

    nrfutil pkg generate --hw-version 52 --sd-req 0xAF,0xB0 --application-version 4 --application <application_hex_file_name>.hex --softdevice s112_nrf52_6.1.0_softdevice.hex --bootloader <bootloader_with_s112v6.1.0_hex_file_name>.hex  --bootloader-version 2 --sd-id 0xB0 --key-file private.pem <dfu_packet_name>.zip


    This command gave me this output:

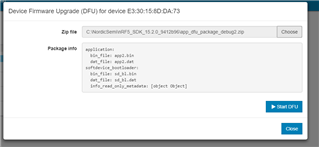
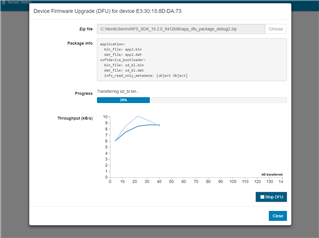
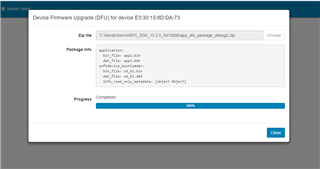
    I opened the nRF Connect Bluetooth Low Energy Application and connected to the bootloader DfuTarg, and clicked on the DFU button, selected the file and started:

    Start of transfer:

    During transfer:

    Completed:

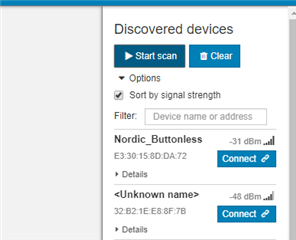
    And after I've completed the transfer, the name of the devices has changed to Nordic_Buttonless, as expected:

    I hope this will make things clearer, and sorry for the late reply.

    Best regards.

    Andreas

  • Andreas, Thanks for your detailed response!

    From your response I can see the missing step for me was to change FLASH_START and FLASH_SIZE in my application build settings. Once I did that I was able to create a single HEX image containing the bootloader, S112, and application and then boot the system and get the application to run normally. After that it was easy to get DFU working again.

    I appologize if I did not communicate the problem clearly. There was never a problem with the DFU upgrade itself, the problem was just getting the DFU application to boot up.

    Based on your response I went back into the SoftDevice Specification and found the section about memory usage. Here it gives some clues about how you need to build your application to be compatible with the SoftDevice flash locations. This is the info I was missing.

    I did run into one problem with your instructions regarding the bootloader. In my case I had to skip the steps where you change the FLASH_XXX macros in the bootloader project. If I made this change I was not able to build the single HEX image containing all three images. When I ran hexmerge it reported an error about overlapping sections. So instead I just used the original values for the bootloader project.

    So to summarize for the benefit of anyone else trying this, here are the steps to replace S132 with S112 and get your application running again:

    1) Modify your application
    1.1) Go to your application folder and copy the entire folder pca10040\s132 to pca10040\s112
    1.2) Modify your project file to use S112 instead of S132
    1.2.1) In my case I use SES so I opened my project file (pca10040\s112\ses\application.emProject) in a text editor
    1.2.2) Do a global replace: 132 --> 112
    1.2.3) Change your flash section placement macros to align with the S112 requirements: FLASH_START=0x19000;FLASH_SIZE=0x67000
    1.2.4) Build

    2) Modify your bootloader. In my case I am using examples\dfu\secure_bootloader
    2.1) Create a new copy of your bootloader project file. In my case I use SES so I copied secure_bootloader_ble_s132_pca10040.emProject to secure_bootloader_ble_s112_pca10040.emProject
    1.2) Modify your bootloader project file to use S112 instead of S132
    1.2.1) In my case I use SES so I opened my project file in a text editor
    1.2.2) Do a global replace: 132 --> 112
    1.2.3) Delete your Output folder and do a full build

    3) Create a single hex image. This example works on Windows:

    set blHex=D:\Nordic\nRF5_SDK_15.2.0\examples\dfu\secure_bootloader\pca10040_ble\ses\Output\Release\Exe\secure_bootloader_ble_s112_pca10040.hex
    set sdHex=D:\Nordic\nRF5_SDK_15.2.0\components\softdevice\s112\hex\s112_nrf52_6.1.0_softdevice.hex
    set appHex=D:\Nordic\nRF5_SDK_15.2.0\examples\ble_peripheral\YourApplication\pca10040\s112\ses\Output\Debug\Exe\YourApplication.hex

    nrfutil settings generate --family NRF52 --application %appHex% --application-version 1 --bootloader-version 1 --bl-settings-version 1 bootloader_settings.hex

    mergehex -m %blHex% bootloader_settings.hex -o bootloaderAndSettings.hex
    mergehex -m bootloaderAndSettings.hex %sdHex% %appHex% -o packageFull.hex

    4) Burn to flash. I just copy the HEX file to the Segger J-Link drive like so:

    copy packageFull.hex f:

    5) Your application should be booting normally now.

Related