This post is older than 2 years and might not be relevant anymore
More Info: Consider searching for newer posts

Flashing nRF5832 using only ST-LINK V2 and OpenOCD

Hello everyone,

I am refering to https://devzone.nordicsemi.com/f/nordic-q-a/29029/programming-nrf52-with-openocd/126175#126175

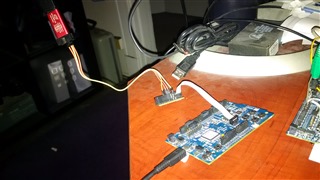
Is there any complete tutorial out there which solves the issue regarding the memory protection bit using only open-ocd and an ST-LINK V2?

The problem with all the posts here on the forum is, that I am not able to reproduce them since they are either really old or don't include the exact versions of the used libraries...

Thanks!

  • The ST-LINK V2 is ... designed specifically for programming/debugging ARM chips

    To be precise, it is designed by ST specifically for programming their own chips (not just their ARM ones) - it was never designed nor intended nor supported for programming 3rd-party chips; eg, Nordic.

    The clue is in the name: ST-Link !

    It is just by luck - because of the common ARM core & SWD interface - that it happens to (mostly) work with other manufacturers' chips

    This should be part of a tutorial for beginners

    Not really.

    If you want support, then you need to use the supported tools.

    If you choose to use unsupported tools, then you are on your own!

    For a beginner, I would strongly recommend that you stick to supported tools - until you have gained sufficient experience to be able to work these things out.

  • I finally had the chance to try my ST-LINK V2 with my nrf52 boards, and I want to make a couple of clarifications.

    First, the correct command to use is actually this:

    openocd -f interface/stlink.cfg -f target/nrf52.cfg -c "gdb_flash_program enable" -c "gdb_breakpoint_override hard"

    Note the "target/nrf52.cfg" instead of "board/nordic_nrf52_dk.cfg." The latter is specifically for the J-Link debugger on the DK board.

    You need to connect the debugger to the "Debug In" port on the nRF52 board. The SWDIO, SWDCLK and GND pins must be connected correctly. Below is a photo of the adapter connected to my nRF52832 board:

    If all goes well, you should see this:

    Open On-Chip Debugger 0.10.0+dev-00581-g1b864d6e-dirty (2018-11-25-00:21)
    Licensed under GNU GPL v2
    For bug reports, read
    openocd.org/.../bugs.html
    Info : auto-selecting first available session transport "hla_swd". To override use 'transport select <transport>'.
    Info : The selected transport took over low-level target control. The results might differ compared to plain JTAG/SWD
    adapter speed: 1000 kHz
    force hard breakpoints
    Info : Listening on port 6666 for tcl connections
    Info : Listening on port 4444 for telnet connections
    Info : Unable to match requested speed 1000 kHz, using 950 kHz
    Info : Unable to match requested speed 1000 kHz, using 950 kHz
    Info : clock speed 950 kHz
    Info : STLINK v2 JTAG v21 API v2 SWIM v4 VID 0x0483 PID 0x3748
    Info : using stlink api v2
    Info : Target voltage: 3.234166
    Info : nrf52.cpu: hardware has 6 breakpoints, 4 watchpoints
    Info : Listening on port 3333 for gdb connections

    I tested both my nRF52832 DK and nRF52840 DK boards and was able to debug and flash both of them with GDB.

    Second, regarding mass erase, I tried the "nrf5 mass_erase" command with the ST-LINK debugger and it actually worked, however I took a closer look at the nRF52832 documentation and the OpenOCD source code and I think I understand why.

    The Debug and Trace section of the manual states that there are actually two debug ports: the DAP and CTRL-AP. The former is what's used for standard ARM SWD, and this is what OpenOCD uses to talk to the chip. The CTRL-AP is separate from that and implements a few special commands only.

    There are two ways to do a mass erase:

    1) Use the ERASEALL register in the NVMC controller block.

    2) Issue an ERASEALL command via the CTRL-AP port.

    The ST-LINK V2 can do 1), but it can't do 2).

    OpenOCD implements flash support for the nRF52 by accessing the NVMC registers via SWD. Basically, it performs the necessary NVMC register accesses to initiate a flash sector erase and write and then just uploads the data into place. To issue a mass erase command, OpenOCD also just uses the ERASEALL register in the NVMC. Currently it does not have support for sending an ERASEALL via the CTRL-AP port.

    But if the APPROTECT bit is set, this won't work anymore: access to the DAP/SWD port would be blocked, and you'd no longer be able to debug or flash the device. (You'd only want to do this for deployed devices so that people can't reverse-engineer your code.) The only way to recover from this is to issue an ERASEALL via the CTRL-AP port instead, which blanks out everything except for the factory info area. In theory it should be possible for someone to patch OpenOCD to implement support for this with low-level debuggers, but it would never be possible to do it with the ST-LINK V2.

    Regarding what's suitable for beginners: even if a beginner might have an easier time with the supported tools, that doesn't mean they're not entitled to a good explanation of how things work when they ask. Just telling someone "don't do that" is not as useful as explaining why it's bad to do that.

    Another thing to bear in mind is that it's often the case that each ARM SoC manufacturer has their own preferred debug tools. That's nice and all, if you assume that a given customer is only ever going to produce one ARM product using parts from just one vendor. Often that's not the case. It can be frustrating if you buy one set of tools for vendor A's parts, and are then faced with potentially having to buy another set of tools for vendor B's parts, especially if vendor A and B both use Cortex-M cores which both speak SWD. In effect you're being told to buy a second tool that's 99% the same as the first one. So if there's a chance you can use one set of tools for both vendors' parts, why not try?

  • Thank you again very much. 

    I succeeded in removing the protection bit and I can now program my nRF52832!

    Your posts helped my immensely to understand the problem.

    Now for the solution I just used the procedure given here: https://stackoverflow.com/a/54372481/3038183

    I installed OpenOCD in my Raspberry Pi 1b+ and connected my nRF52832 to the correct pins. Just used the OpenOCD master branch!

    Then I executed 

    sudo openocd -f tcl/interface/raspberrypi-native.cfg -c "transport select swd" -f tcl/target/nrf52.cfg

    and 

    then I just did what was given by the stackoverflow answer.


    I will probably write a little tutorial after I played a little more with the nRF for newcomers like me Slight smile

Related