This post is older than 2 years and might not be relevant anymore
More Info: Consider searching for newer posts

How to use DFU OTA with custom FW

Hello, we are using 3 nRF52840 DKs, NSDK 15.2, Mesh SDK 3.1.0, SoftDevice 6.1.0 and Segger Embbeded Studio as my IDE.

I have followed the documentation here to program some boards over the air and had SOME success.

I understood that the process has 5 major steps

1 - Generate private and public keys

2 - Generate DFU archive using an application hex file and the private key

3 - Generate Device Page, adding the public key to the <bootloader_config_default.json> file

4 - Flash SoftDevice, Serial Bootloader, first application (examples/dfu) and Device Page in this order in every device

5 - Transfer the DFU archive over serial to one of the boards that then transmits the DFU archive in chunks to the boards in the vicinity.

I could follow the example, and we think the DFU chunks went through since we got the percentages on screen of the transfer and "Device programmed" in the end. The led's didn't start blinking though, and we would like to generate a DFU archive using the blinky example to check that.

We tried using nrfutil to generate a DFU archive like previously, but using the blinky hex file that Segger outputs, to the nRF5_SDK_15.2.0_9412b96/examples/peripheral/blinky/pca10056/blank/ses/Output/Release/Exe folder, but got an error that said ValueError: tobinarray: wrong value for size. We inspected the memory map of the DKs after programming the example DFU application using nRFConnect and in fact noticed something odd...

The Application part of the program on the DKs is huge compared to the blinky one. This leads us to think that we just cannot pick any random hex to transmit via DFUOTA.

What we would like to know is how to adapt an application to be able to be transfered using DFUOTA. We could not find anything about it in the documentation.

Also, what is included in a hex file that is compiled using segger? We normally use segger to compile and program the boards, so we didn't have to bother with that until now. Is the soft device included by default? Is it programmed separately? What about the bootloader?

  • Did not work. I am now using Mesh SDK v3.2 and Nordic SDK 15.3.

    In fact, now the LEDs start blinking but that might be just because I stopped using signature verification, after removing the public_key attribute from nrf5SDKforMeshv320src/tools/dfu/bootloader_config_default.json and removing the --key-file private_key.txt option from nrfutil dfu genpkg when generating the firmware archive.

    The behaviour of the boards is not predictable either since after reprogramming everything from step 4, I was using /dev/ttyACM0 to test the DFUOTA in step 5 and it never worked. Tried using /dev/ttyACM1 and it worked... ONCE!

    That time all 3 boards started blinking the 4 LEDs. I could not repeat the experiment though, despite having step 4 scripted to run over the 3 boards automatically, including generating the device page from the bootloader_config_default.json using the device_page_generator.py.

    Is it possible I have a problem with the serial driver or some library misconfigured? I can always program step 4 but sometimes step 5 fails (most of the times) and sometimes it doesn't...

  • Also, removing the signature verification does nothing regarding the start of DFU transfer. Quote from the documentation:

    "As the entire firmware data is required for the hash, the signature is not checked until after the entire transfer is complete."

  • I think I figured it out.

    Firstly, I had some problems in my script. I am still not 100% sure it was from that, but I can now use any one of the 3 boards to initiate the DFU transfer reliably, I tried each once and every time it worked.

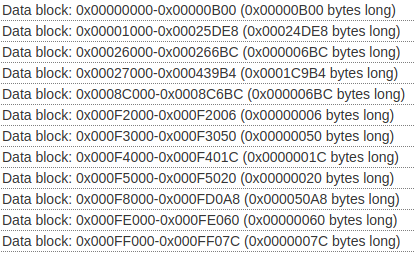
    Secondly, after moving to Mesh SDK v3.2 and Nordic SDK 15.3 AND discarding signature verification (can't tell what caused the following result), nRFConnect now shows me this

    The third block from the bottom is the example blinky application in meshsdk/bin/blinky and the forth block in black/dark grey is the rest of the dfu example application that the documentation advises to program into the board the first time.

    What I THINK is happening is that after programming the blinky application once, the boards cannot be reprogrammed anymore over the air since the application that took care of that does not exist anymore. That forth block from the bottom is just junk. Am I right? Is the application responsible for handling the DFU packets? Or is the mbr/bootloader/softdevice the only parts taking care of that?

    Answering this would answer my original question, I would need to include in my applications the code that is part of the DFU example.

  • Hi Rmarques, 

    You are correct. After you has updated your application to the blinky example it won't be able to be updated (without manually switching it to bootloader mode). 

    You need to integrate DFU feature into your application to do mesh DFU (without manually put it to bootloader mode). To do that you would need to follow this guide

    The dfu project is a good source for reference. 

  • You are correct. After you has updated your application to the blinky example it won't be able to be updated (without manually switching it to bootloader mode). 

    Thank you! After reading the documentation (for 3.1.0 at least), I was unsure if the bootloader handled background updating of the application or if that was only possible if a DFU compatible application took care of that. If I understood correctly, if the application does not have the DFU feature it cannot be updated in background, only in bootloader mode, is that right?

    You need to integrate DFU feature into your application to do mesh DFU (without manually put it to bootloader mode). To do that you would need to follow this guide

    Ah! That guide wasn't present in 3.1.0! :) That is exactly what I was looking for.

Related