This post is older than 2 years and might not be relevant anymore
More Info: Consider searching for newer posts

Verification for schematic for custom Board

Hi,

We are design custom Board using nRF52840 SOC.

  1. We are operating it in Normal mode, using internal DCDC converter
  2. We have used configuration 5 from reference design
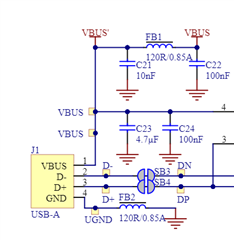
  3. From reference design we have removed NFC pins connection and USB connection because we do not need it in our design
  4. We will be programing our custom board using nRF52840 DK
  5. We have attach led using load switch at P0.15
  6. We have attach buzzer using load switch at P0.16
  7. We have attach button at P0.24
  8. We have taken antenna schematic from nRF52840DK hardware files and remove external connector. Have we done it correctly?
  9. Have we connected reset button correctly?

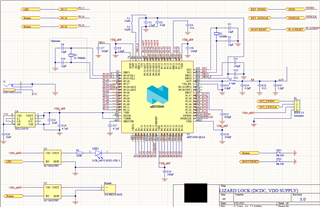
I am attaching the Schematic design for our board can you verify it if it is correct or we are missing something, If it is unclear in picture I can also attach schematic file

Thanks in advance

Regards,

Moghees Bin Zahid

  • Hi Moghees, 

    I'll take a look at it now. 

    Apologies for the late reply.

    Best regards,

    Martin S.

  • Hi Moghees,

    I looked at Final.zip and here are my comments for the layout:

    1. Remove C22 and add via fencing/shielding on both sides of the RF transmission line as so:

    2. Remove all of the unused traces connected to the GPIO's of the nRF52840 that don't connect to anything (they will turn into antennas and pick up noise)

    3. I see you use two GPIO's on inner layer 2, but you have lots of available GPIO's on the top layer, so I'd rather use those. That way you can avoid using any of the GPIO's on the inner layer of pads on the nRF52840 and don't need the via in pad which you can also remove (marked in green). Via in pad adds cost when manufacturing the PCB, so if you don't need it I'd remove it.

    4. If you do what I mention in comment 3., you can also remove inner layer 1 and 2 of the PCB, as they are not needed for routing or ground or power. This also cuts cost when manufacturing the PCB.

    5. Add a matrix of vias in the center pad of the nRF52840 (see reference layout).

    6. I highly recommend adding relief connect around the ground pads of the components, at least the ones that are attached to the antenna and RF trace as it makes it a bit easier to solder components on and off by hand (which will have to be done when tuning the radio and antenna matching components).

    7. Add ground vias directly next to all ground pads and everywhere else where there is empty space

    8. I see many traces on the board that meander when they don't need to, for example the trace going to C24, just rout them straight with 45 degree angles and don't make them longer than you need to. Use the available GPIO's on the top layer as much as possible. (I see now that the trace going to C24 is VDD_nRF, but my point still stands)

    9. Place decoupling capacitors closer to their respective IC's (voltage regulator and load switches), and have the trace go through the pad of the capacitor before it connects to the IC. Look at the datasheets for the components and see if they have a recommended layout.

    10. Clean up the silk screen component designators. Make them the same size and place them so they don't overlap any other elements, and are placed next to the component they belong to

    Best regards,

    Martin S.

  • I have taken care of all the points you mentioned above. I have moved the connection of P0.18/RESET pin to top layer. Kindly review it 
    1817.LL_v1.0_updated.zip


    Regards,
    Moghees Bin Zahid 

  • I have one other question I have replaced DC connector with USB type C connector should I also place Ferrite Bead like there is in nRF52840 USB dongle


  • Thanks Moghees,

    I'll check it out and get back to you tomorrow.

    Best regards,

    Martin S.

Related