Does your build fail today, even though it worked fine yesterday? Are you able to build your project on another computer, but not the one you need to use now?
Here are eight things you can try to fix these type of problems.
The three most popular ways to build projects in nRF Connect are nRF Connect for VS Code, SEGGER Embedded Studio Nordic Edition and using a Command Line Interface (CLI).
The fixes suggested below should work regardless of these alternatives you use to build your project.
In the following steps, I assume that you use the nRF Connect SDK, installed using the Toolchain Manager in nRF Connect for Desktop. However, the tips could be relevant for those who installed using a manual installation as well.
If you are new to the nRF Connect SDK, the nRF Connect SDK Tutorial series is a good place to get started.
1. Delete the build folder manually
To get a completely clean build, manually delete the build folder before building again.
2. Test a sample program
To check if it is a problem with the nRF Connect SDK install or your own project, try to build a sample from nRF Connect SDK. Start with the simplest sample: zephyr/samples/hello_world. If this works fine, move on to samples that are more similar to your own project. Have a look at both nrf samples and the zephyr samples. If the samples build without errors, the errors are likely in your own project.
Also build the samples for different boards. (for example nrf52840dk_nrf52840, nrf9160dk_nrf9160, nrf9160dk_nrf9160_ns, nrf5340_nrf5340dk and nrf5340dk_nrf5340_ns)
When you build the samples, remember to specify supported board names. A list of supported boards for the sample can be seen under the Requirements section (For example see the bluetooth/peripheral_uart Hardware platforms).
For the nRF53 and nRF91 series, remember to check if you need to specify "ns" in the board name. "ns" stands for non-secure.
3. Windows Path Length
Windows is not able to handle path lengths longer than 256 caharacters. nRF Connect SDK will generate build folders with many sub-folders when building. If the path to the nRF Connect SDK install directory is too long, this could cause your build to fail. Change the install directory destination to fix this. You can change this in the Toolchain Manager Settings menu. For example, change from "C:/Users/longusername/Desktop/nrf-connect-sdk" to "C:/ncs/".
4. Try using the Command Line Interface
If your are using Visual Studio Code or Segger Embedded Studio to develop, try to build the program using the Command Line Interface(CLI) to build a single time. The results might be different, or you might get different information. See the nRF Connect SDK Tutorial -Part 1 on how to do this.
This one goes both ways: If you are already using the CLI to build, try using one of the IDEs to build a single time.
5. Update the toolchain and SDK
In the Toolchain Manager, click the Arrow down beside "Open IDE", and select "Update SDK", then repeat for "Update Toolchain", before building again.
If you are using the CLI, navigate to the nrf folder, and use git checkout <tag number> and west update to update the SDK.
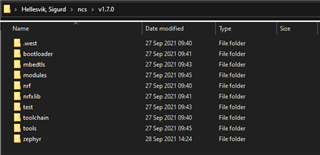
When you are done with the update or installation, your folder structure should look like this:
6. Environment variables
Check if your environment variables are set correctly. If using Windows, select Open bash in the Toolchain Manager, then echo the following variables. In Linux or Mac, select Open terminal instead.
echo $ZEPHYR_BASE
echo $ZEPHYR_TOOLCHAIN_VARIANT
echo $GNUARMEMB_TOOLCHAIN_PATH
ZEPHYR_BASE should return your path to the zephyr folder, for example "C:/ncs/v1.6.1/zephyr". ZEPHYR_TOOLCHAIN_VARIANT should return "gnuarmemb". GNUARMEMB_TOOLCHAIN_PATH should return "/opt" for the Toolchain manager using Windows.
If you installed nRF Connect SDK using the Installing manually method, these variables need to be set as stated in this method.
8. "Have you tried turning it off and on again"
If all else fails, a complete reinstall could be what you need. Copy the projects you want to keep to a safe folder, located outside the nRF Connect install folders, for example to Desktop or Downloads. Remove the toolchains using Toolchain Manager. Uninstall nRF Connect for Desktop. Download the newest version of nRF Connect for Desktop. Install Toolchain Manager and the toolchain you want to use.
In some cases, running antivirus or a VPN have interfered with the toolchain install. If you feel comfortable doing so, consider temporarily deactivating these during the reinstall.
Try step 2. Test a sample program again after the reinstall.
9. Ask for help
There is a good chance that you are not the first to experience this issue.
Use the search function here on DevZone to search for a case similar to the problem you are having.
If none of the previous steps fixed your issue, feel free to create a ticket with our Support Team.
To get you help faster, make sure the your ticket contains all relevant information about your case.
This is typically the parts of your project, such as board name, IDE, toolchain version and a problem description.
If the code crash when using a sample, let us know what sample you use. If not, add the code that causes the crash, either by using the "add code" function in DevZone, or by uploading a zip file with your project to your ticket.
If you have followed these eight steps, remember to add relevant information you learned here to the ticket as well.

