Background
There is a need to enable Nordic hardware with the Direct Test Mode (DTM) firmware. This is so the physical layer and RF characteristics may be ascertained as set in the Bluetooth Sig Specification. The DTM sample, available in nRF Connect SDK, is used to put the nRF52840 into various operational modes in order to exercise the device for Bluetooth Low Energy testing. Although not as robust as the Radio test sample, it can nevertheless be used to test a DUT towards FCC, ETSI, and other regulatory agencies. This may also be used to bring up prototypes to ensure they are operational. The purpose of this post is to show how the DTM sample can be built and programmed on the nRF52840 DK (development kit). The procedures shown are directed at the nRF52840 but are also applicable to any of the other nRF52 devices that the DTM sample supports. A brief study on how to determine if the device is programmed and operational is included.
The sample uses Direct Test Mode (DTM) to test the operation of the following features of the radio:
- Transmission power and receiver sensitivity
- Frequency offset and drift
- Modulation characteristics
- Packet error rate
- Intermodulation performance
Hardware used
nRF52840 DK
A micro USB cable
Windows PC
Optional: nRF52 DK or nRF52840 dongle. Used for testing
Software / Utilities
nRF Connect for Desktop, newest version
nRF Connect SDK
The most current version as well as older revisions may be installed using the Toolchain Manager.
Note that if a different version is used then work must be done in the subsequent subdirectories.
nRF Command Line tools
Segger Embedded Studio – Free Nordic Edition - for nRF Connect SDK
Preparation procedure
Using the micro USB cable, connect the nRF52840 DK to an available USB port on your PC (the use of a USB hub is not recommended).
Start nRF Connect for Desktop. Check for any and all updates, and install as needed.
Launch the Toolchain Manager. Be sure to use the most recent version.
Find nRF Connect SDK v1.9.1 and click on Install in the directory of your choice. It is suggested to install this into an nRF Connect SDK subdirectory off the root directory.
Note that at the time this document was written, v1.9.1 was the most current SDK version. Always use the most current version of the nRF Connect SDK.
Programming the development board
Use the nRF Connect for Desktop to move to a “sand box” first. This is where the programming of the nRF52840 will take place.
In the Toolchain Manager, in the nRF Connect SDK revision you want to use, click on the down arrow to the right and select “Open Command prompt”.
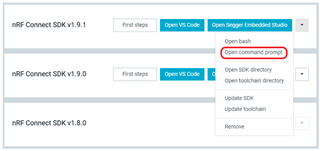
Note that running a command prompt (CMD) from the start menu will not work.
Compiling and flashing the firmware
Navigate to \nrf\samples\bluetooth\direct_test_mode.
Type “west build -b nrf52840dk_nrf52840 -p”
This will build (compile) the project.
At the end of a successful build the utility will show the following:

To program the device, type “west flash”
After a successful programming operation, the following will be shown.
. 
If you have more than one board running it will show a list of Segger serial numbers. They are located on the white label on the DevKit. Chose the one you wish to use for programming.
To reprogram or program additional boards, the only action needed is to go to the proper subdirectory for the Application processor and then type “west flash”.
Device recovery option
If, for some reason, there is difficulty with programming, the device can be recovered using the "nrfjprog -–recover" command.
This requires nrfjprog to be installed on the computer, and is included when the Command Line Tools are installed.
Type nrfjprog –recover and hit enter (double hyphen before recover).
The following should be observed:

If an error is reported, it may be that the path is not set to the location where nrfjprog is located.
Configure the path and run again.
Return to the earlier steps and reflash the application as described in the steps above.
Using the DTM sample
The instructions for running the DTM sample can be found in the documentation.
Note that to do full DTM testing for Bluetooth certification, a dedicated tester such as a Litepoint, Anritsu, Rohde & Schwarz would be used.
Quick test
The operation of the programmed device may be seen by using the Direct Test Mode utility found in nRF Connect for Desktop.
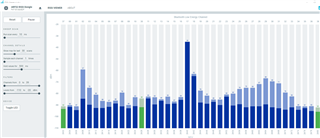
Observation of the nRF52840 transmitting in DTM mode may be accomplished by using an nRF52-based device as an RF sniffer and the RSSI Viewer application in the nRF Connect for Desktop. Connect the device, and in RSSI Viewer select the device. If asked, allow the application to program the device. The RSSI Viewer will show all the 2.4Ghz devices in the nearby proximity regardless of the protocol being used.
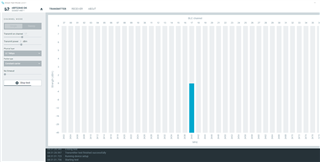
Program the DTM sample on the nRF52840 DK using the method outlined above. Launch the Direct Test Mode application from nRF Connect for Desktop. Click on Select device and choose the nRF52840 DK. Do not accept the invitation to program the device as it will overwrite the firmware previously installed.
Click on the transmitter button. Now click on packet type and then on constant carrier. pick the channel you wish to transmit on. Click on start test. A blue bar will appear on the Bluetooth LE channel map indicating that it is transmitting. Go back to the RSSI Viewer window. The chart should now show a strong signal at the transmitted frequency. Changing the distance between the development kit and dongle should result in the signal level increasing or decreasing.