
Background:
There is a need to be able to put a Nordic Semiconductors S0C /transceivers into modes where the physical layer and RF characteristics may be ascertained. The radio test example is used to put the nRF5340 into various modes in order to exercise the device for FCC, ETSI, and other regulatory agencies. This may also be used to bring up prototypes to ensure they are operational. The purpose of this document is to show how this valuable utility is built and programmed into the nRF5340-DK (development kit). An example of how one can see the utility operation is also provided
Hardware used:
nRF5340-DK
USB to micro USB cable
Windows PC
Software / Utilities:
nRF Connect for Desktop
https://www.nordicsemi.com/Software-and-tools/Development-Tools/nRF-Connect-for-desktop
Most current NCS revision installed by the Toolchain Manager. Note that if a different version is used then work must be done in the subsequent subdirectories.
nRF Command Line tools
https://www.nordicsemi.com/Software-and-tools/Development-Tools/nRF-Command-Line-Tools
Segger Embedded Studio – Free Nordic Edition -for NCS
https://developer.nordicsemi.com/nRF_Connect_SDK/doc/latest/nrf/gs_installing.html#install-the-ses-nordic-edition
Preparation procedure:
- Connect Hardware listed above.
- Download and install the nRF Connect for Desktop utility program from the Nordic semiconductor website.
- Start nRFconnect for desktop
- Check for any and all updates. Install as needed
- Start nRFconnect for desktop and move to Toolchain Manager
- Open the latest Toolchain Manager

- Find v1.5.1 and click on install in the directory of your choice. I suggest installing it into an NCS subdirectory off the root directory.
Programming the development board:
- Use the NRFConnect for Desktop to move to a “sand box” first. This is where you will be for programming and recovery of the two CPU cores.
(Note that running just a command prompt from the start menu will not work)
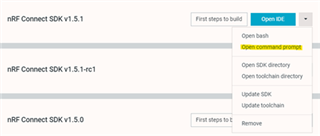
- Click on open in the Toolchain manager

- Click on Open IDE which and then on Open Command Prompt.
Programming the application processor with the empty application.
- This is needed in order to access the GPIOs and other items the application processor controls and the Radio_Test firmware needs.
- Navigate to the \nrf\samples\nrf5340\empty_app_core subdirectory
- Type “west build -b nrf5340dk_nrf5340_cpuapp -p”
- Type “west flash”
Programming the Radio_Test example into the network core.
- Go to \nrf\samples\peripheral\Radio_Test
- Type “west build -b nrf5340dk_nrf5340_cpunet -p”
- Type “west flash”
Recover option.
- If for some reason, there is any difficulty with programming. The device can be “recovered”
- Navigate to the \nrf\samples\nrf5340\empty_app_core subdirectory
-
Type “west flash –recover”
-
Go back to the earlier steps and flash the application core and network core as described above.
Radio_Test Example
- The instructions for running the Radio_Test example may be found here:
- https://developer.nordicsemi.com/nRF_Connect_SDK/doc/1.5.1/nrf/samples/peripheral/radio_test/README.html
- You may also find information on this in the readme.rst file in the radio_test Subdirectory.
- \nrf\samples\peripheral\radio_test
A terminal emulation program like Terra Term, Putty, Real Term, etc. is needed to run the Radio_Test
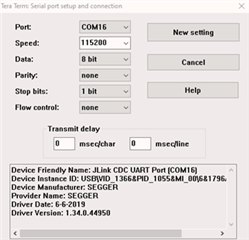
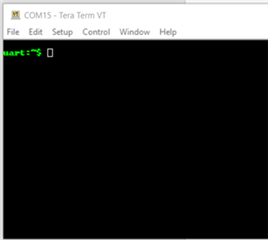
Once the terminal program is configured and the enter key is pushed the following should be seen in the terminal window:
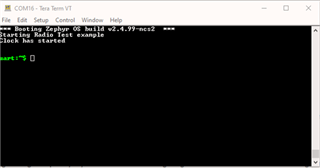
If using a nRF5340-DK, pushing the reset button gives this screen:
If at any time help is required a help menu is available. Type help in the terminal window and a list of commands will be giving.
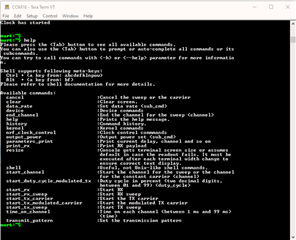
Typing just the command without an argument will show the options for that command. For example:
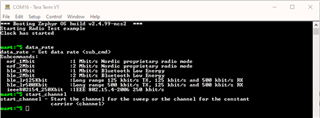
For more info on the command and argument lists visit this link:
https://developer.nordicsemi.com/nRF_Connect_SDK/doc/1.5.1/nrf/samples/peripheral/radio_test/README.html
If a signal analyzer is not available a nRF52 based development kit or a nrf52840 dongle can be used along with the RSSI utility in the nRF Connect for Desktop to monitor the RF from the radio test.
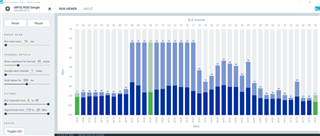
Figure showing the radio configured to sweep between 2420MHz and 2440MHz.
Note that the signal when modulated is like a BLE packet but is not sending out an advertising packet so in this case a central cannot connect.