


Earlier this year, I came across a fun project made by one of my colleagues, Torbjørn Øvrebekk, at Tech Support’s annual Christmas workshop last year. It’s a simple application that plays pre-programmed Christmas songs out of a small buzzer using the nRF52 or nRF53’s PWM capability.
With Christmas and vacation coming up, I thought it would be fun to add a control feature to the project over Bluetooth LE to have a musical ornament to hang on the Christmas tree, as well as add a couple more songs to the playlist. If that sounds fun, how about following along and adding your own upgrades as well?
Table of Contents
Prerequisites
-
nRF Connect SDK v2.4.0~v2.4.2
-
Base project code: too1/ncs-melody
The Thingy:53 is the perfect hardware for this project, with our two critical components, an nRF5340 and a buzzer, already integrated.
The project’s PWM implementation is based entirely on the nrfx driver. The most recent release of nRF Connect SDK, v2.5.0, sees some major changes to the nrfx driver APIs. To avoid the migration effort, I opted for v2.4.2 instead, where the nrfx APIs are still compatible with the project’s current implementation.
I will also build with the thingy53_nrf5340_cpuapp target board instead of thing53_nrf5340_cpuapp_ns. The added security of TF-M is not critical for our project here, and the simpler target should help us get a better compiling time.
Getting started
Let's take a look at the project modules.
Music
Consists of music.c and music.h, this module defines a structure to hard-code some songs into our application and the functions to decode the relatively human-readable music syntax for further processing.
Sound-Gen
Consists of sound_gen.c and sound_gen.h, this module processes the notes from the Music module into a buffer of PWM duty cycle value that will be double buffered to the PWM peripheral.
Instruments and Songs
Consists of instruments.h, instruments.c, songs.h, and song_*.c. These modules define the songs and the instruments that each track of a song will be played with.
Testing the project
Now that we have a general idea of how it works let’s see it in action on the Thingy:53.
First, we need to change the PWM output to the actual pins connected to the buzzer on the Thingy:53. Referring to either the Thingy:53's schematic or its DTS files in nRF Connect SDK, we can find that pin P1.15 controls the buzzer.
Update main.c as below to reconfigure the PWM output to that pin:
#include <hal/nrf_gpiote.h>
#include <hal/nrf_gpio.h>
...
#define PWM_PIN NRF_GPIO_PIN_MAP(1, 15)
...
    {
        .output_pins =
        {
            0,						// channel 0
            PWM_PIN,				// channel 0
            NRFX_PWM_PIN_NOT_USED,	// channel 1
            NRFX_PWM_PIN_NOT_USED,	// channel 2
            NRFX_PWM_PIN_NOT_USED	// channel 3
        },
        .irq_priority = 5,
        .base_clock   = NRF_PWM_CLK_16MHz,
        .count_mode   = NRF_PWM_MODE_UP,
        .top_value    = PWM_COUNTERTOP,
        .load_mode    = NRF_PWM_LOAD_COMMON,
        .step_mode    = NRF_PWM_STEP_AUTO
    };
If you compile and flash the Thingy:53 with the application now, you should be able to hear the tune of Silent Night and God Rest Ye played on repeat!
Adding a remote-control interface
Coming from a largely nRF5 SDK background, my first idea for setting up remote control over Bluetooth LE was to use the Nordic UART Service.
However, I quickly realized there is a very powerful tool in the nRF Connect SDK (specifically from the Zephyr RTOS) that would be perfect for the job: The Shell service. It provides a few features that are perfect for this job:
-
Human-readable custom command definitions and processing with just a few lines of codes
-
Transport over UART, RTT, or BLE (via MCUmgr)
-
This means that we would also get wired control of the device with minimal code changes. This comes in handy for debugging.
-
So first, let’s enable Shell over UART and Bluetooth LE.
# Enable Shell with UART and Dummy backend.
# The dummy backend is necessary for enabling Shell over MCUmgr
CONFIG_SHELL=y
CONFIG_SHELL_BACKEND_SERIAL=y
CONFIG_SERIAL=y
CONFIG_SHELL_BACKEND_DUMMY=y

# Enable MCUmgr Shell feature
CONFIG_MCUMGR=y
CONFIG_NET_BUF=y    # MCUmgr dependency
CONFIG_ZCBOR=y      # MCUmgr dependency
CONFIG_MCUMGR_GRP_SHELL=y

# Enable MCUmgr over Bluetooth LE
CONFIG_MCUMGR_TRANSPORT_BT=y

# Enable automatic connection parameter negotiation suitable for MCUmgr
CONFIG_MCUMGR_TRANSPORT_BT_CONN_PARAM_CONTROL=y

# Enable MCUmgr message reassembly
CONFIG_MCUMGR_TRANSPORT_BT_REASSEMBLY=y

# Enable Bluetooth LE Peripheral
CONFIG_BT=y
CONFIG_BT_PERIPHERAL=y
CONFIG_BT_DEVICE_NAME="Xmas Music Box"

# Enable higher BLE GATT MTU and GAP Data Length
# Shell commands would not work with small MTU
CONFIG_BT_USER_DATA_LEN_UPDATE=y
CONFIG_BT_USER_PHY_UPDATE=y
CONFIG_BT_GAP_AUTO_UPDATE_CONN_PARAMS=n
CONFIG_BT_BUF_ACL_RX_SIZE=502
CONFIG_BT_ATT_PREPARE_COUNT=2
CONFIG_BT_L2CAP_TX_BUF_COUNT=10
CONFIG_BT_L2CAP_TX_MTU=498
CONFIG_BT_CONN_TX_MAX=10
CONFIG_BT_BUF_ACL_TX_COUNT=10
CONFIG_BT_BUF_ACL_TX_SIZE=502

# Restrict number of connections supported to lower RAM consumption
CONFIG_BT_MAX_CONN=1
If you prefer to work with RTT instead, you can also enable Shell over RTT with CONFIG_SHELL_BACKEND_RTT.
We also need to reconfigure the controller running on the Network core to allow for the large data length that was just set on the Host side on the Application core.
Create child_image/hci_rpmsg.conf, and add these overlay configurations:
# Enable higher BLE GATT MTU and GAP Data Length
CONFIG_BT_CTLR_DATA_LENGTH_MAX=251
CONFIG_BT_BUF_ACL_RX_SIZE=502
CONFIG_BT_BUF_ACL_TX_SIZE=502

# Restrict number of connections supported to lower RAM consumption
CONFIG_BT_MAX_CONN=1
You can now test whether the Shell works using a serial terminal on your PC and/or the nRF Device Manager app.
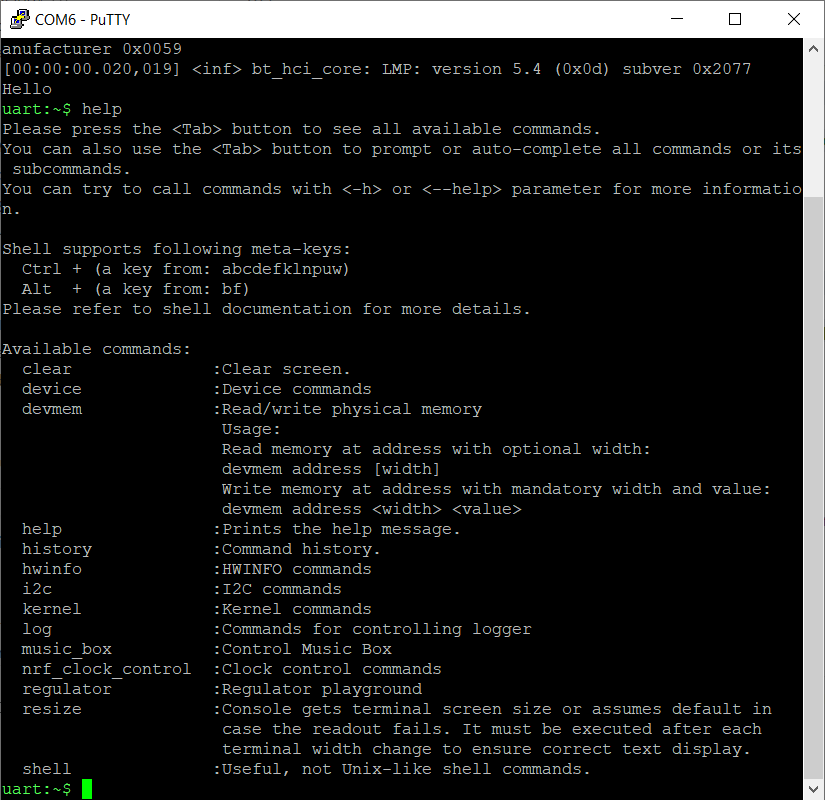
Figure 1: Serial (CDC ACM) Shell Interface
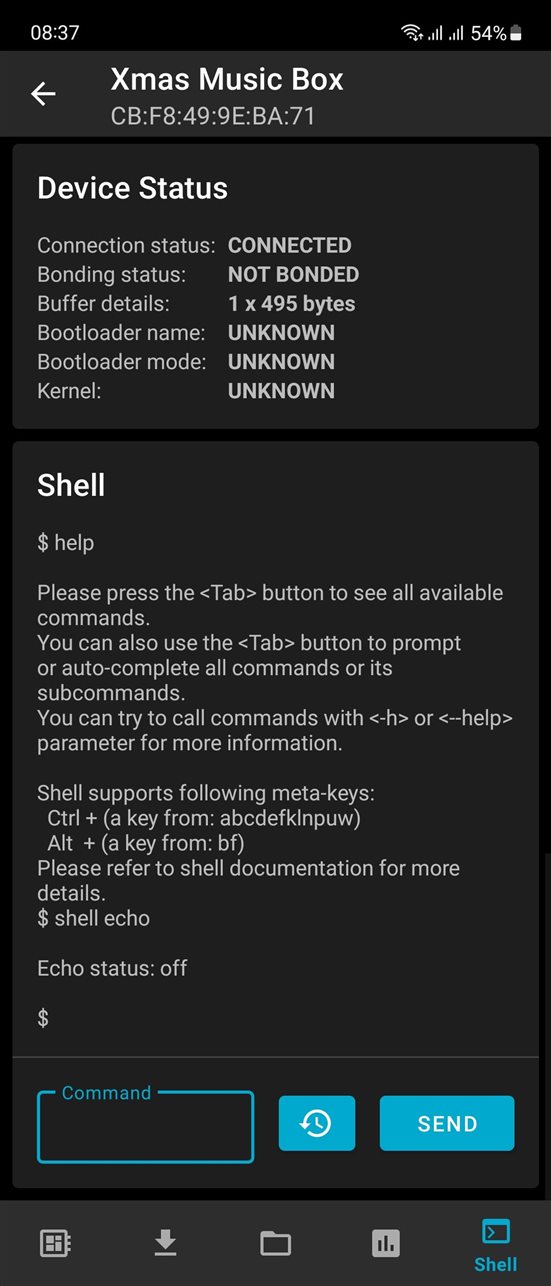
Figure 2: nRF Device Manager Shell Interface
With the Shell running, it's time to set up some custom commands. Update lines these into main.c:
#include <zephyr/shell/shell.h>
...
static int cmd_stop(
	const struct shell *shell, size_t argc, char *argv[])
{
    shell_fprintf(shell, SHELL_NORMAL, "TODO: Stop command\n");
    return 0;
}

static int cmd_play(
	const struct shell *shell, size_t argc, char *argv[])
{
    shell_fprintf(shell, SHELL_NORMAL, "TODO: Play command\n");
    return 0;
}

SHELL_STATIC_SUBCMD_SET_CREATE(
	music_box_cmds,
	SHELL_CMD(play, NULL,
		"usage example:\n$ music_box play\n",
		cmd_play),
	SHELL_CMD(stop, NULL,
		"usage example:\n$ music_box stop\n",
		cmd_stop),
	SHELL_SUBCMD_SET_END
	);

SHELL_CMD_REGISTER(music_box, &music_box_cmds, "Control Music Box", NULL);
We can run a quick test to confirm that our custom commands are functioning as intended.
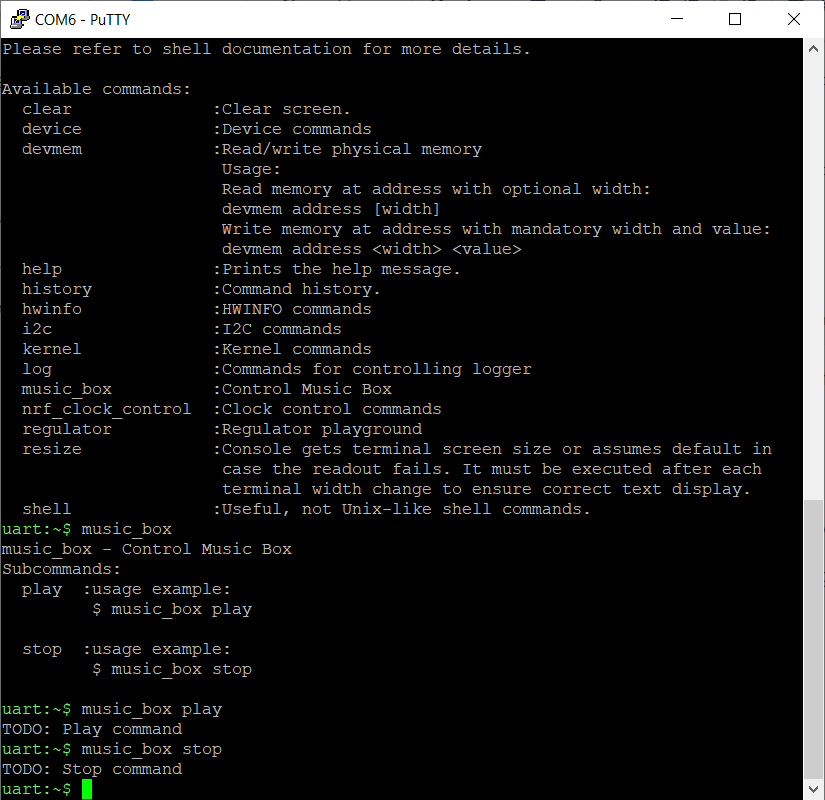
Figure 3: Custom Shell command music_box running
Now, let’s add the functionality.
Adding a Stop Playing functionality
The Stop Playing behavior can be done by interrupting the processing in the Music module. We can quickly implement it with a boolean flag.
music.c
volatile bool stop_playing_flag = false;
...
int music_play_song(music_songdef_t *song)
{
	...
	do {
		active_lists = 0;
		for(int nl = 0; nl < song->num_note_lists; nl++) {
			if (stop_playing_flag) break;
			...
		}
		if (stop_playing_flag) break;
		k_msleep(song->speed);
	} while(active_lists > 0);
	stop_playing_flag = false;
	printk("Song completed\n");
	return 0;
}
main.c
extern volatile bool stop_playing_flag;
...
static int cmd_stop(
	const struct shell *shell, size_t argc, char *argv[])
{
    shell_fprintf(shell, SHELL_NORMAL, "ACK music_box stop\n");
	stop_playing_flag = true;
    return 0;
}
Adding a Start Playing functionality
Our base project has the music started and looped in a dedicated thread. We can add a play control functionality to the thread using the Zephyr RTOS Kernel Events API.
Since this changes the way music is played, we also need to update the cmd_stop() function to also post a kernel event.
First, enable the Kernel Events API in prj.conf:
# Enable Kernel Events API
CONFIG_EVENTS=y
Next, set the event definition and handling in main.c:
K_EVENT_DEFINE(music_ctrl_evts);
#define MUSIC_CTRL_EVTS_START_BIT	((uint32_t) 0x01U << 0)
#define MUSIC_CTRL_EVTS_STOP_BIT	((uint32_t) 0x01U << 1)
#define MUSIC_CTRL_EVTS_ALL_BITS	(MUSIC_CTRL_EVTS_START_BIT | MUSIC_CTRL_EVTS_STOP_BIT)

...
static int cmd_stop(
	const struct shell *shell, size_t argc, char *argv[])
{
    shell_fprintf(shell, SHELL_NORMAL, "ACK music_box stop\n");
	k_event_post(&music_ctrl_evts, MUSIC_CTRL_EVTS_STOP_BIT);
	stop_playing_flag = true;
	return 0;
}

static int cmd_play(
	const struct shell *shell, size_t argc, char *argv[])
{
	shell_fprintf(shell, SHELL_NORMAL, "ACK music_box play\n");
	k_event_post(&music_ctrl_evts, MUSIC_CTRL_EVTS_START_BIT);
    return 0;
}
...
void thread_play_notes_func(void)
{
	while (1) {
		volatile uint32_t evts= 0;
		static volatile bool is_playing = false;

		evts = k_event_wait(&music_ctrl_evts, MUSIC_CTRL_EVTS_ALL_BITS, false, K_MSEC(10));

		if ((evts & MUSIC_CTRL_EVTS_START_BIT) != 0) {
			is_playing = true;
		}
		if ((evts & MUSIC_CTRL_EVTS_STOP_BIT) != 0) {
			is_playing = false;
		}

		k_event_clear(&music_ctrl_evts, MUSIC_CTRL_EVTS_ALL_BITS);

		if (is_playing) {
			music_play_song(&song_holy_night);
		}
	}
}
Adding more songs
With our control interfaces all set up, it’s time to add some more songs!
First, create a new song source file and register it with the project CMakeLists.txt:
target_sources(
    app PRIVATE
    src/main.c
    src/sound_gen.c
    src/music.c
    src/instruments.c
    src/song_god_rest_ye.c
    src/song_holy_night.c
    src/song_xmas.c
    )
Then, we can define a couple more songs in the new song_xmas.c. Here is the code, with 99% credit to my wife, who transcribed the songs from music sheets to the project's syntax:
#include <songs.h>

const char boot_tune[] = "G3-3-100,A-4,B-4,C-4,B-4,A-4,end";

music_songdef_t song_short_dbg = {
	.max_amp = 120,
	.note_lists[0].note_string = boot_tune,
	.note_lists[0].instrument = &instr_lead1,
	.note_lists[0].note_offset = 0,
	.num_note_lists = 1,
	.speed = 300,
};

const char santa_claus_is_coming_to_town_track_1[] =
	"G3-2-100,E-1,F-1,G-2,G-3,G-1,A-1,B-1,C4-2,C-2,2,E3-1,F-1,G-2,G-2,G-2,A-1,G-1,F-2,F-2,P-2,E-2,G-2,C-2,E-2,D-2,F-4,B2-2,G3-8,end";
const char santa_claus_is_coming_to_town_track_2[] =
	"B2-2-100,C3-4,E2-4,F-4,A-4,C3-4,Bb2-4,A-4,Ab-4,G-4,A-4,F-4,G-4,C-8,end";

music_songdef_t song_santa_claus_is_coming_to_town = {
	.max_amp = 120,
	.note_lists[0].note_string = santa_claus_is_coming_to_town_track_1,
	.note_lists[0].instrument = &instr_lead1,
	.note_lists[0].note_offset = 0,
	.note_lists[1].note_string = santa_claus_is_coming_to_town_track_2,
	.note_lists[1].instrument = &instr_lead1,
	.note_lists[1].note_offset = 0,
	.num_note_lists = 2,
	.speed = 200,
};

const char paa_laaven_sitter_nissen_track_1[] =
	"D2-1-100,G-1,Gb-1,G-1,A-1,B-1,A-1,B-1,C3-1,E-2,D-2,D-3,B2-1,D3-2,C-2,C-3,A2-1,C3-2,B2-2,B-3,D-1," \
    "G-1,Gb-1,G-1,A-1,B-1,A-1,B-1,C3-1,E-2,D-2,D-3,B2-1,D3-2,C-2,C-1,Gb2-1,Gb-1,Gb-1,G-2,B-2,G-2,G-2," \
    "E3-1,D-1,C-1,B2-1,D3-1,C-1,B2-1,A-1,G-4,E-2,G-1,G-1,F-4,D-2,A-1,A-1,G-4,E-2,G-2," \
    "E3-1,D-1,C-1,B2-1,D3-1,C-1,B2-1,A-1,G-4,E-2,G-1,G-1,A-2,D3-2,C-1,B2-1,A-1,B-1,C3-2,C3-2,C3-2,end";
const char paa_laaven_sitter_nissen_track_2[] =
	"P-1-100,G1-4,D-4,G-4,D-4,D-4,A-2,D-2,G-4,D-4,G-4,D-4,G-4,E-4,A-4,D-2,A-2,G-2,D-2,G-4," \
	"C-4,F-4,E-4,C-2,Cs-2,D-4,G-4,C2-4,G1-4,C-4,F-4,C-4,G-2,C-2,D-4,G-4,G-2,G-2,G-2,end";

music_songdef_t song_paa_laaven_sitter_nissen = {
	.max_amp = 120,
	.note_lists[0].note_string = paa_laaven_sitter_nissen_track_1,
	.note_lists[0].instrument = &instr_lead1,
	.note_lists[0].note_offset = 0,
	.note_lists[1].note_string = paa_laaven_sitter_nissen_track_2,
	.note_lists[1].instrument = &instr_lead1,
	.note_lists[1].note_offset = 0,
	.num_note_lists = 2,
	.speed = 200,
};
Also, remember to declare the new songs in songs.h:
extern music_songdef_t song_god_rest_ye_gentlemen;
extern music_songdef_t song_holy_night;
extern music_songdef_t song_short_dbg;
extern music_songdef_t song_santa_claus_is_coming_to_town;
extern music_songdef_t song_paa_laaven_sitter_nissen;
Finally, update main.c to play through a playlist:
...
		if (is_playing) {
			static music_songdef_t* playlist[] = {
				&song_santa_claus_is_coming_to_town,
				&song_paa_laaven_sitter_nissen,
				&song_holy_night,
				&song_god_rest_ye_gentlemen
			};
			static size_t playlist_play_idx = 0;
			music_play_song(playlist[playlist_play_idx]);
			playlist_play_idx++;
			if (playlist_play_idx >= (sizeof(playlist) / sizeof(music_songdef_t*))) {
				playlist_play_idx = 0;
			}
		}
...
Result
Here is an audio clip of the Thingy:53 playing all four pre-programmed songs of the final project:
- Santa Claus is Coming to Town
- På Låven Sitter Nissen (a Norwegian Christmas song)
- Silent Night
- God Rest Ye Merry Gentlemen
Below, we see the Thingy:53 hanging on our Christmas tree blinking away, with a few more Thingy:52s for effect.

Closing
With the building blocks that we have covered today, there are a few features that you could consider adding:
- Playlist shuffling
- Currently, our implementation plays all songs in the same order on repeat.
A little shuffle of the play order would be nice.
- Currently, our implementation plays all songs in the same order on repeat.
- LED effect
- The RGB LEDs on the Thingy:53 can be controlled with either basic GPIO toggling or PWM for some soft blinking effect.
There are several samples from Zephyr that we can refer directly to for a speed boost.
- The RGB LEDs on the Thingy:53 can be controlled with either basic GPIO toggling or PWM for some soft blinking effect.
- Button control
- The Thingy:53 also has a button that can work as a Play/Stop toggling button.
We can add it as another convenient control interface. The functions used for the custom Shell commands could be reused as-is here.
- The Thingy:53 also has a button that can work as a Play/Stop toggling button.
- Sleeping and Power Optimization
- Right now, when our music box stops playing, all of its functionality is still running in the background.
We can implement power-saving behavior, such as putting the device into a deep sleep after a period without interaction, or significantly increase the Bluetooth LE advertising period.
- Right now, when our music box stops playing, all of its functionality is still running in the background.
My final project is available on the xmas_2023 branch of my ncs-melody fork: https://github.com/hieuv/ncs-melody/tree/xmas_2023.
Please feel free to comment here if you have any questions 
Happy holidays!

