

Please note that this blogpost is now deprecated as the nRF52820 is fully supported in nRF5 SDK v17.0.0. We recommend using SDK v17.0.0 for nRF52820 fimware development.
Introduction
The nRF52820 IC is a subset of the nRF52833 with smaller RAM and flash, and with less peripheral resources. Therefore, you can use nRF52833 to emulate the functionality of nRF52820.
This blog post will show you how to emulate the nRF52820 on the nRF52833 Development Kit.
Detailed information on the SoC can be found in the nRF52820 Product Specification and a detailed comparison of the features of the various nRF52 Series chips can be seen in the nRF52 Series comparison table on the Nordic Infocenter.
Hardware emulation of nRF52820 on the nRF52833 DK
You can fully emulate nRF52820 features using a nRF52833 Development Kit (PCA10100), there are however, some differences that developers should be aware of when transferring emulated projects to nRF52820 hardware.
The bit length for some of the digital serial interface features differs for both chips. This means that the emulated project lets you use 16 bits, but in order to successfully function on nRF52820, the following features cannot exceed 15 bits in your application.
| Differences | nRF52833 | nRF52820 |
| SPIM: RXD.MAXCNT | 16-bit [1..0xFFFF] | 15-bit [1..0x7FFF] |
| SPIM: TXD.MAXCNT | 16-bit [1..0xFFFF] | 15-bit [1..0x7FFF] |
| SPIS: RXD.MAXCNT | 16-bit [1..0xFFFF] | 15-bit [1..0x7FFF] |
| SPIS: TXD.MAXCNT | 16-bit [1..0xFFFF] | 15-bit [1..0x7FFF] |
| TWIM: RXD.MAXCNT | 16-bit [1..0xFFFF] | 15-bit [1..0x7FFF] |
| TWIM: TXD.MAXCNT | 16-bit [1..0xFFFF] | 15-bit [1..0x7FFF] |
| TWIS: RXD.MAXCNT | 16-bit [1..0xFFFF] | 15-bit [1..0x7FFF] |
| TWIS: TXD.MAXCNT | 16-bit [1..0xFFFF] | 15-bit [1..0x7FFF] |
| UARTE: RXD.MAXCNT | 16-bit [1..0xFFFF] | 15-bit [1..0x7FFF] |
| UARTE: TXD.MAXCNT | 16-bit [1..0xFFFF] | 15-bit [1..0x7FFF] |
It is also important to note that the nRF52833 has higher number of GPIO pins compared to the nRF52820.
| nRF52833 | nRF52820 | |
| Number of GPIO pins | 32 | 18 |
The nRF52833 DK uses the nRF52833 aQFN73 and some of the buttons are tied to GPIOs that are not available on the nRF52820 QFN40 package.
| nRF52833 aQFN73 GPIO | Function on nRF52833 DK | GPIO available on nRF52820 QFN40 |
| P0.11 | Button 1 | No |
| P0.12 | Button 2 | No |
| P0.24 | Button 3 | No |
| P0.25 | Button 4 | No |
| P0.13 | LED 1 | No |
| P0.14 | LED 2 | Yes |
| P0.15 | LED 3 | Yes |
| P0.16 | LED 4 | Yes |
When running an emulated nRF52820 example on the nRF52833 DK you will still be able to use the buttons and LEDs, but when transferring the emulated project to nRF52820 hardware you will need to remap any button and LED pin to available GPIOs on the nRF52820 QFN 40 package, see table below.
| nRF52820 QFN40 GPIOs | Function |
| P0.00 /XL1 | Digital I/O and Connection for 32.768 kHz crystal |
| P0.01 | Digital I/O and Connection for 32.768 kHz crystal |
| P0.02 | Digital I/O and Analog Input |
| P0.03 | Digital I/O and Analog Input |
| P0.04 | Digital I/O and Analog Input |
| P0.05 | Digital I/O and Analog Input |
| P0.06 | Digital I/O |
| P0.07 | Digital I/O |
| P0.08 | Digital I/O |
| P0.14 | Digital I/O |
| P0.15 | Digital I/O |
| P0.16 | Digital I/O |
| P0.17 | Digital I/O |
| P0.18 | Digital I/O and nRESET |
| P0.20 | Digital I/O |
| P0.28 | Digital I/O |
| P0.29 | Digital I/O |
| P0.30 | Digital I/O |
Software emulation of nRF52820
All examples that are hardware compatible can be set up to emulate nRF52820 on nRF52833. Hardware compatibility means that a project uses only the resources present in nRF52820, including peripherals and memory. Note that the nRF52820 does not have cache and hardware floating point support. Its also important to note that the nRF52820 has reduced flash and RAM size, hence not all nRF52833 DK examples may fit on the nRF52820.
See the the nRF52 Series comparison table on the Nordic Infocenter for a full overview of which peripherals that are present on the nRF52820 compared to the nRF52833.
The following SoftDevices are supported on the nRF52820
| SoftDevice | Version |
| S112 | v7.0.1 |
| S140 | v7.0.1 |
| S122 | v8.0.0-10.alpha |
this is also listed in the SDKs and SoftDevices Compatibility Matrix for the nRF52820.
Differences between the the v8.0.0 and v7.0.1 SoftDevice APIs
The S122 is a size-optimized central only BLE SoftDevice for the nRF52820. The S122 API is a compatible subset of the S132 SoftDevice API, hence for features that are common to S122 and S132, the API is the same.
The changes in the API of the S122 v8.0.0-10.alpha compared to the S132 v7.0.1 is as follows:
- SoftDevice
- sd_power_usb* APIs and events have been added.
- GAP:
- Peripheral Role is no longer supported and the following functions, structures, defines and events have been removed (DRGN-13474):
- sd_ble_gap_adv_addr_get()
- sd_ble_gap_adv_set_configure()
- sd_ble_gap_adv_start()
- sd_ble_gap_adv_stop()
- sd_ble_gap_ppcp_set()
- sd_ble_gap_ppcp_get()
- sd_ble_gap_sec_info_reply()
- BLE_GAP_EVT_SEC_INFO_REQUEST
- BLE_GAP_EVT_SCAN_REQ_REPORT
- BLE_GAP_EVT_ADV_SET_TERMINATED
- BLE_GAP_OPT_LOCAL_CONN_LATENCY
- BLE_GAP_OPT_SLAVE_LATENCY_DISABLE
- LE Data Length Extension is no longer supported and the following functions, structures, defines and events have been removed (DRGN-13451):
- sd_ble_gap_data_length_update()
- BLE_GAP_EVT_DATA_LENGTH_UPDATE_REQUEST, BLE_GAP_EVT_DATA_LENGTH_UPDATE
- BLE_GAP_DATA_LENGTH_AUTO
- ble_gap_data_length_params_t, ble_gap_data_length_limitation_t
- ble_gap_evt_data_length_update_request_t, ble_gap_evt_data_length_update_t
- L2CAP:
- L2CAP Connection Oriented Channels is no longer supported and the header file ble_l2cap.h with its functions, structures, defines and events have been removed (DRGN-13451):
- sd_ble_l2cap_ch_setup(), sd_ble_l2cap_ch_release(), sd_ble_l2cap_ch_rx(), sd_ble_l2cap_ch_tx(), sd_ble_l2cap_ch_flow_control()
- ble_l2cap_ch_rx_params_t, ble_l2cap_ch_setup_params_t, ble_l2cap_ch_tx_params_t, ble_l2cap_conn_cfg_t
- BLE_L2CAP_EVT_CH_SETUP_REQUEST, BLE_L2CAP_EVT_CH_SETUP_REFUSED, BLE_L2CAP_EVT_CH_SETUP, BLE_L2CAP_EVT_CH_RELEASED,BLE_L2CAP_EVT_CH_SDU_BUF_RELEASED, BLE_L2CAP_EVT_CH_CREDIT, BLE_L2CAP_EVT_CH_RX, BLE_L2CAP_EVT_CH_TX
- ble_l2cap_evt_t, ble_l2cap_evt_ch_tx_t , ble_l2cap_evt_ch_rx_t, ble_l2cap_evt_ch_credit_t, ble_l2cap_evt_ch_sdu_buf_released_t ,
- ble_l2cap_evt_ch_setup_request_t , ble_l2cap_evt_ch_setup_refused_t, ble_l2cap_evt_ch_setup_t
- L2CAP Connection Oriented Channels is no longer supported and the header file ble_l2cap.h with its functions, structures, defines and events have been removed (DRGN-13451):
- Peripheral Role is no longer supported and the following functions, structures, defines and events have been removed (DRGN-13474):
Installing the nRF MDK and nRF Command-Line Tools
In order to start development on the nRF52820 you need to download the nRF MDK (Microcontroller Development Kit) and the nRF Command-Line Tools that supports the nRF52820.
The nRF MDK provides device support in the form of register header files and startup code for the different toolchains/IDEs supported in the nRF5 SDK and the nRF Command-Line Tools allows you to program the nRF52820 through SEGGER J-Link programmers and debuggers.
The nRF Command-Line Tools version that supports the nRF52820 is v10.7.0 and later, which can be downloaded from https://www.nordicsemi.com/Software-and-tools/Development-Tools/nRF-Command-Line-Tools/Download
The nRF MDK version that supports the nRF52820 is v8.32.1 and later, which can be downloaded from https://www.nordicsemi.com/Software-and-tools/Development-Tools/nRF-MDK/Download#infotabs.
Note: You should select the MDK with the 5-clause Nordic License.
Setting up the MDK varies depending on the IDE/Toolchain used. IDE/toolchain specific instructions are given below.
Segger Embedded Studio
- Download the nRF_MDK_8_32_1_SES_NordicLicense.emPackage from nordicsemi.com using this link.
- Open Segger Embedded Studio
- Click Tools -> Manually Install Packages
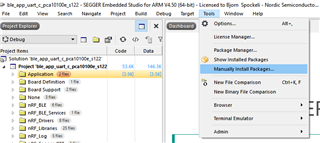
- Navigate to the nRF_MDK_8_32_1_SES_NordicLicense.emPackage in the browse window and click "Open"
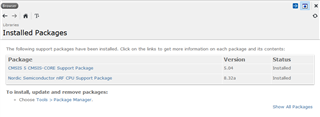
- After the install you should see the following window in Segger Embedded Studio.
- Download the following zip: 0602.mdk_v8_32_1.zip
- Unzip the file
- Replace the nRF5_SDK_16.0.0_98a08e2\modules\nrfx\mdk folder with the mdk folder in the mdk_v8_32_1.zip
GCC
- Download the following zip: 0602.mdk_v8_32_1.zip
- Unzip the file
- Replace the nRF5_SDK_16.0.0_98a08e2\modules\nrfx\mdk folder with the mdk folder in the mdk_v8_32_1.zip
Keil
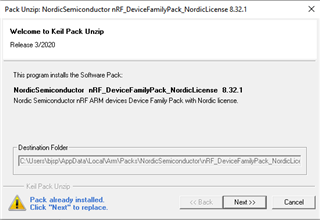
- Download the NordicSemiconductor.nRF_DeviceFamilyPack_NordicLicense.8.32.1.pack
- Install the pack by double clicking the NordicSemiconductor.nRF_DeviceFamilyPack_NordicLicense.8.32.1.pack file.
- This should open the Keil Pack Unzip tool, see screenshot below. Complete the wizard to finish the installation of the MDK.
Patching nRF5 SDK v16.0.0 to support the nRF52820
In addition to updating the nRF MDK you will also have to patch and add some files in the nRF5 SDK v16.0.0 source code to add support for the nRF52820.
The following files in the nRF5 SDK v16.0.0 needs to be patched or added to support the nRF52820:
- Patch nrfx_irqs.h in nRF5_SDK_16.0.0_98a08e2\modules\nrfx\soc\
- Add nrfx_irqs_nrf52820.h to nRF5_SDK_16.0.0_98a08e2\modules\nrfx\soc\
- Patch nrfx_coredep.h in nRF5_SDK_16.0.0_98a08e2\modules\nrfx\soc\
- Patch nrf_power.h in nRF5_SDK_16.0.0_98a08e2\modules\nrfx\hal\
- Patch nrfx_prs.h in nRF5_SDK_16.0.0_98a08e2\modules\nrfx\drivers\src\prs\
In order to add support for the S122 v8.0.0-10.alpha you will also have to patch the following files:
- Patch nrf_ble_gatt.c in nRF5_SDK_16.0.0_98a08e2\components\ble\nrf_ble_gatt\
- Patch nrf_ble_scan.c in nRF5_SDK_16.0.0_98a08e2\components\ble\nrf_ble_scan\
- Patch nrf_sdh_ble.c in nRF5_SDK_16.0.0_98a08e2\components\softdevice\common\nrf_sdh_ble.c
Lastly, a minor modification to the MDK is needed to allow all buttons and leds on the nRF52833 DK to be used when emulating the nRF52820
- Patch nrf52820_peripherals.h in nRF5_SDK_16.0.0_98a08e2\modules\nrfx\mdk\
The patched and added files are available in this zip: 6646.sdk_v16_0_0_nrf52820_patch.zip
Creating an emulated project for the nRF52820 on the NRF52833 DK
Keil
- Open the Keil example project
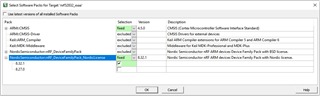
- Open the Select Software Packs window by clicking the
 icon.
icon. - Make sure that the nRF_Device_FamiliyPack_NordicLicense 8.32.1 is selected
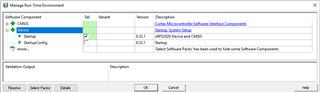
- Open the Manage Run-time Environment window by clicking the
 icon.
icon. - Make sure that only the Startup is selected and that the version is 8.32.1
- Open the Project Settings, click the Device Tab and change to device "NordicSemiconductor->nRF52820_xxaa".
- In the Preprocessor Definitions under the C/C++ Tab, remove the "NRF52" and NRF52_PAN_74 defines if it present.
- Replace the preprocessor define "NRF52833_XXAA" with "NRF52820_XXAA".
- Replace the preprocessor define FLOAT_ABI_HARD with FLOAT_ABI_SOFT.
- Add
NRFX_COREDEP_DELAY_US_LOOP_CYCLES=3 and DEVELOP_IN_NRF52833 to the preprocessor definitions. - Add either S112 or S140, depending on which SoftDevice you are using.
- Adjust the Read/Only Memory Areas and Read/Write Memory Areas to match SoftDevice release notes and the maximum RAM and flash size of nRF52820.
- IROM1 Start: 0x27000 ( S140 v7.0.1) or 0x19000 ( S112 v7.0.1)
- IROM1 Size: IROM1 Start+ IROM1 Size <= 0x40000
- IRAM1 Start: 0x20002B00 ( Can be lowered at a later stage)
- IRAM1 Size: IRAM1 Start+ IRAM1 Size <= 0x40000
- IRAM2 Start: Remove values and untick the default box
- IRAM2 Size: Remove values and untick the default box
- Change the following defines in the sdk_config.h file:
- Under the Peripheral Resource Sharing module settings
- Set NRFX_PRS_BOX_2_ENABLED to 1
- Set NRFX_PRS_BOX_4_ENABLED to 0
- Under the Peripheral Resource Sharing module settings
Segger Embedded Studio
- Open the example project
- Open the Project Options and select the Common configuration
- Under Code > Preprocessor > Preprocessor Definitions, remove the NRF52833_XXAA and FLOAT_ABI_HARD defines.
- Add NRF52820_XXAA and FLOAT_ABI_SOFT to the Preprocessor Definitions.
- Under Code > Preprocessor > Preprocessor Definitions
DEVELOP_IN_NRF52833define to the compile flags. Adding this define will add extra code inSystemInitneeded for nRF52820. - Under Code > Preprocessor > Preprocessor Definitions add
NRFX_COREDEP_DELAY_US_LOOP_CYCLES=3define to ensure correct timing when usingnrf_delay_usfunction. - Under Code > Code Generation set the ARM FP ABI Type to Soft and ARM FPU Type to None
- Under Code > Linker > Section Placement Macros, adjust the linker script to match the maximum RAM and flash size of nRF52820.
- FLASH_PH_SIZE=0x40000
- RAM_PH_SIZE=0x8000
- Modify the FLASH_SIZE and RAM_SIZE macros so that
- FLASH_START + FLASH_SIZE <= FLASH_PH_SIZE
- RAM_START + RAM_SIZE <= (RAM_PH_START + RAM_PH_SIZE)
- Under Code > Build > Memory Segments adjust the values to the following:
- FLASH RX 0x0 0x40000;RAM RWX 0x20000000 0x8000
- Remove the following files from the project: ses
_startup_nrf52833.sandsystem_nrf52833.c. - Add the following files to the project: ses
_startup_nrf52820.sandsystem_nrf52820.c. - Change the following defines in the sdk_config.h file:
- Under the Peripheral Resource Sharing module settings
- Set NRFX_PRS_BOX_2_ENABLED to 1
- Set NRFX_PRS_BOX_4_ENABLED to 0
- Under the Peripheral Resource Sharing module settings
GCC and Makefiles
- Open the Makefile for the example project you want to convert to an emulated nRF52820 example.
- Remove CFLAGS += -DNRF52833_XXAA from the compiler flags and ASMFLAGS += -DNRF52833_XXAA from the Assembler flags.
- Add the following compiler flag CFLAGS += -DNRF52820_XXAA and the following assembler flag ASMFLAGS += -DNRF52820_XXAA
- Add the
DEVELOP_IN_NRF52833define to the compiler and assembler flags, i.e.
CFLAGS += -DDEVELOP_IN_NRF52833
ASMFLAGS += -DDEVELOP_IN_NRF52833
Adding this define will add extra code inSystemInitneeded for nRF52820. - Add the
NRFX_COREDEP_DELAY_US_LOOP_CYCLES=3define to ensure correct timing when usingnrf_delay_usfunction, i.e.
CFLAGS += -DNRFX_COREDEP_DELAY_US_LOOP_CYCLES=3
ASMFLAGS += -DNRFX_COREDEP_DELAY_US_LOOP_CYCLES=3 ChangeCFLAGS += -DFLOAT_ABI_HARD toCFLAGS += -DFLOAT_ABI_SOFT and ASMFLAGS += -DFLOAT_ABI_HARD to ASMFLAGS += -DFLOAT_ABI_SOFTChangeCFLAGS += -mfloat-abi=hard -mfpu=fpv4-sp-d16 to CFLAGS += -mfloat-abi=soft and ASMFLAGS += -mfloat-abi=hard -mfpu=fpv4-sp-d16 to ASMFLAGS += -mfloat-abi=soft- Change the Linker flag LDFLAGS += -mfloat-abi=hard -mfpu=fpv4-sp-d16 to LDFLAGS += -mfloat-abi=soft
- Remove the following lines from the SRC_FILES:
-
$(SDK_ROOT)/modules/nrfx/mdk/gcc_startup_nrf52833.S \
-
$(SDK_ROOT)/modules/nrfx/mdk/system_nrf52833.c \
-
- Add the following lines to SRC_FILES
- $(SDK_ROOT)/modules/nrfx/mdk/gcc_startup_nrf52820.S \
- $(SDK_ROOT)/modules/nrfx/mdk/system_nrf52820.c \
- In the linker script(.ld file locate in the same folder as the Makefile), adjust the linker script to match the maximum RAM and flash size of nRF52820, i.e. make sure that
- FLASH : ORIGIN + LENGTH == 0x40000
- RAM: ORIGIN + LENGTH == 0x20008000
- Change the following defines in the sdk_config.h file:
- Under the Peripheral Resource Sharing module settings
- Set NRFX_PRS_BOX_2_ENABLED to 1
- Set NRFX_PRS_BOX_4_ENABLED to 0
- Under the Peripheral Resource Sharing module settings
Transferring an emulated project to nRF52820 hardware
If you have developed your application using the emulated project as a starting point, there are only two steps you need to perform before you can run it natively on nRF52820:
- In your IDE, remove the
DEVELOP_IN_NRF52833andNRFX_COREDEP_DELAY_US_LOOP_CYCLESdefines from the compile flags. - Remap GPIOs used in your project to pins available on the nRF52820 QFN40. See the table under Hardware emulation of nRF52820 on the nRF52833 DK.
Emulated nRF52820 (PCA10100e) Project examples
Below you will find some of the BLE examples from SDK v16.0.0 where a pca10100e project has been added with support for Keil 5, Segger Embedded Studio.
- BLE Peripheral Examples are available for the S112 v7.0.1
- BLE Central Examples are available for both the S140 v7.0.1 and the S122 v8.0.0-10.alpha
Peripheral UART/Serial Port Emulation over BLE (ble_app_uart)
- Download: 1488.ble_app_uart_pca10100e.zip
- Unzip the zip
- Place pca10100e folder to nRF5_SDK_16.0.0_98a08e2\examples\ble_peripheral\ble_app_uart
Central UART/Serial Port Emulation over BLE (ble_app_uart_c)
- Download 6874.ble_app_uart_c_pca10100e.zip
- Unzip the zip
- Extract pca10100e folder to nRF5_SDK_16.0.0_98a08e2\examples\ble_central\ble_app_uart_c


