Development with Eclipse and GCC

Updated version here (21.04.15): https://devzone.nordicsemi.com/tutorials/7/development-with-gcc-and-eclipse/

I have noticed that there have been several questions on development with Eclipse and GCC, and I have also been trying myself for quite some time to make it work properly. It finally seems like I have figured out an approach that works for me. I.e., successfully importing and debugging of example projects from the nRF51 SDK. So I thought I could make a blog post to share my setup and hopefully help others who are also new to Eclipse and GCC.

Inspired by other devzone users I found out that the easiest solution to setup Eclipse with debugging is probably by using the GNU ARM eclipse plug-in from http://gnuarmeclipse.livius.net/blog/. Regardless, it still it took me some time to get it all working so I have described my approach for importing and debugging SDK 6.0 exampe projects below.

Required tools:

Setting up Eclipse with register view

  • Start Eclipse

  • Click Help and select Install new software

  • Install embsysreqview

  • To install the register view file for Nordic Semiconductor devices copy file nrf51.xml to the folder eclipse\plugins\org.eclipse.cdt.embsysregview_x.x.x\data\cortex-m0\Nordic. nrf51.xml is located in SDK v.x.x.x\SVD.

Configuration step-by-step:

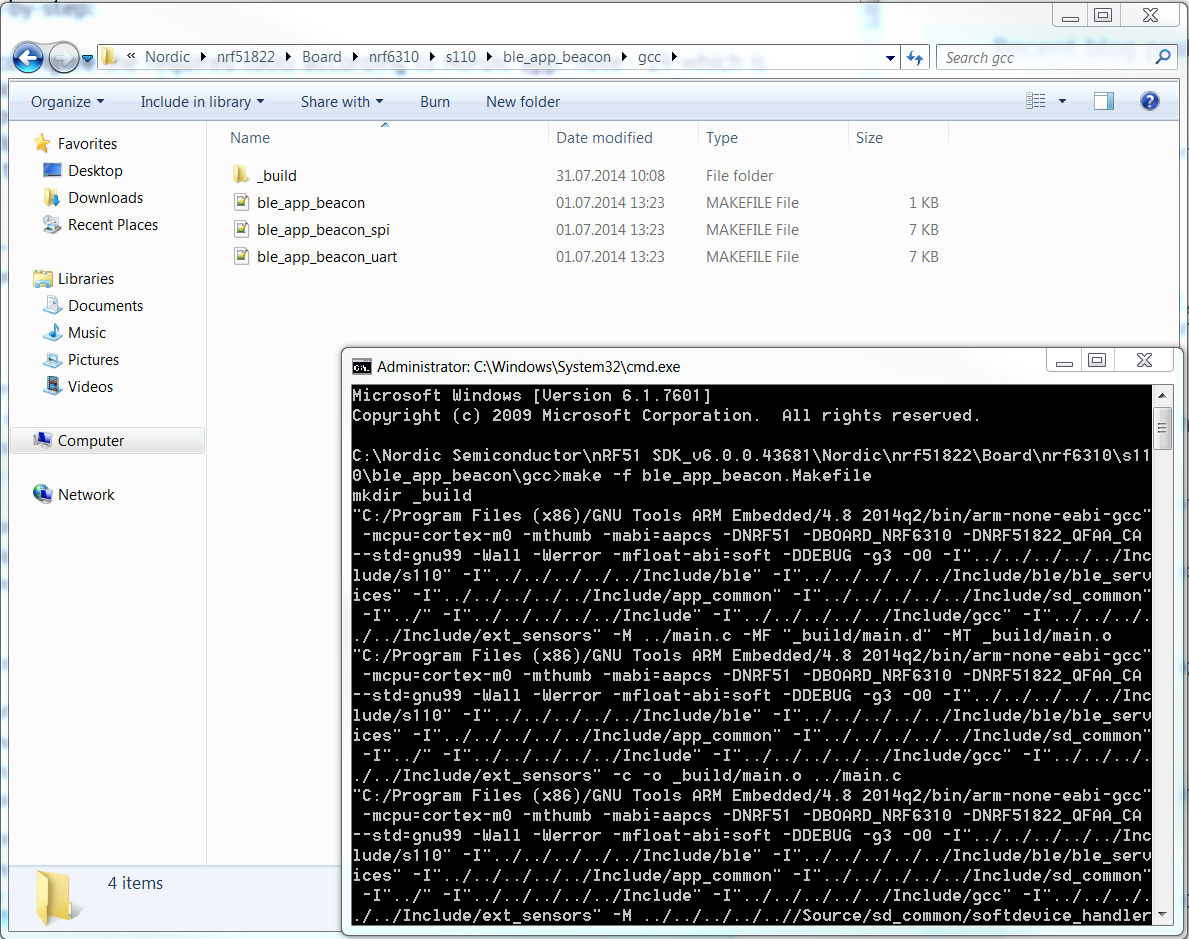
  1. First step is to make sure that the GNU ARM toolchain and Jlink are installed correctly by building and downloading an example project from SDK to a target. This is done by opening the command line in the gcc directory in one of the projects and type the 'make' command with the -f option to specify which makefile to use. After a successful build you should be able to flash your device by typing "make flash -f filename". Remember to flash softdevice beforehand with nRFgo studio when using example projects located in sXXX(softdevice) folders. image description
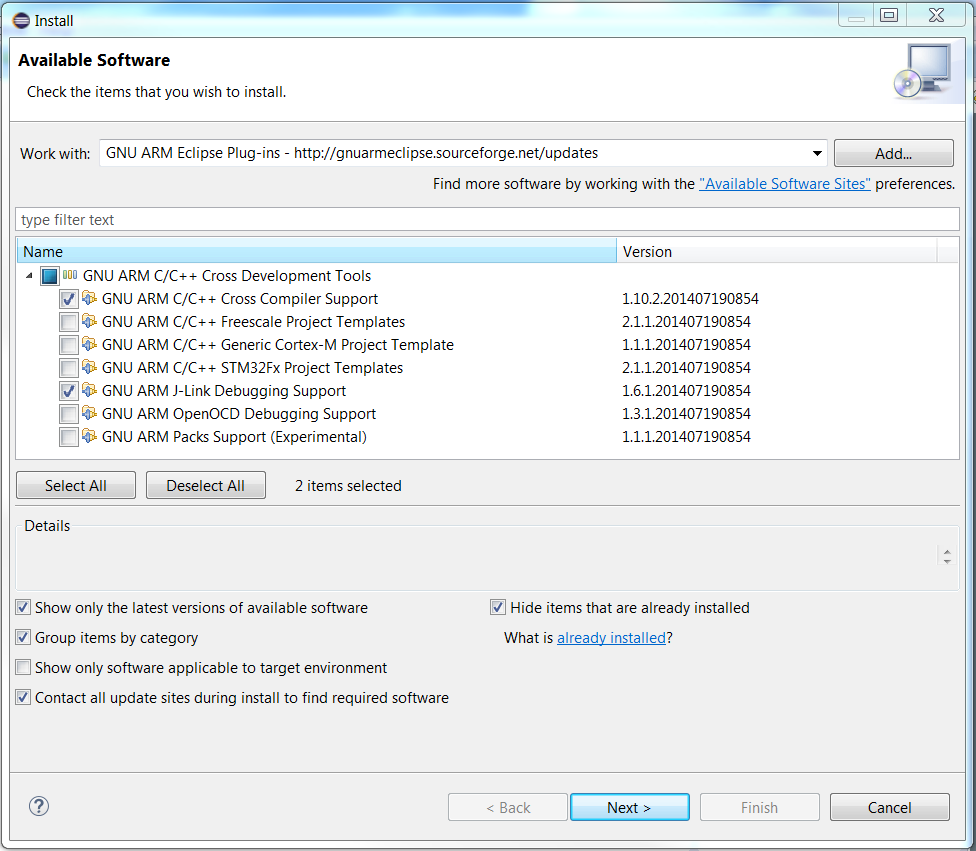
  2. Open Eclipse and install the GNU ARM plug-in like shown below. See http://gnuarmeclipse.livius.net/blog/ for more details. In my setup I chose to install the Cross compiler and J-link debugging support only, but the others can also be installed if needed.image description
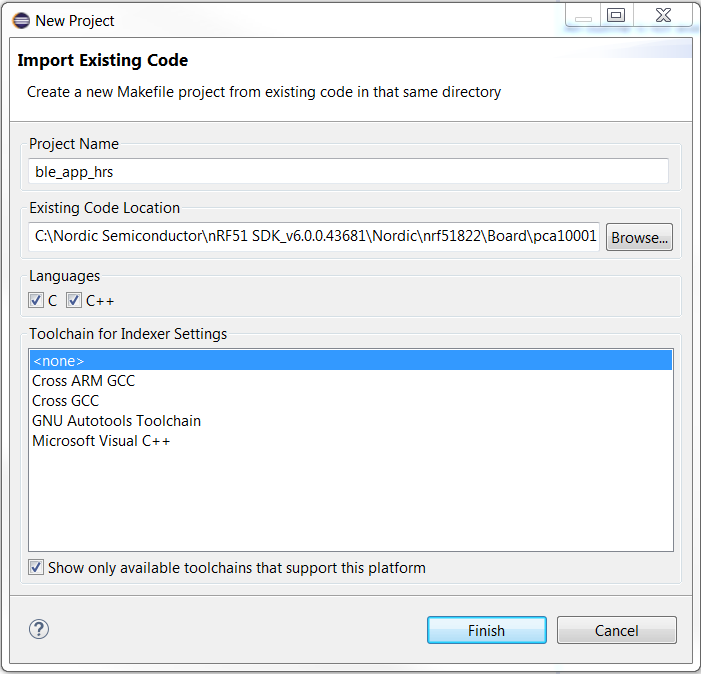
  3. Import an example project from SDK by making a new "makefile project with existing code". The screenshot below does for instance show how to import the heart rate example. You can also choose the Cross ARM GNU toolchain if you wish to make a Nordic project from scratch with auto-generation of makefiles , just make sure to set the toolchain path is defined in your Eclipse environment. image description
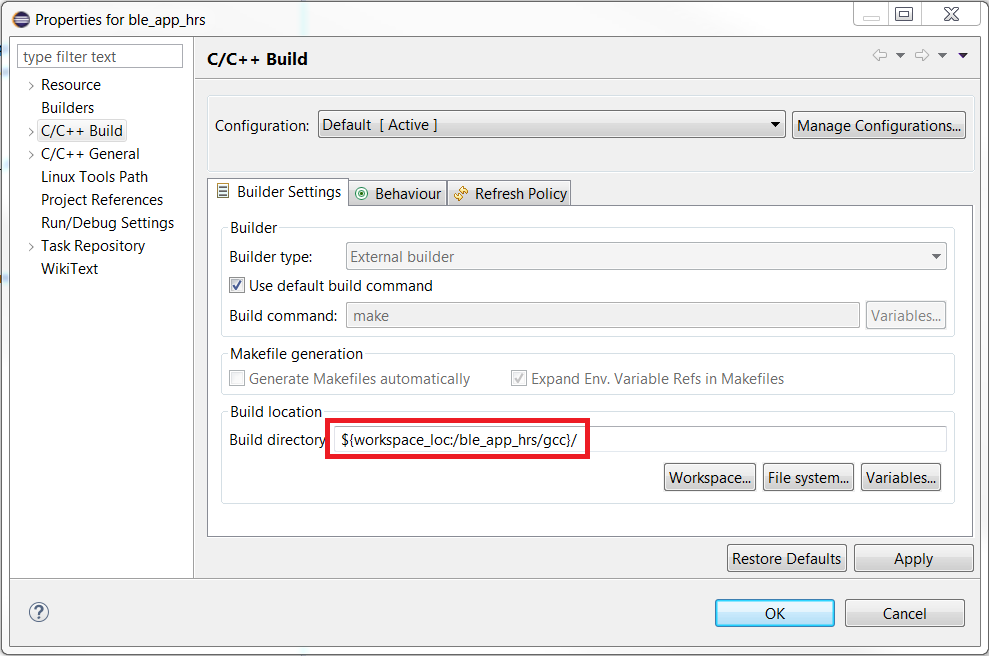
  4. The project should now be visible in your workspace. Then right-click on the project folder and enter properties->C/C++ Build and change the build directory to the gcc folder. Unmark "Use default build command" and type "make" if it is not the default build command. image description
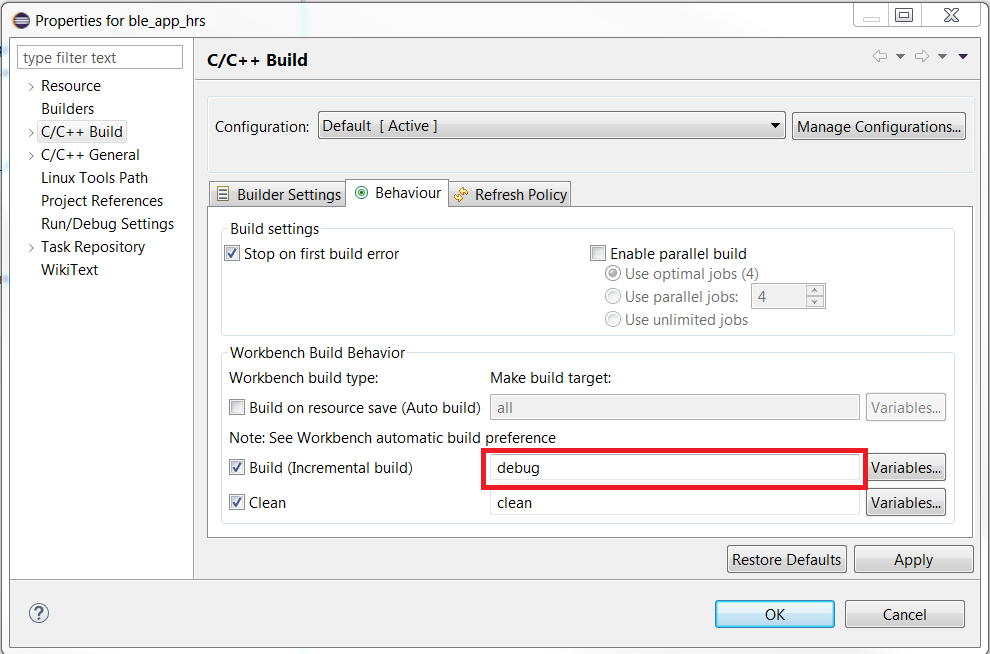
  5. Next we have to tell Eclipse what make option to use during build, which by default is set to 'all'. As defined in the Nordic makefile.common 'all' = 'clean' +'release'. We want to change that to 'debug' in order to enable debugging of the application. It is possible to set the make option by adding new targets to chose what you want to build, but I prefer to set the Build option like shown in screenshot below. This is to ensure that potential auto-build configurations does not suddenly start a build with an unexpected make option.

image description

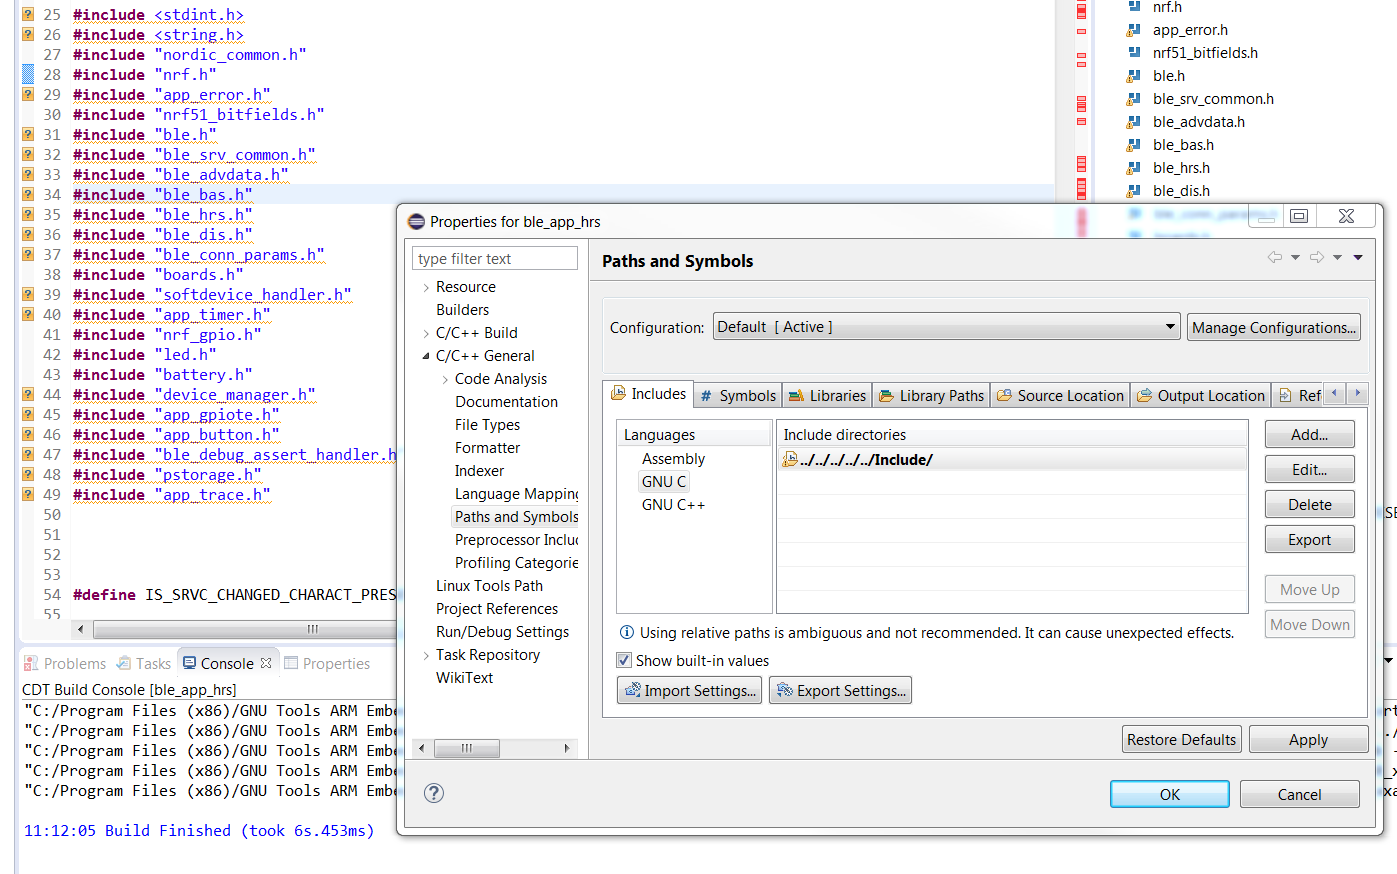
  1. Next step is to rename the Makefile you want to use in the gcc folder. In my case "ble_app_hrs.Makefile" -> "Makefile". If it is preferred to keep the filename the "-f filename" option can be added to the build command instead. The compiler will otherwise not find the Makefile. Now you should be able to successfully build the project. However, despite the successful build you will see that there are several errors in the Eclipse project. This is because Eclipse is not able to automatically index the include files and symbols declared in the Makefile. I have not found an solution for this besides adding the paths and symbols manually. Debugging will still work without adding the paths and symbols manually as Eclipse is a pure IDE and gcc and gdb take care of the build and debug. However, I prefer to add the paths and symbols in Eclipse to better find declarations,references,etc. located outside main in the project. image description.

  2. Indexing or not, the application should be ready for a debugging now. First build the solution by right clicking on the project folder and press "Build project". Then enter tab Run-> Debug Configurations (Alternatively the bug icon in the toolbar) to set up the debug interface. Make sure that the C/C++ Application path is pointing to the .out file of the built.
    image description

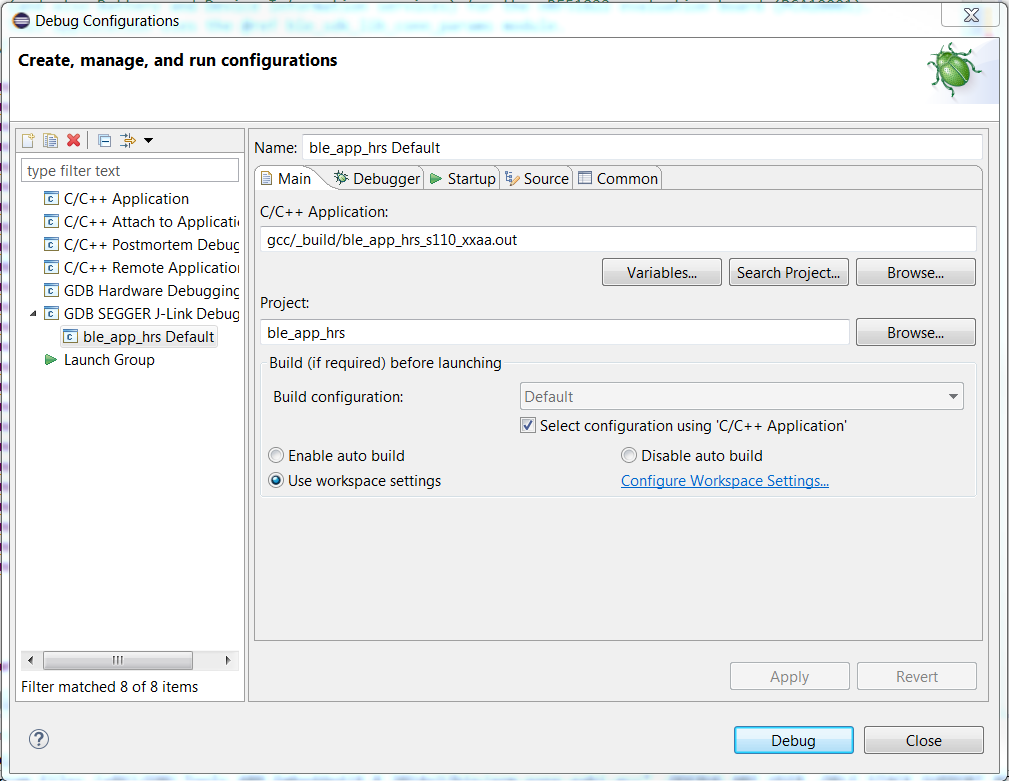
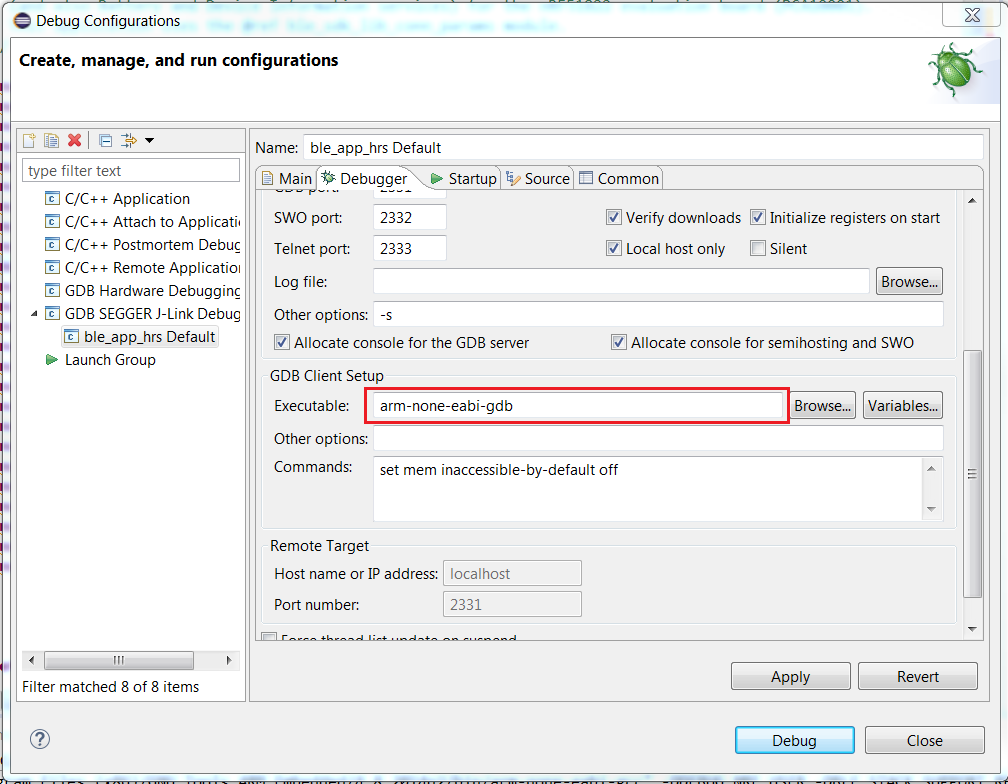
Then set the correct device name in the debugger tab according to your target. See "Supported device name" if you are unsure. Next step is to edit the "jlink_path" variable. Change the path to your latest version of your Segger driver folder (../JLink_Vxx). Then set arm-none-eabi-gdb in the GDB client Setup. SWO can also be disabled under Startup tab as it is not supported by the nRF devices (will only give a warning).

image description

9.That is it. Here is the debug view of the heart rate example:image description

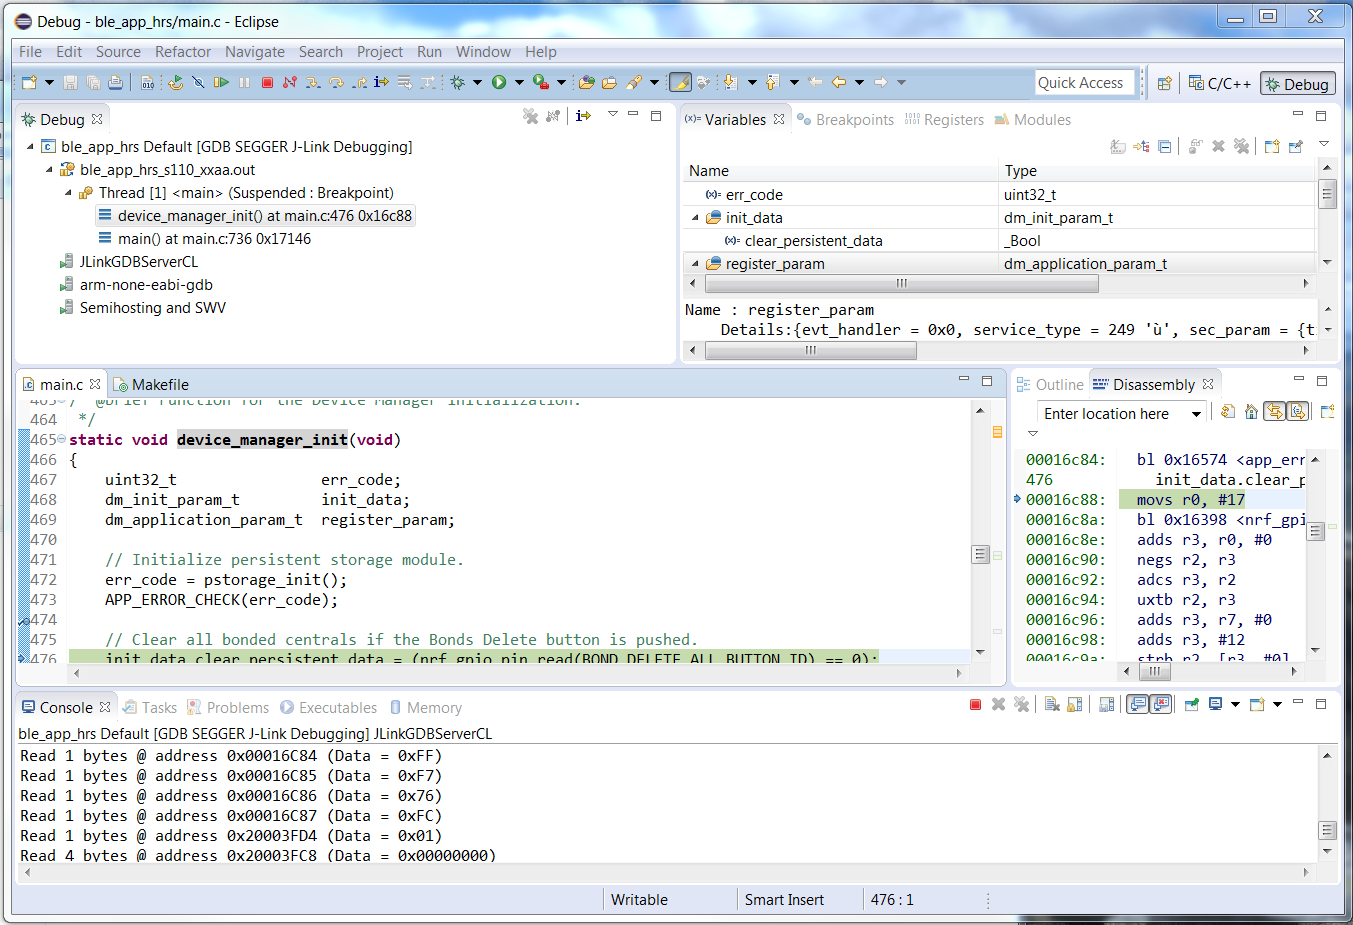
10.Flash downloading can be done with nrfjprog.exe directly from Eclipse. On the run menu, click 'External tools Configuration', select 'program', and then click 'new'. Then set the location of nrfjprog: C:\Program files (x86)\Nordic Semiconductor\nrf51\bin\nrfjprog.exe, and your current working directory: ${workspace_loc}//_build. Then the last step is to provide the nrjprog arguments for programming the hex file: --program{workspace_loc}//_build/.hex --reset. Clicking the 'run' button will then program application to the board.

Troubleshooting

Edit 8.4.2015 - Removed references to deprecated application note.

  • SEGGER J-Link GDB Server V6.00f Command Line Version

    JLinkARM.dll V6.00f (DLL compiled Aug 11 2016 18:36:04)

    -----GDB Server start settings----- GDBInit file: none GDB Server Listening port: 2331 SWO raw output listening port: 2332 Terminal I/O port: 2333 Accept remote connection: localhost only Generate logfile: off Verify download: on Init regs on start: on Silent mode: off Single run mode: on Target connection timeout: 0 ms ------J-Link related settings------ J-Link Host interface: USB J-Link script: none J-Link settings file: none ------Target related settings------ Target device: nRF51422_xxAC Target interface: SWD Target interface speed: 1000kHz Target endian: little

    Connecting to J-Link... J-Link is connected. Firmware: J-Link OB-SAM3U128-V2-NordicSemi compiled Jul 5 2016 08:42:09 Hardware: V1.00 S/N: 681739782 Checking target voltage... Target voltage: 3.30 V Listening on TCP/IP port 2331 Connecting to target...Connected to target Waiting for GDB connection...Connected to 127.0.0.1 Reading all registers Read 4 bytes @ address 0x00000000 (Data = 0x000007C0) Read 2 bytes @ address 0x00000000 (Data = 0x07C0) Target interface speed set to 1000 kHz Resetting target Halting target CPU... ...Target halted (PC = 0x000006D0) R0 = FFFFFFFF, R1 = FFFFFFFF, R2 = FFFFFFFF, R3 = FFFFFFFF R4 = FFFFFFFF, R5 = FFFFFFFF, R6 = FFFFFFFF, R7 = FFFFFFFF R8 = FFFFFFFF, R9 = FFFFFFFF, R10= FFFFFFFF, R11= FFFFFFFF R12= FFFFFFFF, R13= 000007C0, MSP= 000007C0, PSP= FFFFFFFC R14(LR) = FFFFFFFF, R15(PC) = 000006D0 XPSR C1000000, APSR C0000000, EPSR 01000000, IPSR 00000000 CFBP 00000000, CONTROL 00, FAULTMASK 00, BASEPRI 00, PRIMASK 00 Reading all registers Read 4 bytes @ address 0x000006D0 (Data = 0x4C174916) Read 2 bytes @ address 0x000006D0 (Data = 0x4916) Select auto target interface speed (1000 kHz) Flash breakpoints enabled Semi-hosting enabled (Handle on BKPT) Semihosting I/O set to TELNET Client Read 4 bytes @ address 0x000006D0 (Data = 0x4C174916) Read 2 bytes @ address 0x000006D0 (Data = 0x4916) Read 4 bytes @ address 0xFFFFFFFF (Data = 0x00000000) Read 2 bytes @ address 0xFFFFFFFF (Data = 0x0000) Read 4 bytes @ address 0xFFFFFFFF (Data = 0x00000000) Read 2 bytes @ address 0xFFFFFFFF (Data = 0x0000) Resetting target Halting target CPU... ...Target halted (PC = 0x000006D0) Downloading 124 bytes @ address 0x00018000 - Verified OK Downloading 12 bytes @ address 0x0001807C - Verified OK Comparing flash [....................] Done. Erasing flash [....................] Done. Programming flash [....................] Done. Verifying flash [....................] Done. Writing register (PC = 0x00800100) Read 4 bytes @ address 0x00018000 (Data = 0x4C06B510) R0 = FFFFFFFF, R1 = FFFFFFFF, R2 = FFFFFFFF, R3 = FFFFFFFF R4 = FFFFFFFF, R5 = FFFFFFFF, R6 = FFFFFFFF, R7 = FFFFFFFF R8 = FFFFFFFF, R9 = FFFFFFFF, R10= FFFFFFFF, R11= FFFFFFFF R12= FFFFFFFF, R13= 000007C0, MSP= 000007C0, PSP= FFFFFFFC R14(LR) = FFFFFFFF, R15(PC) = 00018000 XPSR C1000000, APSR C0000000, EPSR 01000000, IPSR 00000000 CFBP 00000000, CONTROL 00, FAULTMASK 00, BASEPRI 00, PRIMASK 00 Reading all registers Read 4 bytes @ address 0x00018000 (Data = 0x4C06B510) Starting target CPU... ...Target halted (DBGRQ, PC = 0xFFFFFFFE) Reading all registers Read 4 bytes @ address 0xFFFFFFFE (Data = 0x049083B0) Read 2 bytes @ address 0xFFFFFFFE (Data = 0x0000) Read 4 bytes @ address 0x000007BC (Data = 0x00001000) Read 4 bytes @ address 0x000007B8 (Data = 0x00000C00) Read 4 bytes @ address 0x00000C00 (Data = 0xFFFFFFFF) Read 4 bytes @ address 0x000007BC (Data = 0x00001000) Read 4 bytes @ address 0x000007BC (Data = 0x00001000) Read 4 bytes @ address 0xFFFFFFFF (Data = 0x00001000) Read 4 bytes @ address 0x000007B4 (Data = 0xE7F8461D) Read 4 bytes @ address 0xE7F8461C (Data = 0x00000000) Read 4 bytes @ address 0x000007BC (Data = 0x00001000) Read 4 bytes @ address 0x000007B4 (Data = 0xE7F8461D) Read 2 bytes @ address 0xE7F8461C (Data = 0x0000) Read 4 bytes @ address 0x000007BC (Data = 0x00001000) Read 4 bytes @ address 0x000007B4 (Data = 0xE7F8461D) Read 4 bytes @ address 0x000007B4 (Data = 0xE7F8461D) Read 4 bytes @ address 0x000007B4 (Data = 0xE7F8461D) Read 4 bytes @ address 0x000007B4 (Data = 0xE7F8461D) Read 4 bytes @ address 0xE7F8461C (Data = 0x00000000) Read 4 bytes @ address 0x000007BC (Data = 0x00001000) Read 4 bytes @ address 0x000007B4 (Data = 0xE7F8461D) Read 4 bytes @ address 0x000007B4 (Data = 0xE7F8461D) Read 2 bytes @ address 0xE7F8461C (Data = 0x0000) Read 4 bytes @ address 0x000007BC (Data = 0x00001000) Read 4 bytes @ address 0x000007B4 (Data = 0xE7F8461D) Read 4 bytes @ address 0x000007B4 (Data = 0xE7F8461D)

  • Makefile.common is decprecated in SDK v.7+, and the project makefiles are now standalone. Some of the other changes are that they no longer have the debug target and it's compiled as release with optimization by default. In order to enalbe debugging you need to replace the -O3 option with -O0 and add -g3 in cflags to include debug symbols.

    Please post new questions as a separate post in the question section. This way it's easier to keep track of unanswered questions, and preferably make a link to this post.

  • I'm using SDK 7.0 with Eclipse Luna. With the instructions above and in AN-29, I've been able to build the project (which works from command line too). Setting up debugging through Eclipse is something that doesn't work for me. When I debug the application, all that I see is the following in the console: (I've attached image too) Any help appreciated. There is no issue with the image built since I can download the image through nRFGo studio and it works fine

    image description

    SEGGER J-Link GDB Server V4.96 Command Line Version

    JLinkARM.dll V4.96 (DLL compiled Dec 22 2014 09:51:48)

    -----GDB Server start settings----- GDBInit file: none GDB Server Listening port: 2331 SWO raw output listening port: 2332 Terminal I/O port: 2333 Accept remote connection: localhost only Generate logfile: off Verify download: on Init regs on start: on Silent mode: off Single run mode: on Target connection timeout: 0 ms ------J-Link related settings------ J-Link Host interface: USB J-Link script: none J-Link settings file: none ------Target related settings------ Target device: cortex-m0 Target interface: SWD Target interface speed: 1000kHz Target endian: little

    Connecting to J-Link... J-Link is connected. Firmware: J-Link OB-SAM3U128-V2-NordicSemi compiled Nov 28 2014 10:32:04 Hardware: V1.00 S/N: 681110165 Checking target voltage... Target voltage: 3.30 V Listening on TCP/IP port 2331 Connecting to target...Connected to target Waiting for GDB connection...Connected to 127.0.0.1 Reading all registers Read 1 bytes @ address 0x00000000 (Data = 0xC0) Read 1 bytes @ address 0x00000000 (Data = 0xC0) Read 1 bytes @ address 0x00000000 (Data = 0xC0) Read 1 bytes @ address 0x00000000 (Data = 0xC0) Read 1 bytes @ address 0x00000000 (Data = 0xC0) Read 1 bytes @ address 0x00000000 (Data = 0xC0) Target interface speed set to 1000 kHz Resetting target Halting target CPU... ...Target halted (PC = 0x000006D0) R0 = FFFFFFFF, R1 = FFFFFFFF, R2 = FFFFFFFF, R3 = FFFFFFFF R4 = FFFFFFFF, R5 = FFFFFFFF, R6 = FFFFFFFF, R7 = FFFFFFFF R8 = FFFFFFFF, R9 = FFFFFFFF, R10= FFFFFFFF, R11= FFFFFFFF R12= FFFFFFFF, R13= 000007C0, MSP= 000007C0, PSP= FFFFFFFC R14(LR) = FFFFFFFF, R15(PC) = 000006D0 XPSR C1000000, APSR C0000000, EPSR 01000000, IPSR 00000000 CFBP 00000000, CONTROL 00, FAULTMASK 00, BASEPRI 00, PRIMASK 00 Reading all registers Select auto target interface speed (1000 kHz) Flash breakpoints enabled Semi-hosting enabled (VectorAddr = 0x08) Semihosting I/O set to TELNET Client Downloading 1200 bytes @ address 0x00000000 - Verify failed Downloading 8 bytes @ address 0x000004B0 - Verify failed Downloading 100 bytes @ address 0x000004B8 - Verify failed Writing register (R8 = 0x00000439) Read 1 bytes @ address 0x00000439 (Data = 0xF7) Read 1 bytes @ address 0x00000439 (Data = 0xF7) Read 1 bytes @ address 0x00000439 (Data = 0xF7) Read 1 bytes @ address 0x00000439 (Data = 0xF7) Reading 14 bytes @ address 0x00000439 Read 1 bytes @ address 0x0000033C (Data = 0x05) Read 1 bytes @ address 0x0000033C (Data = 0x05) Read 1 bytes @ address 0x0000033C (Data = 0x05) Read 1 bytes @ address 0x0000033C (Data = 0x05) Reading 14 bytes @ address 0x0000033C Read 1 bytes @ address 0x0000033C (Data = 0x05) Read 1 bytes @ address 0x0000033C (Data = 0x05) Read 1 bytes @ address 0x0000033C (Data = 0x05) Read 1 bytes @ address 0x0000033C (Data = 0x05) Read 1 bytes @ address 0x0000033C (Data = 0x05) Read 1 bytes @ address 0x0000033C (Data = 0x05) Read 1 bytes @ address 0x0000033C (Data = 0x05) Reading 14 bytes @ address 0x0000033C Read 1 bytes @ address 0x0000033C (Data = 0x05) Read 1 bytes @ address 0x0000033C (Data = 0x05) Read 1 bytes @ address 0x0000033C (Data = 0x05) Read 1 bytes @ address 0x0000033C (Data = 0x05) Read 1 bytes @ address 0x0000033C (Data = 0x05) Read 1 bytes @ address 0x0000033C (Data = 0x05) Read 1 bytes @ address 0x0000033C (Data = 0x05) Read 1 bytes @ address 0x0000033C (Data = 0x05) Reading 14 bytes @ address 0x0000033C Read 1 bytes @ address 0x0000033C (Data = 0x05) Read 1 bytes @ address 0x0000033C (Data = 0x05) Read 1 bytes @ address 0x0000033C (Data = 0x05) Read 1 bytes @ address 0x0000033C (Data = 0x05) Read 1 bytes @ address 0x0000033C (Data = 0x05) Read 1 bytes @ address 0x0000033C (Data = 0x05) Read 1 bytes @ address 0x0000033C (Data = 0x05) Reading 14 bytes @ address 0x0000033C Read 1 bytes @ address 0x0000033C (Data = 0x05) Read 1 bytes @ address 0x0000033C (Data = 0x05) Read 1 bytes @ address 0x0000033C (Data = 0x05) Read 1 bytes @ address 0x0000033C (Data = 0x05) Resetting target Halting target CPU... ...Target halted (PC = 0x000006D0) R0 = FFFFFFFF, R1 = FFFFFFFF, R2 = FFFFFFFF, R3 = FFFFFFFF R4 = FFFFFFFF, R5 = FFFFFFFF, R6 = FFFFFFFF, R7 = FFFFFFFF R8 = FFFFFFFF, R9 = FFFFFFFF, R10= FFFFFFFF, R11= FFFFFFFF R12= FFFFFFFF, R13= 000007C0, MSP= 000007C0, PSP= FFFFFFFC R14(LR) = FFFFFFFF, R15(PC) = 000006D0 XPSR C1000000, APSR C0000000, EPSR 01000000, IPSR 00000000 CFBP 00000000, CONTROL 00, FAULTMASK 00, BASEPRI 00, PRIMASK 00 Reading all registers Read 1 bytes @ address 0xFFFFFFFF (Data = 0x00) Read 1 bytes @ address 0xFFFFFFFF (Data = 0x00) Read 1 bytes @ address 0xFFFFFFFF (Data = 0x00) Read 1 bytes @ address 0xFFFFFFFF (Data = 0x00) Read 1 bytes @ address 0xFFFFFFFF (Data = 0x00) Read 1 bytes @ address 0xFFFFFFFF (Data = 0x00) Read 1 bytes @ address 0xFFFFFFFF (Data = 0x00) Setting breakpoint @ address 0x0000033C, Size = 4, BPHandle = 0x0002 Starting target CPU...

  • I have a problem to step 6. could someone help me to add the path and symbols for example ble_app_hrs? I have to understand the mechanism. Thank you so much

  • I appreciate all the feedback regarding this post, but I think that the increasing number of comments regarding problems is making it harder to find the answers for others. I.e., someone looking for a specific solution have to have to read through all comments to see if there's something relevant.

    I think it will be more organized and clear if questions to this blog are posted as separate questions with a link to this blog.

    @jerry_bp: It looks like you you're able to step in main? I have not seen this behavior before, but my first suggestion would be to make sure that you're using the correct softdevice version. s110 version 7 for SDK. 6.x BLE projects. Another option is trying to install the latest Segger drivers.