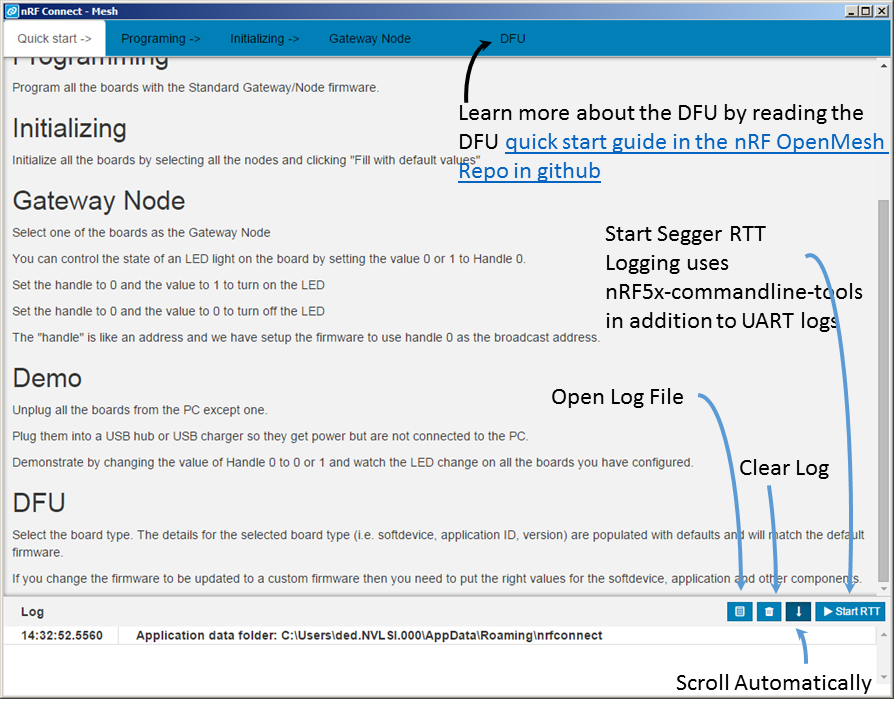
nRF-connect-Mesh PC tool allows the user to demonstrate the nRF OpenMesh and the Mesh Device Firmware Update (DFU).
The Mesh DFU will be used for nRF OpenMesh and the Bluetooth Mesh when it is made available.
The nRF OpenMesh used is v0.8.7. The tool will be updated to support the Bluetooth Mesh when it is available.

DFU quick start guide in the nRF OpenMesh repo
Tools Required
Hardware
Any one of the below x 2 or more, all of the same type is best during the evaluation
nRF51-DKnRF51-DonglenRF52-DK- USB Wall Charger or USB battery pack (optional), Used to move the mesh after programming on the PC
Software
- Segger jlink version 5.10n (attached, see troubleshooting for detailed use)
- nRF5x-commandline-tools-win32 v9.0.0 ( nrfjprog.exe will work for Windows 64bit machines as well)
- nRF-Connect-Mesh zip file (82.3 MB attached)
Steps
-
Install the nrfjprog as part of the
nRF5xcommandlinetoolswin32 -
Unzip the attached
nRF-connect-meshzip file -
Connect all the boards that you need for the Mesh demo to the PC.
-
Wait until the drivers for the boards have been loaded.
-
Run the nRF-Connect executable in the nRF-Connect-Mesh folder
Make sure all boards are identical i.e. nRF51 or nRF52 (do not combine nRF51 and nRF52 in the demo, even though the mesh is capable of handling mixed board sets).
Demo for the LED lights over Mesh using the nrf-connect-mesh
- Program all the boards with the standard gateway firmware in the "Programming" tab.
- Initialize all the boards in the "Initializing" tab by selecting all boards, click "fill with default values" and selecting the "Initialize selected Devices"
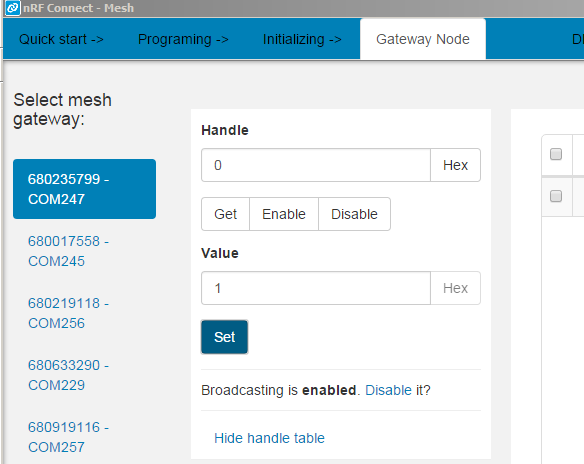
- Click in the Gateway Node tab, select one of the devices as the gateway node
- Handle 0 : control LED 0 on all the boards : "1" will turn it on and "0" will turn it off
- Handle 1 : control LED 1 on all the boards : "1" will turn it on and "0" will turn it off
- Click the "Set" button

You should now be able to control the LED light from the node attached to the PC but setting Handle and value and clicking "set".
Demo for the DFU using the nrf-connect-mesh
- Program all the boards with the standard gateway firmware in the "Programming" tab.
- Initialize all the boards in the "Initializing" tab by selecting all boards, click "fill with default values" and selecting the "Initialize selected Devices"
- Reset all the boards in the "Initializing" tab by selecting all boards and selecting the "Reset Selected Devices".
- Select the hex file that you want to flash for nRF51 or nRF52
- Click on the DFU tab, fill in the text boxes with the suggested values as displayed by default in the text box. Note: The defaults are for nRF51 , If you are using the nRF52 the softdevice id for the nRF52 needs to be modified to match the softdevice used (0x0084)
- The DFU will be done and the boards will change to the new application after the DFU is complete
If you used the default blinky for nRF51/nRF52 you need to re-program the boards to demo the DFU again.
If you want to test DFU repeatedly by just changing the application version, you need to use the hex files nRF51/examples/ble_gateway/bin which is present in the nRF OpenMesh gitub repo (https://github.com/NordicSemiconductor/nRF51-ble-bcast-mesh)
Troubleshooting
Disable Mass storage device in the nRF5x boards
This is typically used when a significant number of boards (more than 4) are attached to the PC. The PC has an anti-virus software that will keep scanning the attached boards seen as USB flash drives and will reduce the stability of the software.Use jlink.exe that is installed as part of Segger jlink
- jlink command used
msddisable - plug out the board
- plug in back in
Downgrade all your nRF5x boards to segger jlink firmware version 5.10n
Segger jlink virtual COM port is used by nRF-connect-mesh and the 5.10n version has been tested with the nRF-connect-mesh. You may need to downgrade to 5.10n if you encounter issues with the DFUInstall segger jlink 5.10n
- run jlink.exe (also known as jlink commander, version 5.10n), (select the correct board if multiple boards are connected), type in the command below
exec invalidatefwThe update firmware popup will appear click "yes" to allow update. - exit jlink commander
- run jlink.exe ( from the 5.10n segger jlink installation), (select the correct board if multiple boards are connected). Yes, you need to run it the second time.
- The update firmware popup will appear again (it appears when you do exec invalidatefw as well), click "yes" for the update and you be flashed with the 5.10n version of the firmware
Remember not to upgrade the jlink firmware board after a downgrade
Reset the boards before attempting DFU
If you encounter issues with the DFU. Select the "Initializing" tab, Select all the connected devices, select "Reset selected devices" the proceed to the DFU tab to do the DFU.Known issues
-
Blue Screen of Death (BSOD) has been noticed once when tested over a few days.
-
The PC became unresponsive once over the few days the tool was tested and needed to be re-booted.
-
DFU throws errors even when the DFU has finished successfully Examples : "dfu err: byref() argument must be a ctypes instance, not 'NoneType'" Other non-fatal errors have also been noticed
-
When a device is reset using "Initalizing -> select the devices -> Reset Selected Devices" it can take 8 seconds for the reset to complete, so care must be taken to wait for the reset to complete before other operations are started


