Nordic and Nowi have partnered to develop an energy autonomous version of the Nordic Thingy:91, an easy-to-use prototyping platform for cellular IoT using LTE-M, NB-IoT and GPS. The energy autonomous Thingy:91 plug-in board enables the user to develop LTE-M or NB-IoT sensor applications which can operate indefinitely without any battery replacement or recharging. With this new plugin board, Nowi has again showcased its strong commitment to reducing industry reliance on primary batteries which are very harmful to the environment.
The plug-in uses Nowi’s NH2 Energy Harvesting PMIC with an onboard voltage supervisor for over voltage protection. The plug-in is specifically designed to easily add energy harvesting to applications running on the Thingy:91. It includes various features like current measurement capabilities, pin-to-pin compatibility with Nordic’s Power Profiler Kit II to optimize the power consumption of the application.
View the video below for a quick understanding of the Energy Autonomous Thingy:91.
Introduction & Features
Nowi Energy Autonomous Thingy:91 Plug-In is a hardware accessory to be used with Nordic Semiconductor’s Thingy:91 prototyping platform. It can be used for the design and development of energy autonomous sensor applications that require LTE Cat-M1 or LTE CAT-NB1/NB2 connectivity.
The board includes all necessary circuitry to safely charge the internal battery of the Thingy:91 using solar energy harvesting.
The key features and components of this accessory board are:
- NH2D0245 energy harvesting PMIC
- Plug-in Photovoltaic (PV) panel expansion board
- Interface for the NH2 output current measurements
- Compatible with Nordic Semiconductor’s Power Profiler Kit II (PPK2)
- Voltage supervisor to protect the battery of the Nordic Thingy:91
Hardware Content
The Nowi Energy Autonomous Thingy:91 Plug-In accessory contains the Plug-In board and three plastic PCB spacers to attach the Plug-In board to the Thingy:91. A PV panel expansion board can be used to attach a solar harvester and guidelines for the dimensions of the PV panel expansion board are given in Figure 1 below. The PV expansion board is symmetrical and has the same shape and dimensions as the PCB of the Thingy:91. The polarity of the pins are given in Figure 1.
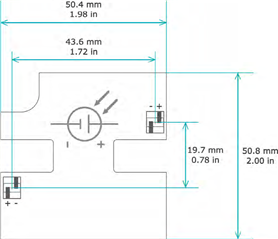
Figure 1. Add-on PV board dimensions and pin polarity
Reference Designs
The hardware design files including schematics, PCB layout files, bill of materials for the Nowi Energy Autonomous Thingy:91 Plug-In accessory are available on the product page of our website. In addition to the information in this document, please consult the following additional documents as required:
Block Diagram
The Nowi Energy Autonomous Thingy:91 Plug-In board consists of two blocks: the energy harvesting block using NH2D0245 and the voltage supervisor block for overcharge protection. The connections between the different blocks and sub-blocks are shown in Figure 2.

Figure 2. Nowi Energy Autonomous Thingy:91 plugin board block diagram
Pin Designations and Functionality
The energy harvesting section of the Plug-In board consists of the NH2D0245. The spring-loaded connector J4 is used to charge the battery in the Thingy:91 with energy harvesting. There are two female connectors provided on the top side of the board at J2 and J3, which provide connection to a PV harvester extension board. At J1 there are current measurement pins exposed to measure the output current of the NH2D0245 energy harvesting PMIC and how much current flows into the Thingy:91.
There is a switch available on the top side at SW1 used to set the NH2D0245 to higher power mode (top position) or lower power mode (bottom position), according to PV panel size on the PV panel expansion board. Typically for outdoor solar harvesting application it is recommended to set this switch to high power mode. Table 1 gives a brief overview of the designators of the connectors and switch with the corresponding functionality.
|
Designator |
Functionality |
Note |
|
J1 |
Current measurement interface |
Compatible with Nordic Power Profiler Kit II |
|
J2 |
PV expansion board connector |
Photovoltaic harvester |
|
J3 |
PV expansion board connector |
Photovoltaic harvester |
|
J4 |
Spring loaded battery connector |
Electrically connected to the battery of Thingy:91 |
|
SW1 |
Power range selection switch |
Switch between high power and low power range |
Table 1. Designators of switch and connectors
The voltage supervisor in the Plug-In board is BD46421G by ROHM Semiconductor. If the battery voltage is higher than 4.2 V the voltage supervisor will disable the NH2D0245, if the battery voltage is lower than 4.2 V the voltage supervisor will keep the NH2D0245 turned on.
PCB Layout
Figures 3 shows the top and bottom layout of the Thingy:91 Plug-In.

Figure 3. Top Layer of PCB layout (left), bottom layer of PCB layout (right)
Measuring Current
There is a current measurement connector present on the Plug-In board at connector J1. Using this connector, the output current of the PMIC, which also corresponds to the current flowing into the Thingy:91, can be measured. Table 2 shows the pinout of the PPK2 compatible current measurement connector. Connect both Grounds to the designated Grounds on the PPK2 (Pin 1 and 4), connect the output of the NH2 (Pin 2) to the input of the PPK2, and connect the output of the PPKII to the input to the Thingy:91 (Pin 3). Please note that the PPK2 software should be set in Ampere mode. When measuring with a regular current meter, connect the positive terminal of the meter to pin 2 and the negative terminal of the meter to pin 3.
|
1 |
2 |
3 |
4 |
|
GND |
Output of the NH2 |
Input to the Thingy:91 |
GND |
Table 2. Pinout Connector J1
Assembly of Nowi Energy Autonomous Thingy:91 Plug-In
Assembling the Thingy:91 Energy Harvesting Plug-In is very straightforward, as shown in the figures 4 to 8 below.
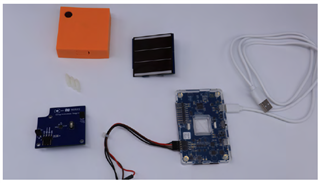
Figure 4. Assembly step 1
Take the Thingy:91, NH2 Plug-In board, PV Board, and the PPK2.
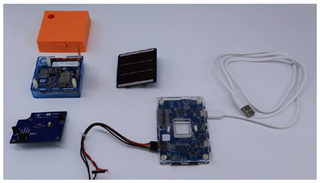
Figure 5. Assembly step 2
Remove the silicon cover of the Thingy:91 and attach the three plastic PCB spacers in the mounting holes of the PCB of the Thingy:91.
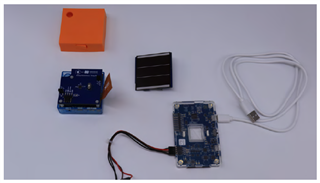
Figure 6. Assembly step 3
Attach the NH2 Plug-In board into the plastic PCB spacers. After attaching the energy harvesting plug-in board to the Thingy:91 using the plastic PCB spacers, a measurement tool of choice can be attached to measure the battery charging current.
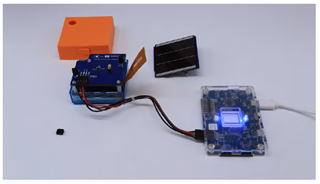
Figure 7. Assembly step 4
After attaching the PPK2, the PV add-on board can be plugged into the energy harvesting plug-in.
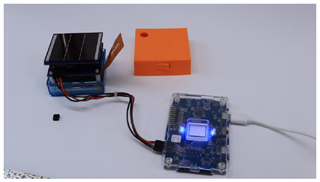
Figure 8. Assembly step 5
After completing all the steps, the battery inside the Thingy:91 will be charged using solar energy harvesting, and the battery charging current can be measured using the PPK2 or different measurement tool.
Application testing
Now we have assembled the device and are able to measure the current, we can test the device by flashing an application. For our test setup, we will make use of the Asset Tracker v2 application found in the nRF Connect SDK v1.7.0. If you are having trouble flashing the device, you can follow this guide for building and programming an application.
First, we can have a look at how much the solar harvesting will generate for our application. With the device turned on, we can measure the current flowing to the battery using the PPK2. In figure 9 we can see that 61 µA is flowing from the NH2 to the Thingy:91. At a battery voltage of 4V, this means 244 µW is being generated by solar harvesting.
(Measured currents may vary depending on the lighting of the environment, measurements were performed indoor at an illuminance of 560 lux)
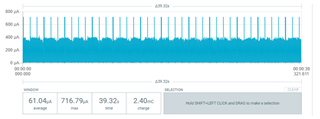
Figure 9: Solar harvesting by Energy Autonomous Thingy:91
How to decrease consumption?
With the generated energy now known, we can have a look at the consumption of the application. There are mutliple options for decreasing the consumption to increase the battery life or even make the application energy autonomous. To start off, one can disable any peripherals unnecessary for their application. Some peripherals that might not be required for your application that can be turned off are:
- LEDs (used for indicating the application state)
- Serial Logging (UART)
- GPS
- GPIO’s
These options can be adjusted by editing the prj.conf file found in the directory of the application. More settings and modules can be adjusted by looking at the autoconf.h file and placing them in the prj.conf file. Here is the modified prj.conf file used in this demo (prj.zip).
With the above settings changed we are going in the right direction to make the application energy autonomous. By directly measuring the current between the battery and the device we can determine the power consumption. We find that with a default transmission interval of 120 seconds the consumption will be over 450 µA. Whilst 61 µA is generated, the consumption will decrease to 390 µA. Since our battery has a capacity of 1400mAh (5.18Wh), this will extend the battery life from 3111 hours to 3589 hours. This is a decent gain, but how can we make the device totally energy autonomous?
Adjusting the transmission interval
When most of the peripherals are turned off, the biggest contributer to the consumption will be the transmissions. Depending on the device mode, the following parameters can be adjusted to change the transmission interval.
When the device is on active mode (default), the following parameter can be added to the prj.conf file to adjust number of seconds between each publication.
CONFIG_DATA_ACTIVE_TIMEOUT_SECONDS=120
When the device is in passive mode, the following parameter can be added the prj.conf file. In this mode the device will wait for the specified duration until a movement triggers the next update.
CONFIG_DATA_MOVEMENT_RESOLUTION_SECONDS=120
In passive mode, a movement timeout can also be set to send data not dependent on a minimum time interval. This can be done by adding the following line to the prj.conf file.
CONFIG_DATA_MOVEMENT_TIMEOUT_SECONDS=3600
With this knowledge of adjusting the transmission parameters, we can find the break-even point to make our application energy autonomous. The graph in figure I shows the the change in consumption while increasing the interval time.
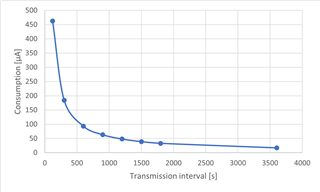
Figure 10: Device consumption vs. transmission interval
By looking at the graph we find that at a transmission interval of approximately 900 seconds the application will be energy autonomous. If you are curious on how to adjust multiple parameters to decrease the consumption even more, have a look at Nordic’s Online Power Profiler for LTE to estimate the consumption of your application.
Acronyms and Abbreviations
LTE-M: Long Term Evolution for Machines
NB-IoT: Narrowband Internet of Things
PMIC: Power Management Integrated Circuit
Li-Po: Lithium-Polymer
SiP: System-in-Package
PCB: Printed Circuit Board
PPK2: Power Profiler Kit II


