

![]()
The Zephyr Project RTOS
The Zephyr Project RTOS is a recent effort by the Linux Foundation to provide the embedded world with a free, secure and fully-featured Real Time Operating System. It is designed from the ground up to be a modern, scalable, secure and responsive RTOS with a clear focus on IoT protocols and foundations. This open source RTOS is Apache 2.0 licensed and has a fully open development model
Recently Nordic contributed ports to all of our Cortex-M based ICs (nRF51, nRF52832 and nRF52840) as well as a fully featured, open source BLE Controller (Link Layer + HCI)that is highly optimized for the nRF5x family of ICs. This means that if you own any of the Nordic Development Kits for the nRF5x series you can clone, build and run Zephyr today and take advantage of all the features that it enables, including many standard BLE profiles, IPv6 over BLE, and a rich set of APIs and functionality that one would expect from a modern RTOS. On top of that every single line of code, including the BLE Host and Controller, are fully open source, allowing you to tweak and modify its behaviour or even extend it at will. You can even build your own controller and then use it to control it from an external Host stack or run the rest of the RTOS on your desktop computer using QEMU!
Here are some of the features that Zephyr supports:
Architectures:
- ARM Cortex-Mx
- Intel x86
- ARC
- Synopsys nios2
- RISC-V
- Tensilica Xtensa
- MIPS (upcoming)
Real-time kernel:
- Cooperative and preemptible threads
- Work queues and delayed work
- Semaphores and mutexes
- FIFO, LIFO queues, mailboxes, message passing and pipes
- Memory slabs and pools
- Idle management, atomic operations and FPU control
Device Drivers:
- Scalable device driver model with power management
- Broad range of external sensor drivers for common devices
- Support for CMSIS and external vendor driver integration
- USB device, CDC ACM and Mass Storage support
Bluetooth Low Energy:
- Full BLE Controller, 5.0 compliant (only nRF5x ICs supported)
- Native and flexible BR/EDR and BLE Host
- Support both for combined (Host+Controller) or independent builds
Networking:
- Native, optimized IPv4 and IPv6 dual stack with efficient memory and power management
- RPL, CoAP, MQTT and SSL support
Build and debug:
- Flexible and powerful configuration system based on Kconfig
- GCC and Clang support
- GDB and Segger RTT support
Running Zephyr on nRF5x
Zephyr currently supports the following Nordic ICs:
- nRF51822 (all variants)
- nRF52832
- nRF52840
Additionally, there's built-in support for the following nRF5x-based boards:
- nRF51 DK
- nRF52 DK
- nRF52840 PDK
- Linaro's 96boards Carbon (BLE IC only)
- Linaro's 96boards Nitrogen
- BBC micro:bit
- RedBear BLE Nano
- RedBear BLE Nano 2
- Arduino 101 (BLE IC only)
Important note on custom or additional boards: If your board is similar to one of the above supported ones but does not include a 32KHz external crystal, you may have to include the following lines in your prj.conf:
CONFIG_CLOCK_CONTROL_NRF5_K32SRC_RC=y
CONFIG_CLOCK_CONTROL_NRF5_K32SRC_250PPM=y
Since the internal RC would then need to be used as the low frequency source.
Using the nRF52832 and the nRF52 DK as an example, let's go through the steps of building, flashing and running Zephyr on it. If you want to use the official documentation instead of following this guide, please refer to:
NOTE: This instructions are valid for macOS and Linux. To build on Windows please refer to the official documentation
First we need to obtain and install a toolchain. The following toolchains are supported:
- Linux: Zephyr SDK, GNU ARM Embedded
- macOS: GNU ARM Embedded
Assuming we go with GNU ARM Embedded and that you have a working native compiler and basic toolset on your machine, you can then follow the steps below:
-
Download and unpack GNU ARM Embedded to the folder of your choice. In this manual we will assume you've unpacked it in ~/gccarmemb/
-
Export the following environment variables:
$ export GCCARMEMB_TOOLCHAIN_PATH="~/gccarmemb/"
$ export ZEPHYR_TOOLCHAIN_VARIANT=gccarmemb
- Clone the repository to obtain Zephyr's source code:
$ git clone https://github.com/zephyrproject-rtos/zephyr.git
- At the root folder of your freshly cloned repository, run:
$ source zephyr-env.sh
- Now you are ready to build. Let's start with a simple beacon example:
$ cd samples/bluetooth/beacon
$ mkdir build && cd build
$ cmake -DBOARD=nrf52_pca10040 ..
$ make
-
To flash the image into the board you will need to download and install the JLink Software and Documentation Pack and the nRF5x command-line tools. Additional information about Segger J-Link in Nordic nRF5x boards can be found in the Nordic nRF5x Segger J-Link doc page
-
Now you are ready to use nrfjprog to erase and program the board:
$ nrfjprog --eraseall -f nrf52
$ nrfjprog --program outdir/nrf52_pca10040/zephyr.hex -f nrf52
$ nrfjprog --reset -f nrf52
or simply
$ make flash
- When pluggin in the board, a serial communications port will have been detected by your operating system. Use your favourite terminal program to view the console output of the program you have just flashed (115k2, 8N1), for example:
$ minicom -D /dev/ttyACM0 -b 115200
- Use any device capable of scanning to make sure Zephyr's beacon is advertising correctly
Building a BLE Controller
Using Zephyr's built-in, Nordic-contributed, BLE Controller you can actually turn any of your nRF5x-based boards into a fully featured, standard BLE Controller than you can use with external protocol stacks. The Controller supports nRF51 and nRF52, and you can configure it to support any number of connections in any role.
To do so, you only need to compile the hci_uart sample:
$ cd samples/bluetooth/hci_uart
$ mkdir build && cd build
$ cmake -DBOARD=nrf52_pca10040 ..
$ make
After that, you can flash the .hex file to your board and you already have a fully-featured BLE Controller ready to accept HCI commands. The UART settings are as follows:
- Baudrate: 1Mbit/s
- 8 bits, no parity, 1 stop bit
- Hardware Flow Control (RTS/CTS) enabled
Using the BLE Controller with Linux's BlueZ
Once you have built and flashed a BLE Controller to your Development Kit, you can even try it out with Linux's built-in Bluetooth stack, BlueZ!
Here's a short guide to achieving that, full instructions can be found in the Using BlueZ with Zephyr documentation page.
- First of all make sure you have a recent Linux kernel installed (at least 4.10) and a modern (5.45+) version of the BlueZ userspace tools. For some of the tools, and depending on what your distribution bundles, you might need to compile BlueZ from scratch. To do so issue the following commands:
$ git clone git://git.kernel.org/pub/scm/bluetooth/bluez.git
$ ./bootstrap-configure --disable-android --disable-midi
$ make
You can then find btattach, btmgt and btproxy in the tools/ folder and btmon in the monitor/ folder.
-
Compile and flash the hci_uart example as shown above
-
On a separate terminal, open btmon to be able to observe all HCI traffic between BlueZ and the controller:
$ sudo btmon
- Open another terminal, attach the controller to the system:
$ sudo btattach -B /dev/ttyACM0 -S 1000000 -P h4
- Open a third terminal and open btmgt:
$ sudo btmgmt --index 0
NOTE: the "--index" option is the controller index. Depending on whether you already had one or more controllers connected this could be a number from 0 to N.
- From the btmgmt console assign any random static address to the controller (only required for BlueZ < 5.45):
[hci0]# static-addr FF:02:03:04:05:FF
- Power on the controller:
[hci0]# auto-power
- Now you are ready to do whatever you want with it, you could for example scan for devices:
[hci0]# find -l
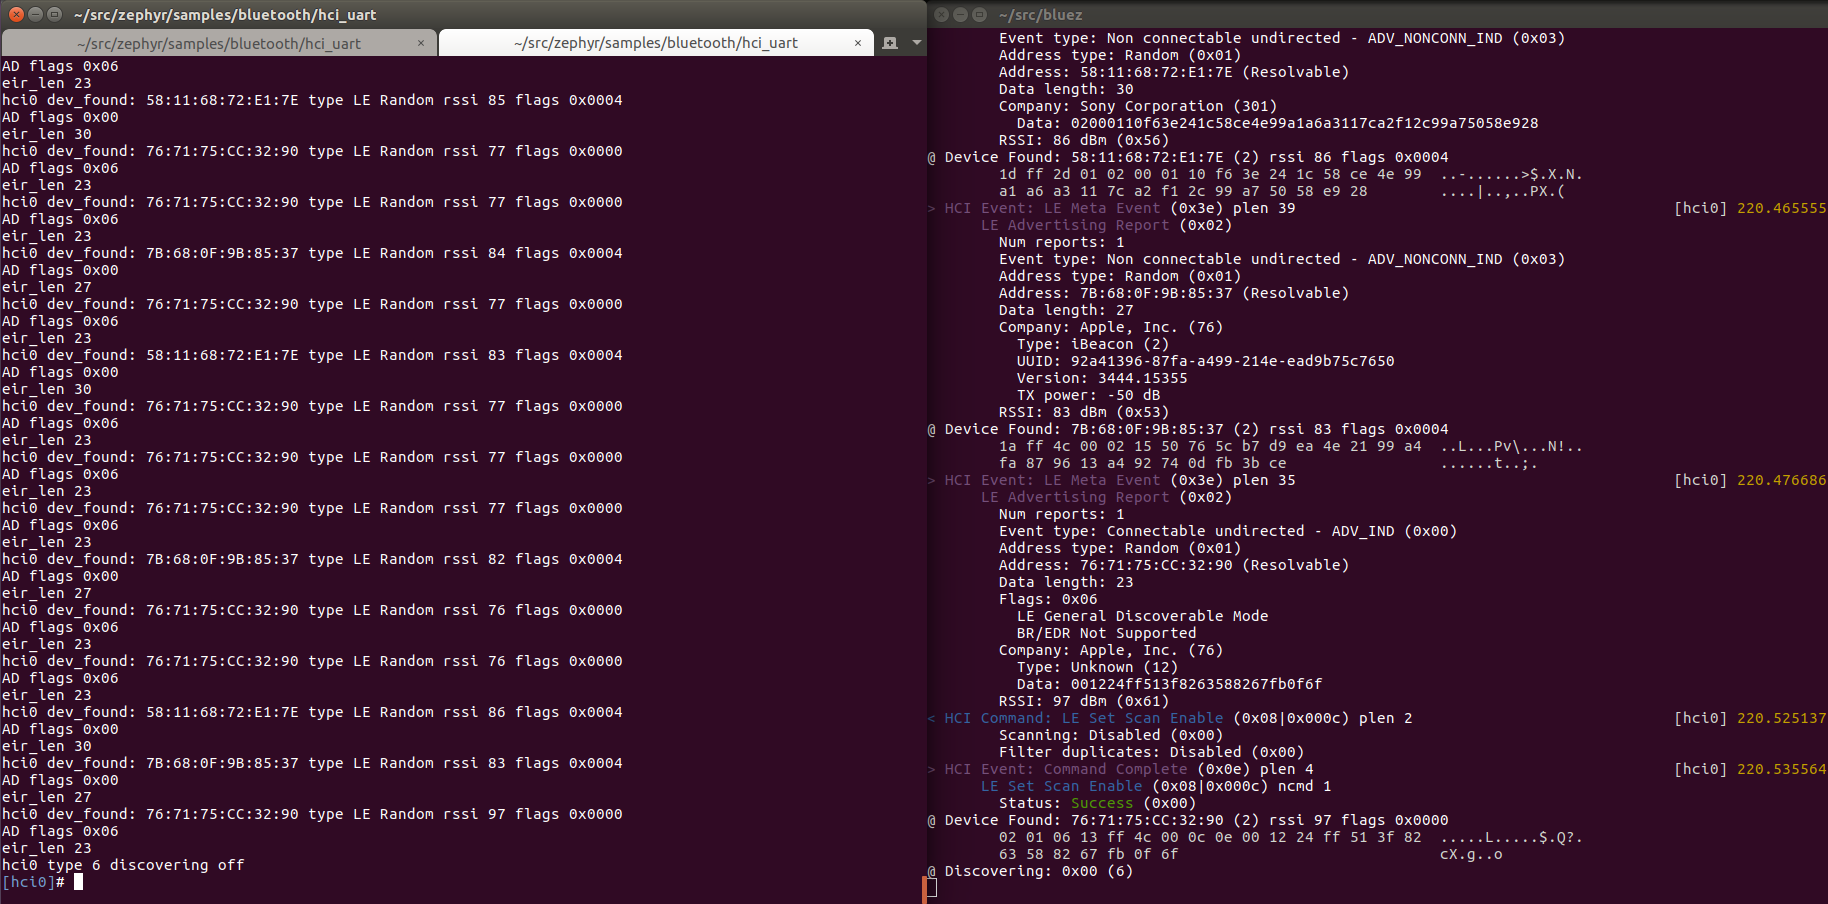
Additional documentation can be found in the btmon, btattach and btmgmt man pages.
Note: We recommend enabling the experimental features in BlueZ in order to access all of the BLE functionality. To do that edit:
/lib/systemd/system/bluetooth.service
And make sure that you include the -E option in bluetoothd's ExecStart:
ExecStart=/usr/libexec/bluetooth/bluetoothd -E
After that reload and restart the daemon:
$ sudo systemctl daemon-reload
$ sudo systemctl restart bluetooth
Using the BLE Controller build to run the RTOS from QEMU
Another useful feature of Zephyr is the possibility to run all or part of its codebase from QEMU, allowing you to develop and debug directly on your computer, no flashing or remote debugger required.
To enable BLE development with QEMU, first follow the instructions on the section above to build and flash a BLE Controller build onto your Development Kit. Additionally you will need to install the Zephyr SDK to compile for QEMU, since you cannot use GCC ARM Embedded at this point for it. To install the SDK (Linux only) follow the steps detailed here.
-
Make sure you have a recent Linux kernel installed (at least 4.6) and a modern (5.42+) version of the BlueZ userspace tools.
-
Compile and flash the hci_uart example as shown above
-
On a separate terminal, open btmon to be able to observe all HCI traffic between BlueZ and the controller:
$ sudo btmon
- Open another terminal, attach the controller to the system in raw mode (note the -R):
$ sudo btattach -B /dev/ttyACM0 -S 1000000 -R
- In yet another terminal, open an instance of btproxy, which will expose the controller to QEMU:
$ sudo btproxy -i 0 -u
NOTE: Replace -i 0 with the index corresponding to your Zephyr-based BLE Controller
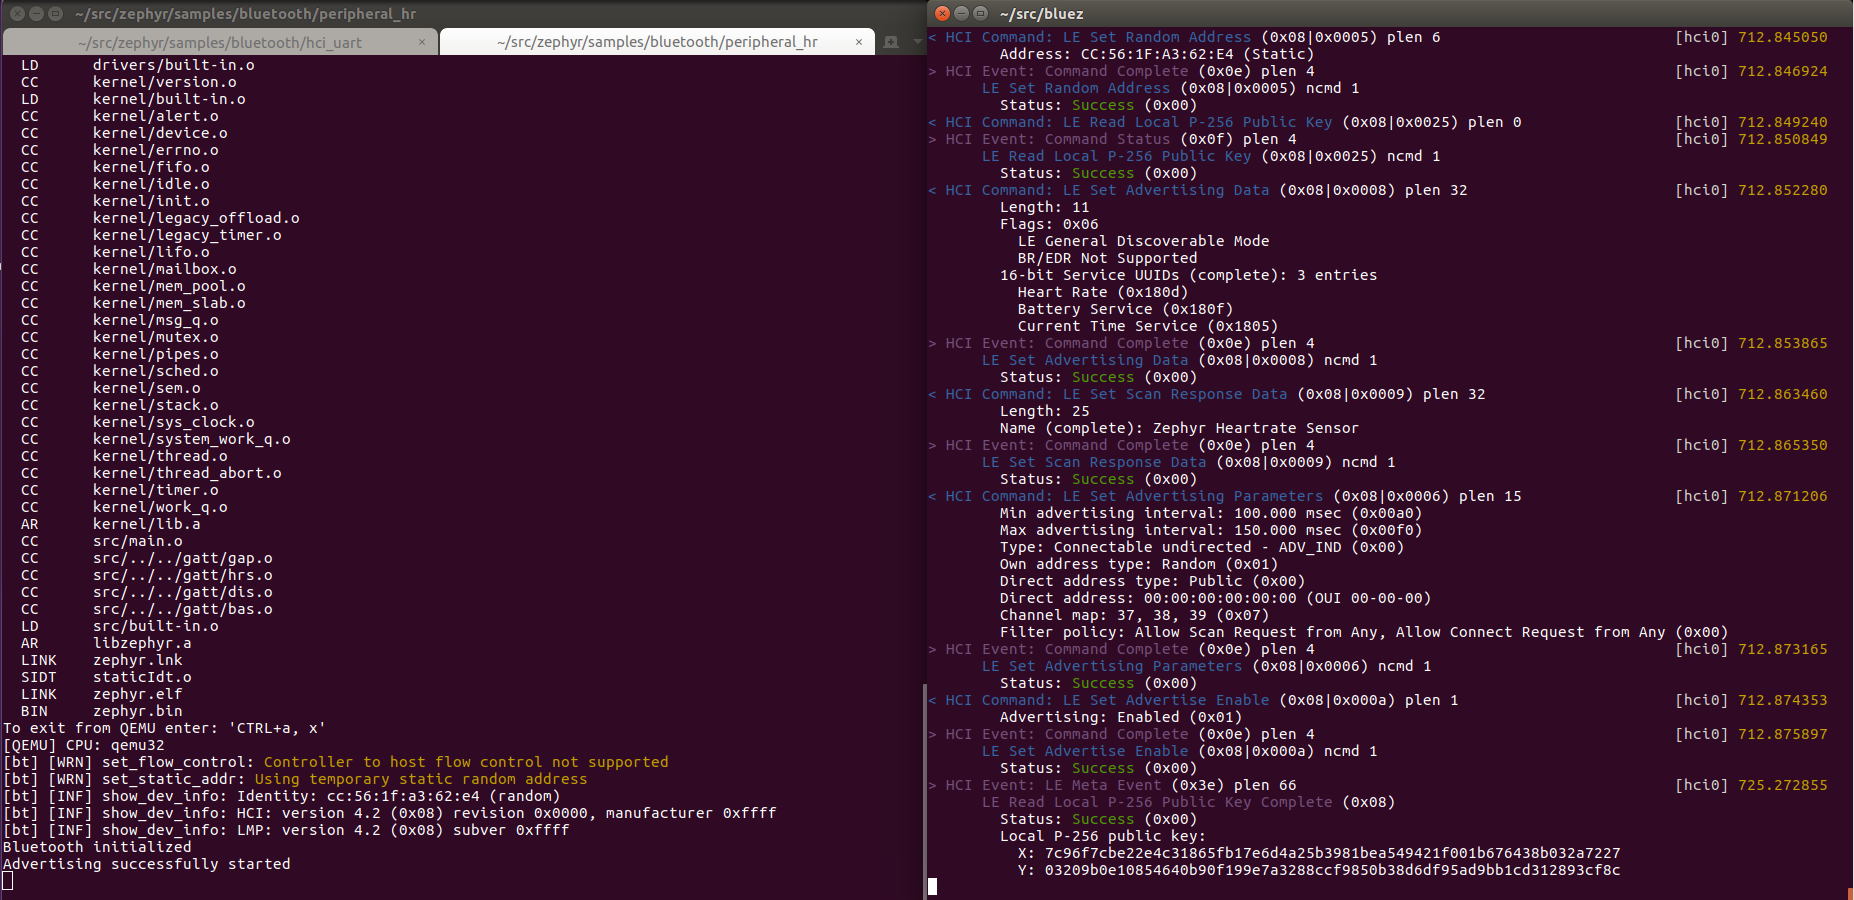
- Open a fourth terminal and choose any of the bluetooth samples available, in this case we'll try the peripheral_hr one:
$ cd samples/bluetooth/peripheral_hr
- Finally you are ready to compile for QEMU and run:
$ make qemu
At this point you are running the application, RTOS and the Bluetooth Host on QEMU locally on your development computer, but the controller on the nRF5x on the Development Kit. They interface using standard HCI, and you will see all traffic being sent between the two in your btmon window.
Happy coding! If you try Zephyr out on the nRF5x and have feedback for us, please feel free to leave a comment in the blog post or tweet to us at @NordicTweets.
Also if you want to get involved with Zephyr, or simply need help as a user, you can join the Zephyr mailing list or join the #zephyrproject IRC channel.


