

I was looking at a way to run MicroPython on an nRF91 Series development kit to do a quick prototype with some existing Python code. The MicroPython Zephyr port was already quite advanced, so I added the code necessary to manage the cellular IoT and GNSS functions. Thinking that others could use this functionality, I created a GitHub repository with pre-compiled MicroPython binaries for nRF91 Series development kits and some Python samples. With this repository, you can prototype directly with Python without compiling the MicroPython application binaries yourself.
In this blog, I'll walk you through how to load those binaries onto your own development kit, create a filesystem, and load the Python files necessary to create an asset tracker. The Python files also have some hints on how to add your own custom data to the asset tracker, such as temperature and humidity, to prototype a cold chain solution.
Table of Contents
Introduction
This project is intended to show how to use an nRF91 Series device and nRF Cloud to create an asset tracker using MicroPython. The format used for transmitting the data to nRF Cloud is similar to the Zephyr Asset Tracker v2 application, so no changes are required on the cloud side.
To follow the steps of this project, you will need:
- A development kit for an nRF91 Series device
- An account on nRF Cloud
- Knowledge of MicroPython development tools, such as mpremote or Thonny
MicroPython allows you to quickly create a demonstration project and modify it to suit your needs. This blog will show how to do so with compiled binary executables for your development kits (DKs). As a project moves towards professional application development, there are some things to keep in mind about this demo approach:
- The binary executable MCUBoot uses default development keys, which means that there is no security provided against someone replacing the application.
- If you are creating custom hardware, any deviation from the DK hardware will require changes to the Zephyr-based source code for the MicroPython port.
NOTE: This is an open-source, community-supported project. It is not an official Nordic project, and the DevZone team cannot provide support. If you have questions, you can get community support in the ’Zephyr port’ channel in the MicroPython Discord server, or the issues section of the GitHub repositories listed below. For supported professional application development, see the nRF Connect SDK resources at the end of this blog.
What is MicroPython
![]() MicroPython is an open-source implementation of Python 3.x that runs on microcontrollers. It is maintained by Damien George and Jim Mussared. You can find the latest version of MicroPython on GitHub. Note that for this blog, and to run on the nRF91 Series devices, I am using a modified version of MicroPython. The modified version is compiled with nRF Connect SDK. I am providing binaries and samples in a GitHub repository so you don't need to compile MicroPython to use on an nRF91 Series development kit. If you'd like to port this to a custom board, see the ”Porting to another board” section below for more details.
MicroPython is an open-source implementation of Python 3.x that runs on microcontrollers. It is maintained by Damien George and Jim Mussared. You can find the latest version of MicroPython on GitHub. Note that for this blog, and to run on the nRF91 Series devices, I am using a modified version of MicroPython. The modified version is compiled with nRF Connect SDK. I am providing binaries and samples in a GitHub repository so you don't need to compile MicroPython to use on an nRF91 Series development kit. If you'd like to port this to a custom board, see the ”Porting to another board” section below for more details.
You might have also heard of CircuitPython, which is a fork of MicroPython that is maintained by Adafruit. CircuitPython requires devices to have a USB device interface, while MicroPython does not.
There are several ports of MicroPython to different microcontrollers. The one that is interesting for use with the nRF91 Series devices is the Zephyr port. I added the Cellular and GNSS functionalities of the nRF91 Series devices on the existing Zephyr port and compiled it using the nRF Connect SDK to provide the binaries that I am using for this blog.
Get MicroPython working
The nRF91 Series devices have two separate processors: the application and modem cores. The development kits come with firmware pre-loaded, but we must update the application core to the MicroPython binary. At the same time, we should update the modem firmware to make sure that it is supported by the MicroPython application.
Load the application and modem binaries
- Download the MicroPython binary for your development kit
- Download the latest modem firmware for your device: 1.3.5 or later for nRF9160 here; 2.0.0 or later for nRF91x1 here
- Download and install nRF Connect for Desktop
- Use the Programmer application to program the modem firmware and application Hex file onto your development kit.
Connect to REPL
The MicroPython command line (REPL) is on UART0 of the nrf91xx device. On the development kits, this UART is connected to the first Virtual COM port exposed on the USB connector of the board.
Use your favorite MicroPython utility to connect to REPL. Some common examples are Thonny and mpremote. I will use mpremote for the examples here.
The following command will list the available serial ports. It will be the first one listed as SEGGER. In my case below, it is /dev/ttyACM0:
$ mpremote devs /dev/ttyACM0 001050951800 1366:1059 SEGGER J-Link
/dev/ttyACM1 001050951800 1366:1059 SEGGER J-Link
Now connect to REPL, replacing /dev/ttyACM0 with the serial port assigned to your development kit:
$ mpremote connect /dev/ttyACM0
Connected to MicroPython at /dev/ttyACM0
Use Ctrl-] or Ctrl-x to exit this shell
>>>
Create a file system
This step only needs to be done once and will create the filesystem on the external flash of the development kit. On the REPL prompt, enter:
>>> import os >>> from zephyr import FlashArea >>> block_dev = FlashArea(FlashArea.STORAGE, 4096) >>> os.VfsLfs2.mkfs(block_dev) >>> os.mount(block_dev, '/flash') The filesystem will be automatically mounted after every reboot once it’s been created.
You should now exit from REPL so you can install the MicroPython application files. See the next section for details on what files are necessary.
Install Tracker code
You will need to install three Python files onto your new filesystem. From the helper scripts directory, download the following:
- board file for your kit, found in the board_support directory
umqtt.pynrfcloud_mqtt.py
From the asset tracker directory, download:
tracker.py
If using a board other than the nRF9161 DK, change the following line in tracker.py to match your board:
import nrf9161dk as board
Now install all the files. For example, with mpremote:
$ mpremote connect /dev/ttyACM0 cp tracker.py :tracker.py$ mpremote connect /dev/ttyACM0 cp umqtt.py :umqtt.py$ mpremote connect /dev/ttyACM0 cp nrfcloud_mqtt.py :nrfcloud_mqtt.py$ mpremote connect /dev/ttyACM0 cp nrf9161dk.py :nrf9161dk.py
Onboard your kit to nRF Cloud
If your development kit has already been claimed to your nRF Cloud account, you can skip this step and go to the "Run the Tracker" section. The development kit might have been added even if you were running a Zephyr example, such as Asset Tracker v2.
If the development kit has not been added, then follow these steps:
Get back into REPL:
$ mpremote connect /dev/ttyACM0
Run the provisioning loop, which makes the device try to connect to nRF Cloud. This is necessary since Nordic development kits use Just In Time provisioning, which means the device must first present its device certificate before you can claim it:
>>> import tracker >>> tracker.provision()While that is running, log into your nRF Cloud account, go to the Devices page, and click on “Add Devices”

On the pop-up, select LTE Device.
The next window that appears is the Add LTE Device pop-up window, asking you to enter the Device ID and the PIN/HWID.
The Device ID is the text ‘nrf’ followed by the 15-digit IMEI. Both the IMEI and the PIN/HWID can be found on the white sticker on the board. Click “Add Device”. If it gives you an error about the device not being found, make sure the provisioning loop is able to connect to the network. For example, is your SIM card activated?
Run the Tracker
You should be able to run the Asset Tracker example successfully now. By default, the application prints most events. You can change that in the interrupt handler that is in tracker.py.
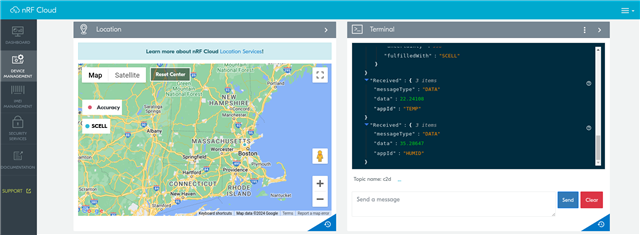
>>> import tracker >>> tracker.run() Registration status: 2 RRC Mode: Connected Registration status: 5 PSM parameter update: TAU 3240, Active time -1 Connected to nRF CloudRRC Mode: Disconnected RRC Mode: Connected Location found via Cellular: Latitude 42.XXXXX, Longitude -71.XXXXX, accuracy 998.0 Location found on 2024/1/17 at 16:51:27.539 RRC Mode: Disconnected The application will attempt to get the location every 30 minutes. First, it will try GNSS for 2 minutes, assisted with nRF Cloud AGNSS data. If that times out, it will attempt to use nRF Cloud’s Multi-cell and Single-cell Services to get the location based on nearby cellular towers.
Additional data
For my testing, I added an SHT20 temperature and humidity sensor connected to the development kit’s I2C port. In the helper scripts directory, you can find a simple driver for it called i2c_sht20.py. Install that on the filesystem, and the tracker file is already setup to take care of the rest.
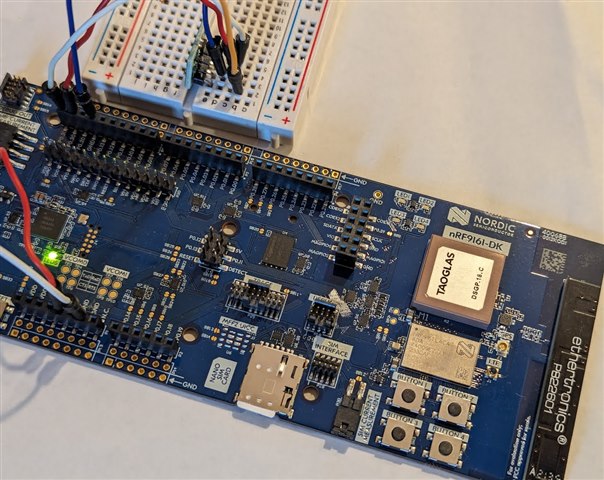
Note that power for the SHT20 is 2.1V to 3.6V, while the default I/O voltage for the nRF91xx development kit is 1.8V. Since the I2C SDA and SCL pins are open drain, there is no need for voltage translation, but you will need to find a way to generate the voltage just to power the SHT20. You could use an external 5V to 2.5V (or 3.3V) power supply and connect to the 5V output on the Arduino shield connector of the development kit. I used an nPM1300DK to do that.
Viewing the data
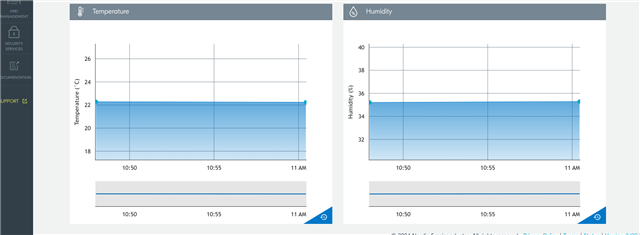
Navigate to the device’s page in nRF Cloud, and you’ll be able to see the location, and if you have the sensor installed, the temperature and humidity:
Next steps
The GitHub for this project has additional examples that you can try on your development kit. There is an application showing how to use MQTT to send and receive data via the HiveMQ broker. You can also use Bluetooth Low Energy to provision the nRF7002DK onto a Wi-Fi network.
If you would like to contribute your own Python application to the repository, feel free to submit a Pull Request!
Porting to another board
Currently the code for running MicroPython on these boards is on a fork that you can find here. Note that you will want to build using the nRF Connect SDK, instead of the regular Zephyr build process. The instructions to do that are here.
Join the MicroPython Discord server to discuss this port. If you find an issue, you can enter one in one of the Github repositories linked above.
Closing
In this blog post, we showed how to run Python code on an nRF91 Series device, through these easy steps:
- Update the application with a port of MicroPython
- Create a filesystem to be able to store files on the device that persist across reboots
- Run the Python files
The example showed how to create a simple Asset Tracker that uses GNSS and nearby cellular towers to locate the device. In addition, it shows how you can add your own custom data to be displayed on nRF Cloud.
The nRF Connect SDK Asset Tracker v2 application, written in C, has a lot more customizations that can be done if you’re looking to create an Asset Tracker. This simple Tracker written in Python shows an easy way to get started if you prefer to use Python to create a demonstration project.
Using the nRF Connect SDK
As I mentioned in the introduction, after using MicroPython for a demonstration project, you might want to move to using the nRF Connect SDK if the project moves forward to professional development. There are several reasons that you might want to do that:
- Firmware security: having MCUBoot only run an application binary that you have signed, to prevent hijacking of your product.
- Custom hardware will require using the nRF Connect SDK at least for re-compiling the MicroPython binary
- Reducing flash and SRAM usage, as well as some power consumption
To accelerate your development with the nRF Connect SDK, check out the free courses on the Nordic DevAcademy.
