
This tutorial shows you how to get started with RIOT OS on nRF52832 using IPv6 over BLE communication.
To fully understand this tutorial you will need to have minimum knowledge of Linux environment and shell. An nRF52 Development Kit and Bluetooth 4.0-compatible hardware are required to run the examples.
This tutorial should cover everything to get you started.
Introduction
From https://riot-os.org:
"RIOT powers the Internet of Things like Linux powers the Internet. RIOT is a free, open source operating system developed by a grassroots community gathering companies, academia, and hobbyists, distributed all around the world."
RIOT is a powerful open-source operating system for small MCUs like the nRF52832. Being designed from the ground up for IoT applications, it offers a fully pre-emptible micro-kernel, a nice API and extensive networking capabilities.
For more information, check out https://github.com/RIOT-OS/RIOT/wiki/Introduction
1.) Installing the necessary tools
Throughout the rest of the tutorial we’ll assume that we’re using Ubuntu 16.04 Linux distribution. In order to compile for the nRF52 DK platform, you'll need the following tools:
a) Segger JLink Software for Linux (https://www.segger.com/jlink-software.html)
Download and install “Software and documentation pack” using a deb package appropriate for your machine (32bit or 64bit). In order to use the nRF52 DK as a regular Linux user, edit (using sudo) the /etc/udev/rules.d/99-jlink.rules file and replace the ATTR keyword with ATTRS.
b) The remaining tools can be installed using Ubuntu’s package manager:
sudo apt-get install gcc-arm-none-eabi gdb-arm-none-eabi \
    make unzip git \
    python python-serial \
    bluez libcap-ng0
c) Clone the RIOT OS repository:
cd $HOME
git clone https://github.com/RIOT-OS/RIOT
d) Find out your nrf52dk's serial tty
Your nrf52dk will get a serial device file like /dev/ttyACM0. Depending on how many USB ACM serial devices you have in your computer, it might get a different number than "0".
In order to find out the correct device file, powercycle the nrf52dk using it's power switch, then check the output of "dmesg".
Example:
kaspar@ubuntu:~/RIOT$ dmesg | grep 'cdc_acm.*USB ACM device' | tail
[25398.308837] cdc_acm 1-1:1.0: ttyACM0: USB ACM device
[26152.729879] cdc_acm 1-1:1.0: ttyACM0: USB ACM device
kaspar@ubuntu:~/RIOT$
In this example, the nrf52dk got "/dev/ttyACM0", note that down.
2.) Getting started with Hello World
Try RIOT's hello world application:
cd $(HOME)/RIOT/examples/hello-world
BOARD=nrf52dk PORT=<your-tty-device> make clean all flash term -j4
This command should compile the hello-world example, flash it on the board, reset the nrf52dk and start a terminal showing the output.
3.) Setting up an IPv6 connection
Let's try RIOT's CoAP server example and access it from Linux.
First, compile & flash the example:
cd $(HOME)/RIOT/examples/microcoap-example
BOARD=nrf52dk PORT=<your-tty-device> make clean all flash term -j4
As soon as the board has reset after the flashing procedure, it will start advertising itself over BLE. It should also show which address it has auto configured:
[..]
2016-07-12 20:12:45,883 - INFO # Connect to serial port /dev/ttyACM0
Welcome to pyterm!
Type '/exit' to exit.
2016-07-12 20:12:46,890 - INFO # main(): This is RIOT! (Version: 2016.07-devel-393-g8096-booze-nordic_softdevice)
2016-07-12 20:12:46,891 - INFO # RIOT microcoap example application
2016-07-12 20:12:46,892 - INFO # Waiting for address autoconfiguration...
2016-07-12 20:12:49,144 - INFO # Configured network interfaces:
2016-07-12 20:12:49,146 - INFO # Iface  6
2016-07-12 20:12:49,151 - INFO #            Long HWaddr: 02:4c:86:ff:fe:12:d1:0f
2016-07-12 20:12:49,153 - INFO #
2016-07-12 20:12:49,158 - INFO #            MTU:1280  HL:64  6LO  RTR  RTR_ADV  IPHC
2016-07-12 20:12:49,164 - INFO #            Source address length: 8
2016-07-12 20:12:49,165 - INFO #            Link type: wireless
2016-07-12 20:12:49,168 - INFO #            inet6 addr: ff02::1/128  scope: local [multicast]
2016-07-12 20:12:49,173 - INFO #            inet6 addr: fe80::24c:86ff:fe12:d10f/64  scope: local
2016-07-12 20:12:49,179 - INFO #            inet6 addr: ff02::2/128  scope: local [multicast]
2016-07-12 20:12:49,183 - INFO #
2016-07-12 20:12:49,184 - INFO # Waiting for incoming UDP packet...
The node has the link-local address "fe80::24c:86ff:fe12:d10f". Save it for later.
Now open another terminal in order to set up the bluetooth connection.
Then make sure your bluetooth dongle has been recognized:
kaspar@ubuntu:~/RIOT$ hciconfig
hci0:   Type: BR/EDR  Bus: USB
        BD Address: 00:1A:7D:DA:71:14  ACL MTU: 310:10  SCO MTU: 64:8
        UP RUNNING
        RX bytes:640 acl:0 sco:0 events:41 errors:0
        TX bytes:1751 acl:0 sco:0 commands:41 errors:0

kaspar@ubuntu:~/RIOT$
Reset the bluetooth dongle:
sudo hciconfig hci0 reset
Now look for the advertisements using "hcitool":
kaspar@ubuntu:~/RIOT$ sudo hcitool lescan
LE Scan ...
00:4C:86:12:D1:0F RIOT BLE
00:4C:86:12:D1:0F (unknown)
00:4C:86:12:D1:0F RIOT BLE
00:4C:86:12:D1:0F (unknown)
00:4C:86:12:D1:0F RIOT BLE
00:4C:86:12:D1:0F (unknown)
00:4C:86:12:D1:0F RIOT BLE
00:4C:86:12:D1:0F (unknown)
^Ckaspar@ubuntu:~/RIOT$
The tool will not exit itself, but you can exit it using CTRL-C. In the example above, the advertising node was found and it has the Bluetooth address "00:4C:86:12:D1:0F". Copy & paste that somewhere, you'll need that later.
Before we can connect to the device, we need to load and enable the bluetooth_6lowpan kernel module:
kaspar@ubuntu:~/RIOT$ sudo modprobe bluetooth_6lowpan
kaspar@ubuntu:~/RIOT$ echo 1 | sudo tee /sys/kernel/debug/bluetooth/6lowpan_enable
Finally, we can make the connection by running the following command (replace 00:AA:BB:CC:DD:EE with your device’s Bluetooth address):
echo "connect 00:AA:BB:CC:DD:EE 1" | sudo tee /sys/kernel/debug/bluetooth/6lowpan_control
My BLE dongle starts blinking at that point.
Confirm that the BLE interface has been created:
ifconfig bt0
This should show some details.
Now try pinging the node using the link-local address from above, appended with "%" and the bluetooth device name:
ping6 fe80::24c:86ff:fe12:d10f%bt0
If you get ping replies, everything worked so far and your Linux box has IPv6 link-local connectivity towards the nrf52dk.
In theory, this is enough in order to query the nrf52dk using a CoAP client, but unfortunately Firefox cannot access link-local addresses, so in order to use that, we have to configure the nrf52dk with a routable address.
4.) Distributing a routable address
In Linux, this is done by using the Router Advertisement Daemon (RADVD). To configure RADVD, create a /etc/radvd.conf file (as root) and edit it, so that it has the following content:
interface bt0
{
    AdvSendAdvert on;
    prefix 2001:db8::/64
    {
        AdvOnLink off;
        AdvAutonomous on;
        AdvRouterAddr on;
    };
};
Set an address in the subnet for the linux box, enable forwarding and restart radvd:
sudo ip address add 2001:db8::1/64 dev bt0
echo 1 | sudo tee /proc/sys/net/ipv6/conf/all/forwarding
sudo service radvd restart
If successful, all devices connected to the host will receive a routable 2001:db8::/64 prefix. This can be verified by sending an echo request to the full address. The nrf52dk will use the same suffix as for it's link-local address, but with the new prefix instead. So replace "fe80::" with "2001:db8::" and again try to ping:
ping6 2001:db8::24c:86ff:fe12:d10f
Again, you should see some ping replies.
5.) Using Mozilla Firefox as a CoAP client
Once the connection has been established, we can finally play with it. For this you can use Mozilla Firefox with Copper plug-in. You can simply install the plug-in using Firefox’s extensions menu. The plug-in kicks in automatically whenever you enter a URI that uses the coap:// scheme.
In order to use an IPv6 address, it has to be enclosed in "[" and "]". For example with my IP address, the URI would be:
coap://[2001:db8::24c:86ff:fe12:d10f]
After this, a screen similar to the one show in the Figure below will appear.
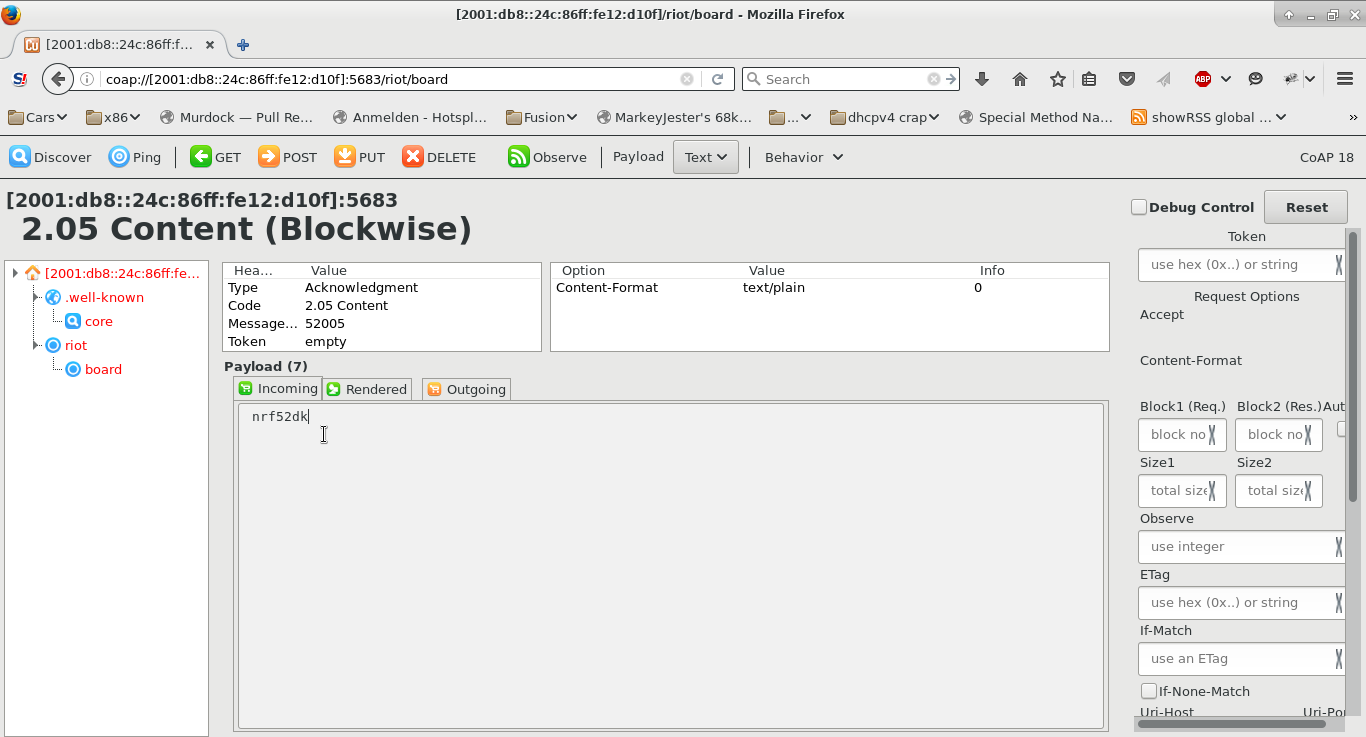
The RIOT example is very basic and, apart from "/.well-known/core", only serves "/riot/board" which returns the board's name as plain text, in your case probably "nrf52dk".
If you made it this far, congratulations! You've successfully set up RIOT with BLE/6lowpan/UDP/CoAP and can access it from you Linux box!
6.) Troubleshooting
Sometimes, the SoftDevice doesn't get flashed correctly, leading to a board that doesn't boot at all. Use "nrfjprog" (available as Nordic download) to recover the board in that case.


