

The purpose of this blog is to provide a step by step guide to help a developer, starting off with the Nordic Semiconductor nRF51 DK, to get the necessary tools installed and get the software (SW) development environment setup so that the user can start developing with the nRF51 DK using the IAR Embedded Workbench for ARM (EWARM) IDE.
1.0 Requirements
The following hardware is required for this guide.
- A laptop or desktop PC running Windows 7 or higher, with at least one free USB port, and knowledge of whether the Windows OS running on this machine is a 32-bit or 64-bit OS.
- Nordic Semiconductor’s nRF51 (PCA10028) or nRF52 DK (PCA10040).
- A micro-USB cable
2.0 Setting UP the nRF5x DK Related SW Tools
-
Download the document nRF51-DK - User Guide v1_0.pdf. The nRF52 DK User Guide will be available when we release the DK with the production silicon sometime in Q1 2016.
-
Listed below in more detail, and with the links to the referenced SW tools, are steps in Sec. 3, “Getting Started” of the nRF51-DK - User Guide v1_0.pdf document. These steps are also applicable to the nRF52 DK. Separate download links are provided where applicable.
a. Download and install nRFgo Studio (which includes the nRF Command-Line Tools package; JLinkARM, JLink CDC, nRFjprog, and mergehex) from one of the following links. Use this link, https://www.nordicsemi.com/eng/nordic/download_resource/46414/58/12750323, if the PC/Laptop where you will be setting up the development environment, has a 64-bit Windows OS, OR, use this link, https://www.nordicsemi.com/eng/nordic/download_resource/38915/56/78083215, if the PC/laptop has a 32-bit Windows OS.
b. If you already have a licensed copy of IAR, it is important that you upgrade to the latest version of EWARM, and you can skip this step. Download and install the latest evaluation version of IAR “Embedded Workbench for ARM” (EWARM) tool chain from this link: http://supp.iar.com/Download/SW/?item=EWARM-EVAL. NOTE: It is recommended that the size-limited evaluation version be selected instead of the 30-day evaluation version, as the former does not have a time limit. Be aware that the size-limited version of IAR is limited to 16 Kbyte of compiled/linked code size for M0 (nRF51) and 32Kbyte of compiled/linked code size for M4 (nRF52), and some SW examples included with the nRF5 SDK are larger than the 16Kbyte limit, and therefore unusable in the nRF51, unless a full license is purchased from IAR.
c. Download the latest nRF5 Software Development Kit (SDK), common for nRF51 and nRF52, currently v.11.0.0, by clicking on this hyperlink: nRF5_SDK_11.0.0_89a8197.zip. Extract all the files from this zip file to a folder of your choice. NOTE: The instructions in steps below assume the SDK files are extracted to the folder “C:\Nordic Semiconductor\nRF5 SDK_v11.0.0”.
- For the nRF51 DK download one of the S110, S120, or S130 softdevice (SD) zip files from the links below.
a. S110 – BLE peripheral only protocol stack: s110_nrf51_8.0.0.zip
b. S120 – BLE peripheral only protocol stack: s120_nrf51_2.1.0.zip
c. S130 – BLE concurrent peripheral/central/broadcaster/observer protocol stack: s130_nrf51_2.0.1.zip.
d. Extract all the files from this downloaded zip to a folder of your choice. One of the files extracted is the precompiled SD file with the “.hex” extension, which is the file that you will need to program into the nRF5x DK using the nRFgo Studio tool in the next step.
- For the nRF52 DK download S132 SD zip file from this hyperlink, s132_nrf52_2.0.1.zip, and extract all the files from the zip file to a folder of your choice.
3.0 Programming the Softdevice onto the nRF5x device on the DK
- Open the nRFgo Studio application
- Connect the nRF51/nRF52 DK board to the computer using a micro USB cable
- In the nRFgo Studio application the device should show up under the “nRF51/nRF52 development boards” in the “Device Manager” window as shown circled in red in Figure 1. Click on this string, that starts with the word “Segger”, and the display in the big window on the right will change to display the flash memory map and programming options, as shown in Figure 1. NOTE: If you are prompted to update the Segger firmware on the nRF5x DK, click on "Yes" to upgrade to the latest Segger firmware. After the firmware upgrade the nRFgo Studio application may need to be restarted, as it may stop responding. If you have to restart nRFgo Studio, repeat this step.
- Click on the “Erase all” button (circled in brown in Figure 1). After completion of this operation the memory map will show “Region 1 (Application)” with the flash size of the device (256 kB for nRF51 or 512 kB for nRF52), as show in Figure 1.
- Next click on the “Program Softdevcie” tab on the right side of the memory map (circled in blue in Figure 1). Click “Browse” and locate the proper SD .hex file in the folder you previously unzipped the downloaded SD zip file to (S110, S120 or S130 for nRF51-DK, and S132 for nRF52-DK).
- Click on the “Program” button. A small window should pop-up stating that the programming operation is in progress, and after successful completion of this, the big window in nRFgo Studio should look like the one in Figure 2.
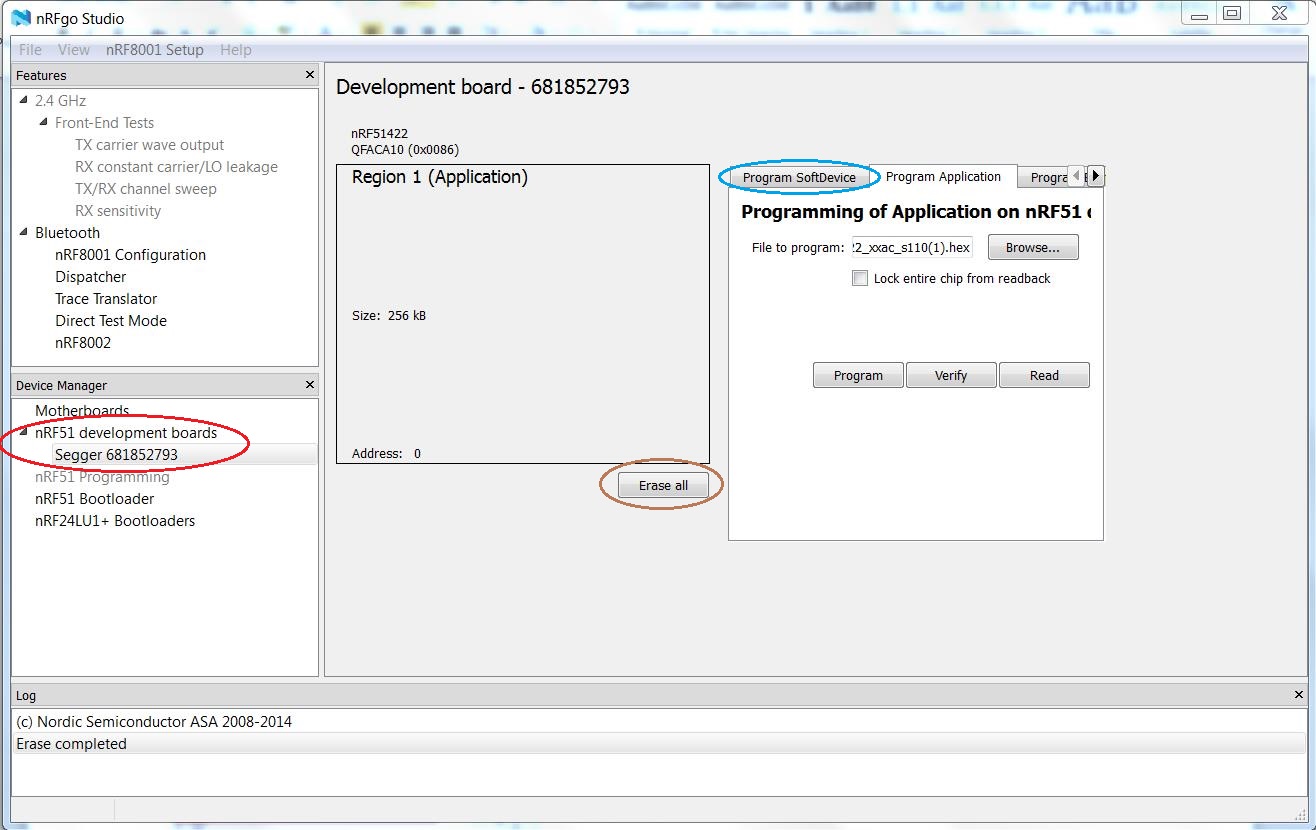 Figure 1
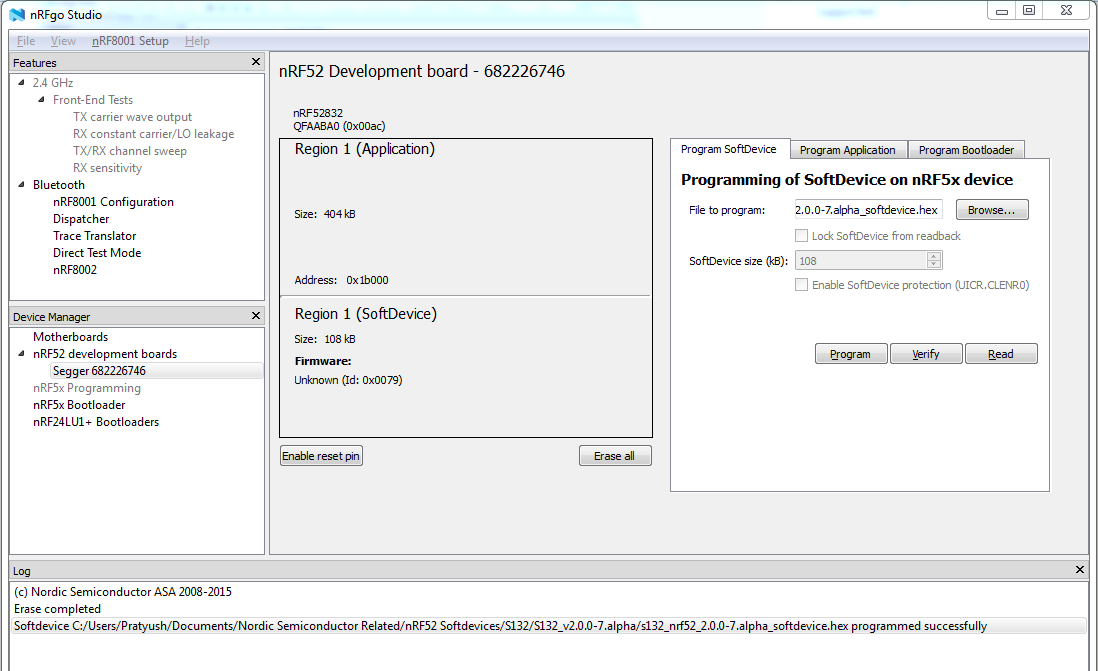 Figure 2
The nRF5x DK is now ready to be programmed with a user application
4.0 Programming and Running a BLE Application on the nRF5x DK
- Navigate to the SDK example, “ble_app_hrs”, in the folder, “C:\Nordic Semiconductor\nRF5 SDK_v11.0.0-2.alpha\examples\ble_peripheral\ble_app_hrs”, and open the IAR project work-space file “ble_app_hrs.eww” by double-clicking on it. If you installed the IAR toolchain successfully in Section 1.0, Step 2b, above, the IAR IDE should open up and you should see a window as in Figure 3.
a. The file, “ble_app_hrs.eww”, is an IAR workspace file that contains several IAR projects as you can see from the list in the “Workspace” window (encircled with a brown outline box in Figure 3).
b. Next set the project “ble-app_hrs_s130_pca10028 - nrf51422_xxac_s130” (encircled in blue outline in Figure 3), as the active project, by right-clicking on it and selecting “Set as Active” in the context menu that pops-up. The active project will show up in bold font as in Figure 3. Note: Here I have chosen to use the S130 softdevice along with the nRF51-DK board, PCA10028, for the purpose of this blog.
c. Next build the project by clicking on “Project” in the menu bar, and selecting “Rebuild All”. The project should build with 0 errors and 0 warnings as show in the “Build” window (encircled in red outline box) at the bottom, in Figure 3.
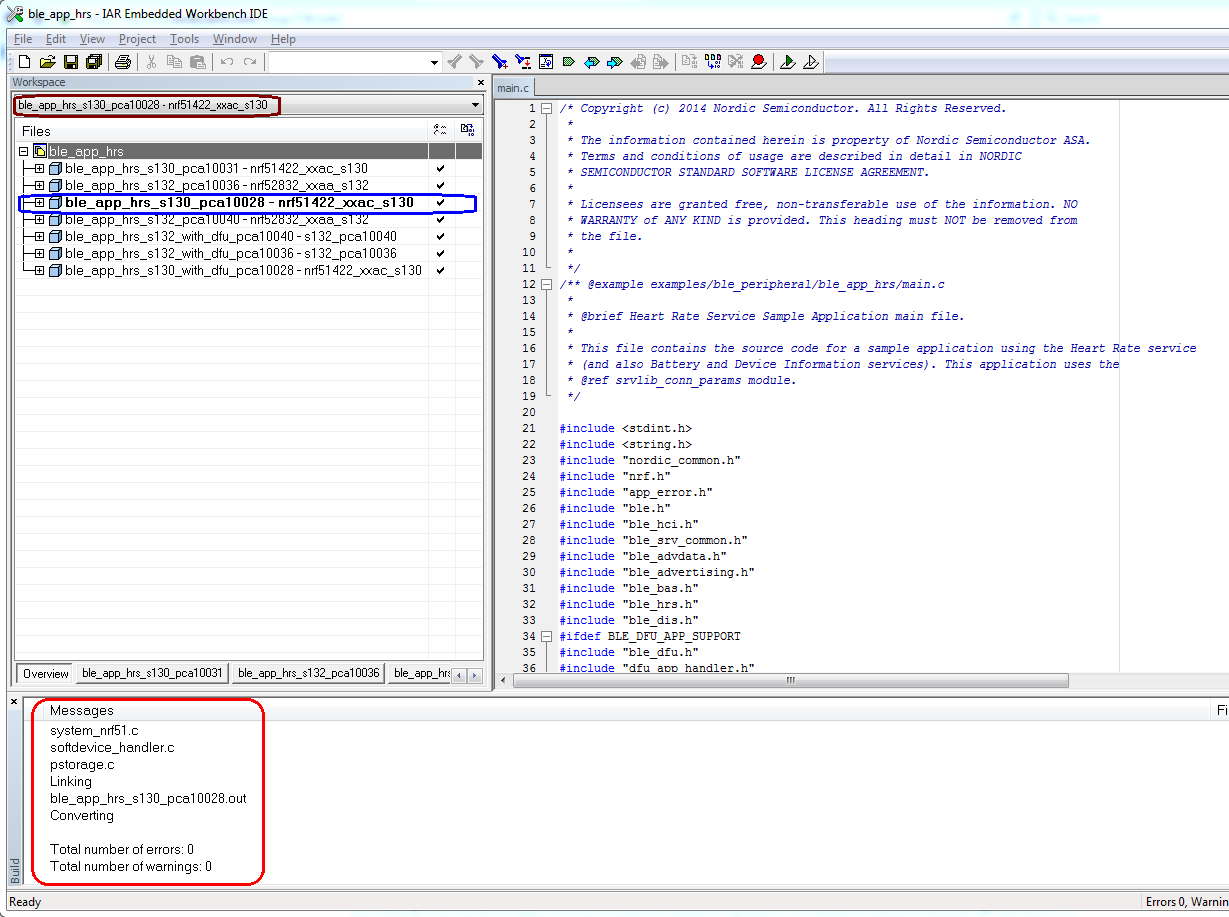 Figure 3
d. If you get errors, you may not have the correct device selected. To select the correct device, right click on the Active project name, “ble-app_hrs_s130_pca10028 - nrf51422_xxac_s130”, and click on “Options..” in the context menu that pops up. The Options dialog box will be displayed (see Figure 4). Click on the box next to the “Device” selection (encircled in red in Figure 4), and from the window that pops up, select appropriate "NordicSemi" device and click on "Ok" to save the selection and dismiss the "Options" window. Next rebuild the project, and it should rebuild without any errors or warnings.
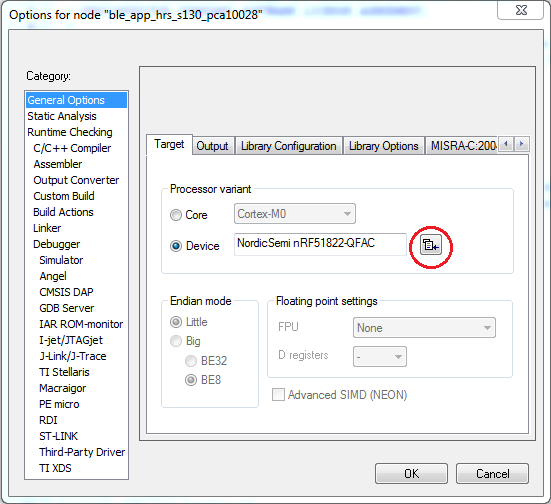 Figure 4

