The Thingy:53 is a bleeding edge IoT prototyping platform featuring the flagship nRF5340 dual-core Wireless SoC. It also contains several sensors and a rechargeable Li-Po battery, making it an excellent tool to rapidly prototype an application that can be deployed in the field. To learn more about Thingy:53, please visit the product webpage and watch the webinar, which is available on demand.
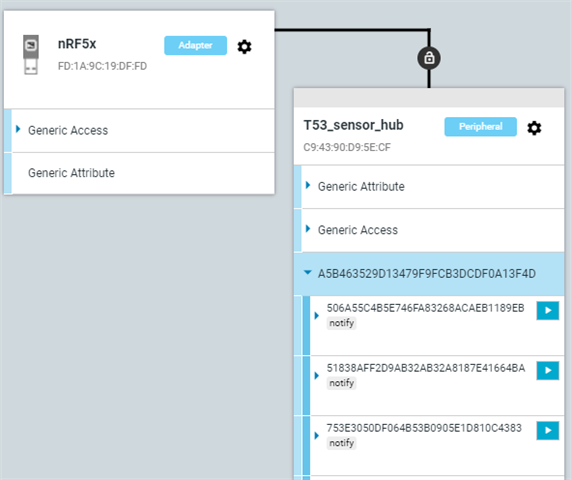
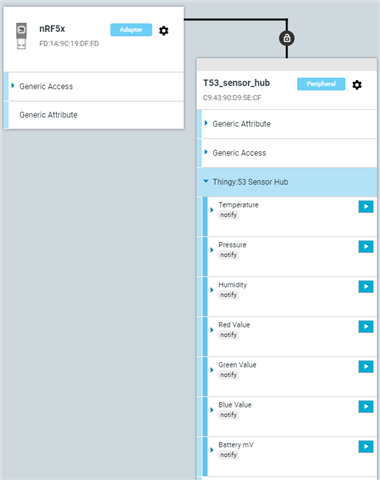
In this blog post, we will set up the Thingy:53 as a sensor hub that takes measurements from the onboard BME688 environmental sensor, BH1749 color and light sensor, and the on-chip SAADC to read out the Li-Po battery voltage. The data will also be available to read over GATT by a connected Bluetooth LE central device.
We will go through all the necessary steps to get this prototype up and running in the section below, but if you wish to skip directly to the finished firmware to test it for yourself, it is linked at the end of this blog post. If you at any point are unsure about the Zephyr devicetree, application configuration, or macro-usage, then we would highly recommend going through the nRF Connect SDK Fundamentals course in the Nordic Developer Academy before proceeding. It is an excellent course for gaining an understanding of how the nRF Connect SDK works behind the scenes.
Table of Contents
Setting up the project
Having installed the nRF Connect SDK v2.1.0 using the Toolchain Manager, we start by using the 'Create a new application' option in Visual Studio Code (VS Code) to create a freestanding application based on the peripheral LBS sample. Once the project has been created we need to add a build configuration for the thingy53_nrf5340_cpuapp_ns target, which means we are building the application to run on the application CPU in the non-secure environment. This might sound scary, but it is in fact making our firmware more secure as it will incorporate TF-M into the build and create a secured domain that is separate from the non-secure one. Steps for adding a build configuration can be found in the nRF Connect for VS Code documentation.
The main reason for choosing the peripheral LBS sample as our place to start is that it is already compatible with Thingy:53. So it already has the necessary DFU parts implemented and some of the Bluetooth LE functionality, which lets us focus on the data collection and transmission.
We need our application to feature DFU right from the beginning because Thingy:53 does not have an onboard debugger. Therefore we need to implement a means of updating the application on the Thingy:53. For convenience, we could, of course, have used a standalone debug-probe, or another DK's debugger, to perform the programming of the Thingy:53, but that would require additional hardware. It would have robbed us of the opportunity to see how easy it is to add DFU to our application.
After building the project, the DFU-ready application can be found in <project_path>/build/zephyr/dfu_application.zip. If you already have an existing application that you would like to add DFU to, you could follow this guide.
Trimming down to a minimal project
To highlight the necessary steps for the sensor hub implementation, we will start by trimming away the peripheral LBS-specific functionality from our application. In this case, we do not need any of the LBS specific code or the button functionality - we can keep the generic Bluetooth parts and the LEDs. Removing all the LBS service specific code leaves us with the following, minimal main.c which will be used as baseline for our project:
/*
* Copyright (c) 2018 Nordic Semiconductor ASA
*
* SPDX-License-Identifier: LicenseRef-Nordic-5-Clause
*/

#include <zephyr/types.h>
#include <stddef.h>
#include <string.h>
#include <errno.h>
#include <zephyr/sys/printk.h>
#include <zephyr/sys/byteorder.h>
#include <zephyr/kernel.h>
#include <zephyr/drivers/gpio.h>
#include <soc.h>

#include <zephyr/bluetooth/bluetooth.h>
#include <zephyr/bluetooth/hci.h>
#include <zephyr/bluetooth/conn.h>
#include <zephyr/bluetooth/uuid.h>
#include <zephyr/bluetooth/gatt.h>

#include <zephyr/settings/settings.h>

#include <dk_buttons_and_leds.h>

#define DEVICE_NAME             CONFIG_BT_DEVICE_NAME
#define DEVICE_NAME_LEN         (sizeof(DEVICE_NAME) - 1)


#define RUN_STATUS_LED          DK_LED1
#define CON_STATUS_LED          DK_LED2
#define RUN_LED_BLINK_INTERVAL  1000

#define USER_LED                DK_LED3

#define USER_BUTTON             DK_BTN1_MSK

static const struct bt_data ad[] = {
    BT_DATA_BYTES(BT_DATA_FLAGS, (BT_LE_AD_GENERAL | BT_LE_AD_NO_BREDR)),
    BT_DATA(BT_DATA_NAME_COMPLETE, DEVICE_NAME, DEVICE_NAME_LEN),
};

static const struct bt_data sd[] =
{

};

static void connected(struct bt_conn *conn, uint8_t err)
{
    if (err) {
        printk("Connection failed (err %u)\n", err);
        return;
    }

    printk("Connected\n");

    dk_set_led_on(CON_STATUS_LED);
}

static void disconnected(struct bt_conn *conn, uint8_t reason)
{
    printk("Disconnected (reason %u)\n", reason);

    dk_set_led_off(CON_STATUS_LED);
}

BT_CONN_CB_DEFINE(conn_callbacks) = {
    .connected        = connected,
    .disconnected     = disconnected,
};

void main(void)
{
    int blink_status = 0;
    int err;

    printk("Starting Sensor Hub application\n");

    err = dk_leds_init();
    if (err)
    {
        printk("LEDs init failed (err %d)\n", err);
        return;
    }

    err = bt_enable(NULL);
    if (err) {
        printk("Bluetooth init failed (err %d)\n", err);
        return;
    }

    printk("Bluetooth initialized\n");

    if (IS_ENABLED(CONFIG_SETTINGS))
    {
        settings_load();
    }

    err = bt_le_adv_start(BT_LE_ADV_CONN, ad, ARRAY_SIZE(ad),
                sd, ARRAY_SIZE(sd));
    if (err)
    {
        printk("Advertising failed to start (err %d)\n", err);
        return;
    }

    printk("Advertising successfully started\n");

    for (;;)
    {
        dk_set_led(RUN_STATUS_LED, (++blink_status) % 2);
        k_sleep(K_MSEC(RUN_LED_BLINK_INTERVAL));
    }
}
We will also need to make some changes to the prj.conf - we'll keep the general Bluetooth parts, and remove the LBS specific parts. In addition, we have renamed the device to 'T53_sensor_hub' for convenience and easy discoverability by a BLE central device during scanning. The prj.conf which should look like this afterwards:
#
# Copyright (c) 2018 Nordic Semiconductor
#
# SPDX-License-Identifier: LicenseRef-Nordic-5-Clause
#

# Enable Bluetooth
CONFIG_BT=y
CONFIG_BT_PERIPHERAL=y
CONFIG_BT_DEVICE_NAME="T53_sensor_hub"

# Enable buttons and LEDs
CONFIG_DK_LIBRARY=y

CONFIG_SYSTEM_WORKQUEUE_STACK_SIZE=2048
Lastly, you can delete the Kconfig and prj_minimal.conf files from the sample directory as well.
Setting up the BH1749 color and light sensor
We may now start to add the data collection functionality to our project. We will use the BH1749 to collect sensor readings of the ambient light in the environment, specifically the red/green/blue values. To make things easy for ourselves, we will here make use of the SENSOR module, which works with the variety of sensors already implemented in Zephyr. We start by adding the following configurations to our prj.conf:
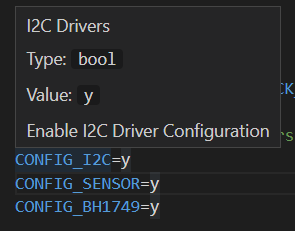
# Configure Thingy:53 sensors
CONFIG_I2C=y
CONFIG_SENSOR=y
CONFIG_BH1749=y
The specific function of each of these configurations can be checked by either going to the kconfig reference search, or by hovering over the specific configuration in the prj.conf opened in your VS Code editor, as shown below.
Now we need to add the source code that brings the sensor functionality into our project. In main() we will retrieve the sensor from the devicetree and check for its readiness. In addition we will create a separate function sample_and_update_all_sensor_values for sampling all the sensors, which gets called from the main loop. In that function the sensor data is sent to sensor_hub_update_* functions which handle the BLE data transfer over GATT. We will go over that functionality in the sections below.
It is also required to make a slight modification to the connected/disconnected bluetooth callbacks and in the main loop, so that the sensor sampling is only done if there is a BLE central device connected to the Thingy:53 (allowing for energy savings), and when the LEDs are off. This is because the BH1749 is right next to the RGB LED on the Thingy:53 board, and that would influence the readings if we were to sample the sensor when the LED is on.
...
#include <zephyr/drivers/sensor.h>
...

//BT globals and callbacks
struct bt_conn *m_connection_handle = NULL;
static void connected(struct bt_conn *conn, uint8_t err)
{
    if (err) {
        printk("Connection failed (err %u)\n", err);
        return;
    }

    m_connection_handle = conn;

    printk("Connected\n");
}

static void disconnected(struct bt_conn *conn, uint8_t reason)
{
    printk("Disconnected (reason %u)\n", reason);

    m_connection_handle = NULL;
}

BT_CONN_CB_DEFINE(conn_callbacks) = {
    .connected        = connected,
    .disconnected     = disconnected,
};

//Local function prototypes
static int sample_and_update_all_sensor_values(const struct device *bme688Dev, const struct device *bh1749Dev, const struct device *adc_dev);

// Main loop
void main(void)
{
    uint8_t blink_status = 0;
    int err;

    printk("Starting Sensor Hub application\n");

    //Setting up BH1749 light and color sensor
    const struct device *bh1749rgbDev = DEVICE_DT_GET_ONE(rohm_bh1749);

    if (!device_is_ready(bh1749rgbDev))
    {
        printk("Sensor device not ready\n");
        return;
    }

    ...

    for (;;)
    {

        if(!(blink_status % 2) && m_connection_handle)
        {
            /*When blink is even number it means the LED has been OFF for 500ms, so we can sample
            the sensors if there is a BLE central connected */
            sample_and_update_all_sensor_values(bme688SensorDev, bh1749rgbDev, adc_dev);
        }

        //Change LED status
        dk_set_led(RUN_STATUS_LED, (++blink_status) % 2);

        //Put thread to sleep for UPDATE_INTERVAL
        k_sleep(K_MSEC(UPDATE_INTERVAL));
    }
}

//This function samples all the needed data from the sensors and sends it over to the service.c/.h module that handles the GATT data transfer
static int sample_and_update_all_sensor_values(const struct device *bme688Dev, const struct device *bh1749Dev, const struct device *adc_dev)
{
    int err;
    struct sensor_value red_value;
    struct sensor_value green_value;
    struct sensor_value blue_value;

    //Trigger sampling of BH1749 - The sensor does only support fetching SENSOR_CHAN_ALL
    err = sensor_sample_fetch_chan(bh1749Dev, SENSOR_CHAN_ALL);

    if (err)
    {
        printk("sensor_sample_fetch failed err %d\n", err);
        return err;
    }

    //Collect red light sample and update characteristic
    err = sensor_channel_get(bh1749Dev, SENSOR_CHAN_RED, &red_value);
    if (err)
    {
        printk("sensor_channel_get failed err %d\n", err);
        return err;
    }
    sensor_hub_update_red_color(m_connection_handle, (uint8_t*)(&red_value.val1), sizeof(red_value.val1));

    //Collect green light sample and update characteristic
    err = sensor_channel_get(bh1749Dev, SENSOR_CHAN_GREEN, &green_value);
    if (err)
    {
        printk("sensor_channel_get failed err %d\n", err);
        return err;
    }
    sensor_hub_update_green_color(m_connection_handle, (uint8_t*)(&green_value.val1), sizeof(green_value.val1));

    //Collect red light sample and update characteristic
    err = sensor_channel_get(bh1749Dev, SENSOR_CHAN_BLUE, &blue_value);
    if (err)
    {
        printk("sensor_channel_get failed err %d\n", err);
        return err;
    }
    sensor_hub_update_blue_color(m_connection_handle, (uint8_t*)(&blue_value.val1), sizeof(blue_value.val1));

    printk("All sensors sampled and characteristics updated!\n");

    return 0;
}
Setting up the BME688 environmental sensor
Now we can also add the BME688 sensor, to gather the pressure, humidity and temperature data. We will also here make use of the SENSOR module, as shown in the previous step. Since we already have some of the sensor modules kconfigs added, we will only need to add the following to our prj.conf:
CONFIG_BME680=y
At the time of writing, the BME688 sensor that we are gointhg to be using is not declared in the thingy53_nrf5340_common.dts file, which can be found in <sdk_path>\<sdk_version>\zephyr\boards\arm\thingy53_nrf5340. This is the devicetree file that contains the hardware definition for the board (e.g. buttons, LEDs, sensors). It would also be possible to add the BME688 sensor declaration into the overlay files in <project_path>/boards, but doing it on the SDK file will make the change available for any project targeting Thingy:53.
We will have to make a small amendment to include the missing sensor. As we see on the file, the i2c1 instance is already used for both BH1749 and the BMM150, but there is no mention of the BME688 that we are interested in using. Looking at the Thingy:53 hardware files, downloadable from here, tells us that these three sensors are on the same I2C bus, and so we can just add it to the declaration as so:
&i2c1 {
    compatible = "nordic,nrf-twim";
    status = "okay";
    clock-frequency = <I2C_BITRATE_FAST>;

    pinctrl-0 = <&i2c1_default>;
    pinctrl-1 = <&i2c1_sleep>;
    pinctrl-names = "default", "sleep";
    bmm150@10 {
        compatible = "bosch,bmm150";
        label = "BMM150";
        reg = <0x10>;
    };

    bh1749@38 {
        compatible = "rohm,bh1749";
        label = "BH1749";
        reg = <0x38>;
        int-gpios = <&gpio1 5 (GPIO_PULL_UP | GPIO_ACTIVE_LOW)>;
    };

    bme688@76 {
        compatible = "bosch,bme680";
        label = "BME688";
        reg = <0x76>;
    };
};
Similarly to the previous section, we need to add the source code that brings the sensor functionality into our project. In main() we will retrieve the sensor from the devicetree and check for its readiness. In addition we will add the BME688 sampling to a the function sample_and_update_all_sensor_values.
// Main loop
void main(void)
{
    ...

    //Setting up BME688 environmental sensor */
    const struct device *bme688SensorDev = DEVICE_DT_GET_ONE(bosch_bme680);

    if (!device_is_ready(bme688SensorDev))
    {
        printk("Sensor device not ready\n");
        return;
    }

    ...

    for (;;)
    {

        if(!(blink_status % 2) && m_connection_handle)
        {
            /*When blink is even number it means the LED has been OFF for 500ms, so we can sample
            the sensors if there is a BLE central connected */
            sample_and_update_all_sensor_values(bme688SensorDev, bh1749rgbDev, adc_dev);
        }

        //Change LED status
        dk_set_led(RUN_STATUS_LED, (++blink_status) % 2);

        //Put thread to sleep for UPDATE_INTERVAL
        k_sleep(K_MSEC(UPDATE_INTERVAL));
    }
}

//This function samples all the needed data from the sensors and sends it over to the service.c/.h module that handles the GATT data transfer
static int sample_and_update_all_sensor_values(const struct device *bme688Dev, const struct device *bh1749Dev, const struct device *adc_dev)
{
    ...

    struct sensor_value temperature_value;
    struct sensor_value pressure_value;
    struct sensor_value humidity_value;

    ...

    //Trigger sampling of BME688 sensor
    err = sensor_sample_fetch(bme688Dev);
    if(err)
    {
        printk("Failed to collect samples from bme688\n");
        return err;
    }

    //Collect temperature sample and update characteristic
    err = sensor_channel_get(bme688Dev, SENSOR_CHAN_AMBIENT_TEMP, &temperature_value);
    if(err)
    {
        printk("Failed to fetch temperature sample");
        return err;
    }
    sensor_hub_update_temperature(m_connection_handle, (uint8_t*)(&temperature_value.val1), sizeof(temperature_value.val1));

    //Collect pressure sample and update characteristic
    err = sensor_channel_get(bme688Dev, SENSOR_CHAN_PRESS, &pressure_value);
    if(err)
    {
        printk("Failed to fetch pressure sample");
        return err;
    }
    sensor_hub_update_pressure(m_connection_handle, (uint8_t*)(&pressure_value.val1), sizeof(pressure_value.val1));

    //Collect humidity sample and update characteristic
    err = sensor_channel_get(bme688Dev, SENSOR_CHAN_HUMIDITY, &humidity_value);
    if(err)
    {
        printk("Failed to fetch humidity sample");
        return err;
    }
    sensor_hub_update_humidity(m_connection_handle, (uint8_t*)(&humidity_value.val1), sizeof(humidity_value.val1));

    ...

    printk("All sensors sampled and characteristics updated!\n");

    return 0;
}
Setting up ADC to read Li-Po battery voltage
The final peripheral functionality to be added to our project is the ADC, which allows us to read the on-kit Li-Po battery voltage battery. Since the battery voltage exceeds the nRF5340 supply voltage, it will be read through an on-board voltage divider with two resistors that is enabled via a GPIO. This can be found on page 4 of the boards schematics.

This voltage divider is also defined in the device tree, on the earlier mentioned thingy53_nrf5340_common.dts file. The properties in the vbatt node tell us that ADC channel 2 is being used to sample the voltage through a 1M5+180k ohm resistor ladder, and also that P0.16 is used to enable the ladder.