
Purpose
When creating a mesh network with many nodes, it can take a while to provision each node, especially using PyACI. An alternative is to use a static provisioner that provisions the nodes automatically but that requires a dedicated node that is used for this purpose.
This document outlines the use of a Python script, meshfwpatch.py, that can take as input, firmware that has been ripped (read back from node’s flash and saved as an Intel Hex file using nrfjprog) from a provisioned node, update the device address and the device key in that firmware, write the updated firmware to a new file, and, finally, update the mesh database file. This allows for the quick generation of multiple firmware copies that can be flashed onto nodes. The nodes are, therefore, pre-provisioned from the start automatically. It is only required to manually provision one node and then that node’s firmware can be ripped and new copies of firmware generated using this script for any number of other nodes.
Workflow
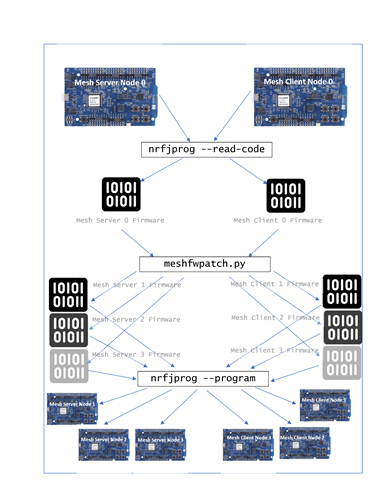
The following is the workflow in order to create copies of mesh firmware from provisioned nodes:
Procedure
In this procedure, we will provision a node using PyACI, rip its firmware, and then use the meshfwpatch.py script to generate new firmware. We will then flash this firmware to a new node and observe it as coming up provisioned. This process can be extended to any number of nodes.
- Connect a nRF52-DK to the PC via USB cable and launch the Segger Embedded Studio (SES) with the project in <Mesh SDK>/examples/serial/ directory.
- Compile, flash, and run the serial firmware on the nRF52-DK.
- Follow instructions here to install Python 3 and launch the PyACI tool under <Mesh SDK>/scripts/interactive_pyaci/.
- Connect another nRF52-DK to the PC via USB cable and launch the Segger Embedded Studio (SES) with the project in <Mesh SDK>/examples/light_switch/server/ directory.
- Compile, flash, and run the light switch server firmware on the nRF52-DK.
- We need to start with a fresh JSON file which will hold the database of the mesh network. This file resides in the <Mesh SDK>/scripts/interactive_pyaci/database/ directory. Note that this file can be edited by humans since it is human-readable JSON format. Copy “example_database.json.backup” to “example_database.json” in the same folder. Overwrite, if needed. This will be a necessary step each time only when provisioning a brand new network.
- Now we will provision the light switch server node. In PyACI shell, type in the highlighted input:
In [1]: db = MeshDB("database/example_database.json")
In [2]: p = Provisioner(device, db)
In [4]: p.scan_start()
In [5]: p.scan_stop()
In [6]: p.provision(name="Light bulb")
In [7]: cc = ConfigurationClient(db)
In [8]: cc.force_segmented = True
In [9]: device.model_add(cc)
In [10]: cc.publish_set(8, 0)
In [11]: cc.composition_data_get()
In [12]: cc.appkey_add(0)
In [13]: cc.appkey_add(1)
In [14]: cc.model_app_bind(db.nodes[0].unicast_address, 0, mt.ModelId(0x1000))
This should provision the node.
- Launch a command line window, go the <Mesh SDK>/scripts/interactive_pyaci/ directory, and issue the following command to rip the firmware from the provisioned light switch server node:
nrfjprog --family nrf52 --readcode dump_nRF52832_mesh_server_provisioned.hex
- Copy the meshfwpatch.py script to the <Mesh SDK>/scripts/interactive_pyaci/ directory. The script has been tested to run only from this directory.
- Now we will look at the mesh database file to see the information of the provisioned node. We can manually read the mesh database file, as it is in human-readable JSON format, or we can use the meshfwpatch.py script to parse it for us and show us the node information. We will use the latter so type the following command:
python meshfwpatch.py --list-info database\example_database.json
- Observe the output (the device key will be unique and different, of course):
Index: 0
Node name: Light bulb
Device key: b432ad3a97e35032d0a5d2db871fdd17
Unicast address: 0x10
- Type in the following command to generate three new pre-provisioned firmware copies:
python meshfwpatch.py --hex-input-file dump_nRF52832_mesh_server_provisioned.hex --db-input-file database\example_database.json --clone-copies 3 --hex-output-file nRF52832_mesh_server_provisioned_clone.hex - The generated files can now be flashed to a new node using nrfjprog. After flashing the nodes, switch the nodes off and then on and they should come up already pre-provisioned.
- Let’s verify that the mesh database file has also been updated by issuing the same command to query the mesh database:
python meshfwpatch.py --list-info database\example_database.json - Observe the output with the added three nodes:
Index: 0
Node name: Light bulb
Device key: b432ad3a97e35032d0a5d2db871fdd17
Unicast address: 0x10
Index: 1
Node name: Light bulb_0011
Device key: 24b07e34e3b648ec840993d1acfe6bbf
Unicast address: 0x11
Index: 2
Node name: Light bulb_0012
Device key: a178f4436baf4c95a7c523e958a10011
Unicast address: 0x12
Index: 3
Node name: Light bulb_0013
Device key: d6132114a94d456eba0d3c51507412ec
Unicast address: 0x13
NOTES:
- For different types of nodes in a mesh network, the first node needs to be manually provisioned and then it can be processed with the script to generate firmware for other nodes of the same type. For instance, if there is a light switch client node in the mesh network, the first client node is manually provisioned, and then other client nodes can reuse the firmware ripped from that client node after processing by the script.
- Use the -h parameter to have meshfwpatch.py script display a help screen.
- The device key and the unicast address are automatically generated but can be specified on the command line as well.
- The optional parameters to the script are --log-level, --node-name, --unicast-addr, --device-key, --start-node, --mesh-sdk-version, and --clone-copies.
- The hex dump command nrfjprog –readcode would not read the UICR. So if there is data in the UICR, it needs to be programmed manually.
- The script will fail if the ripped firmware is from a node that has had its provisioning information deleted (such as by pressing button 4 on Light Switch examples). You must rip firmware from a node that has been freshly provisioned ONCE the first time. Enhancing the script to intelligently parse the Flash Filesystem is yet to be implemented; until then, please be aware of this limitation.
DISCLAIMER: Please use for development / research purposes only, noting the points below:
- Pre-provisioning firmware is a security risk as leaked information about the security keys can compromise the whole network.
- If a device boots as pre-provisioned, this goes against qualification of the end-product since end-product can no longer behave as an unprovisioned device thus failing the qualification criteria.
