
This getting started guide is meant as a more detailed practical guide for the Thread Secure DFU Example found on Infocenter which demonstrates upgrade of firmware over the air (OTA). For any questions regarding Thread or this getting started guide, please create a ticket in DevZone.
You will use the following setup:
- Minimum 2 nRF52840 Development Kits
- 1 nRF52840 Dongle (a nRF52840 DK can replace the Dongle)
The hardware will have these tasks:
- 1 DK will run a Client + Bootloader, this is the device we will upgrade the firmware on. Hence from now on, this DK will be referred to as the Client.
- 1 DK will run a Server. Hence from now on, this DK will be referred to as the Server.
- The nRF52840 Dongle will be used as a packet sniffer to monitor the network traffic and see that everything goes as planned (You can also use a nRF52840 DK).
- If you use more then two DK’s, these boards will also run the Client and Bootloader.
The following tools are required:
- GNU Arm Embedded Toolchain (7 2018-q2-update or newer)
- nrfutil (5.1.0 or newer - pip install nrfutil)
- Terminal Window (PuTTY/Termite/MobaXterm for example)
- Wireshark (installation is explained)
The SDK used for this guide is nRF5 SDK for Thread and Zigbee v3.0.0, which can be downloaded here.
The path to the different part of the SDK that will be used is:
<InstallFolder>\examples\thread\dfu (The Bootloader and Client example)
Unlike the device upgrade process in BLE, we require a Server to provide the new firmware packet to the nodes of our network. The Server could for example be a cloud service, an nRF52840 DK in conjunction with nrfutil, or a mobile phone running an application. In this guide, we will use an nRF52840 DK as the Server.
We also require a device to upgrade, called a Client. The Client is responsible for downloading the new firmware packet from the Server and installing it.
The Thread Secure DFU supports two modes of distributing the firmware packet, unicast and multicast. The main difference between these two modes is that for unicast mode each DFU Client requests consecutive firmware blocks from the Server individually, but in multicast mode, the Server sends consecutive firmware blocks with a multicast message, and Clients interested in a new firmware receive and process them. It is possible to read from the sniffer logs which mode these packets use by looking at the mode bit. The picture below shows the Data payload for a Trigger Packet (GET) for multicast and unicast mode and the structure format of the payload.
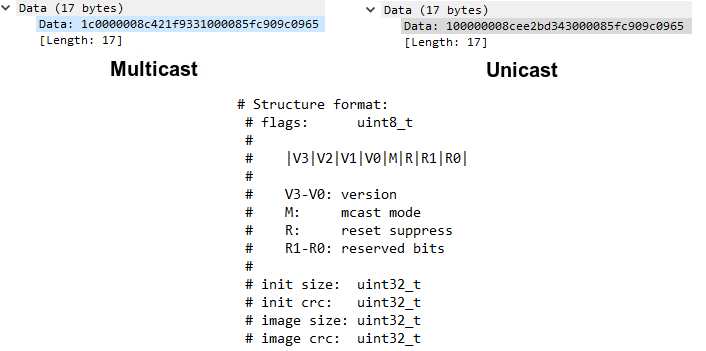
We are interested in the flags section of the data payload, which is the first byte. For our multicast payload, this is 1c and for our unicast payload, this is 10. If we convert these two hexadecimal to binary values, we get 0001 1100 for multicast and 0001 0000 for unicast. From the structure format we can see that the mode bit is bit number 3 (mcast mode), counting from the LSB. And if we look at our converted values we can indeed see that multicast mode has the mode bit set to 1 and unicast mode has the mode bit set to 0.
Below is a message sequence chart for both multicast mode and unicast mode:
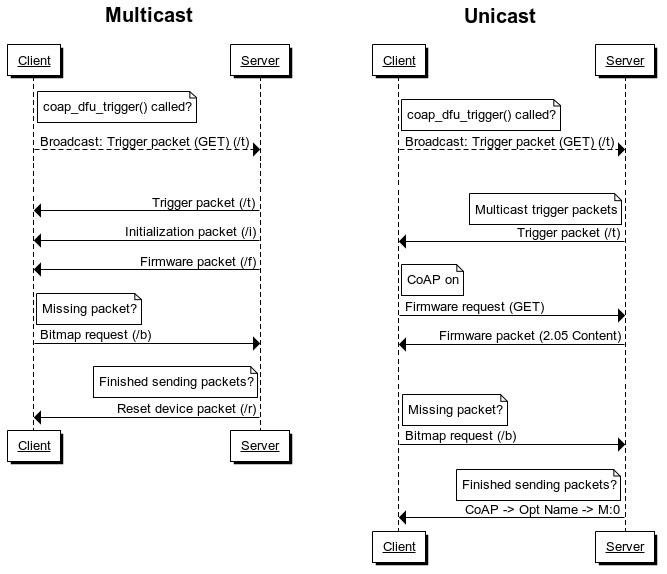
In both modes, it is possible for the Client to check if there are any Servers in the vicinity with a new firmware that is ready to be broadcasted, by broadcasting Trigger Packets (GET). These packets are transmitted by the Client by calling the coap_dfu_trigger() function. Below is an example of the packet as seen in Wireshark, you can distinguish these packets from others by the Protocol which is CoAP and that the Info contains GET and /t.

Below you can see some of the packets from the message sequence chart for multicast mode captured in Wireshark:

All these packets are sent from the Server. Packet number 1 is a trigger packet, packet number 2 is the first initialization packet, packet number 3 is the last initialization packet, packet number 4 is the first firmware packet, packet number 5 is the last firmware packet, and packet number 6 is the reset device packet. There is one missing packet in this list that is found in the message sequence chart and that is the bitmap request packet, which is transmitted from the Client to the Server if there is a missing packet.
Below you can see some of the packets from the message sequence chart for unicast mode captured in Wireshark:

The first packet is a trigger packet which is broadcasted by the Server. Packet number 2 is an initialization packet request which the Server responds with an acknowledgement that contains the initialization packet, which is packet 3 on the list. Packet number 4 is a firmware request packet which is sent from the Client to the Server, the Server responds with packet number 5 which is an acknowledgement that contains firmware data.
Let us start by setting up the nRF Sniffer.
Step 1: nRF Sniffer with Wireshark setup.
There is a detailed guide on the Infocenter on how to set up the nRF Sniffer with Wireshark here. Since we are using a nRF52840 Dongle as our sniffer, follow the steps described under PCA10059 Dongle to flash the correct firmware to the Dongle. After flashing the firmware just follow the steps under Installing Wireshark and extcap plugin, Starting Wireshark with the sniffer (select channel 16 instead of 11), and Configuring Wireshark for Thread. When you are finished with the configuration, just start sniffing for packets on channel 11. You can also use a nRF52840 DK as the sniffer by following the described steps under PCA10056 Development Kit.
Step 2: Setup for a bootloader with logging
Optional: Bootloader with logging
If you wish to use RTT Viewer to see the bootloader logs you can do this step. If you don't want to use logging please move on to the end of this step.
The first thing we need to do is to navigate to the dfu folder, located in <InstallFolder>\examples\thread\dfu\.
Make a copy of the bootloader folder and give it the name bootloader_debug. Open the folder and open the file thread_dfu_bootloader.ld, we have to do some adjustment to the memory configuration to include logging in our bootloader.
You need to change the FLASH configuration to this:
FLASH (rx) : ORIGIN = 0xef000, LENGTH = 0xf000
And you need to add .log_backends to SECTIONS:
.log_backends :
{
PROVIDE(__start_log_backends = .);
KEEP(*(SORT(.log_backends*)))
PROVIDE(__stop_log_backends = .);
} > FLASH
It should look like this when you are finished:
/* Linker script to configure memory regions. */

SEARCH_DIR(.)
GROUP(-lgcc -lc -lnosys)

MEMORY
{
  FLASH (rx) : ORIGIN = 0xef000, LENGTH = 0xf000
  RAM (rwx) :  ORIGIN = 0x20004000, LENGTH = 0x3bad0
  mbr_params_page (r) : ORIGIN = 0x000FE000, LENGTH = 0x1000
  uicr_mbr_params_page (r) : ORIGIN = 0x00000FFC, LENGTH = 0x4
  bootloader_settings_page (r) : ORIGIN = 0x000FF000, LENGTH = 0x1000
  uicr_bootloader_start_address (r) : ORIGIN = 0x00000FF8, LENGTH = 0x4
  legacy_uicr_bootloader_start_address (r) : ORIGIN = 0x10001014, LENGTH = 0x4
}

SECTIONS
{
  .mbr_params_page(NOLOAD) :
  {
    PROVIDE(__start_mbr_params_page = .);
    KEEP(*(SORT(.mbr_params_page*)))
    PROVIDE(__stop_mbr_params_page = .);
  } > mbr_params_page
  .uicr_mbr_params_page :
  {
    PROVIDE(__start_uicr_mbr_params_page = .);
    KEEP(*(SORT(.uicr_mbr_params_page*)))
    PROVIDE(__stop_uicr_mbr_params_page = .);
  } > uicr_mbr_params_page
  .bootloader_settings_page(NOLOAD) :
  {
    PROVIDE(__start_bootloader_settings_page = .);
    KEEP(*(SORT(.bootloader_settings_page*)))
    PROVIDE(__stop_bootloader_settings_page = .);
  } > bootloader_settings_page
  .uicr_bootloader_start_address :
  {
    PROVIDE(__start_uicr_bootloader_start_address = .);
    KEEP(*(SORT(.uicr_bootloader_start_address*)))
    PROVIDE(__stop_uicr_bootloader_start_address = .);
  } > uicr_bootloader_start_address
  .legacy_uicr_bootloader_start_address :
  {
    PROVIDE(__start_legacy_uicr_bootloader_start_address = .);
    KEEP(*(SORT(.legacy_uicr_bootloader_start_address*)))
    PROVIDE(__stop_legacy_uicr_bootloader_start_address = .);
  } > legacy_uicr_bootloader_start_address
}

SECTIONS
{
  . = ALIGN(4);
  .mem_section_dummy_ram :
  {
  }
  .log_dynamic_data :
  {
    PROVIDE(__start_log_dynamic_data = .);
    KEEP(*(SORT(.log_dynamic_data*)))
    PROVIDE(__stop_log_dynamic_data = .);
  } > RAM
  .fs_data :
  {
    PROVIDE(__start_fs_data = .);
    KEEP(*(.fs_data))
    PROVIDE(__stop_fs_data = .);
  } > RAM

} INSERT AFTER .data

SECTIONS
{
  .mem_section_dummy_rom :
  {
  }
  .log_const_data :
  {
    PROVIDE(__start_log_const_data = .);
    KEEP(*(SORT(.log_const_data*)))
    PROVIDE(__stop_log_const_data = .);
  } > FLASH

  .log_backends :
  {
    PROVIDE(__start_log_backends = .);
    KEEP(*(SORT(.log_backends*)))
    PROVIDE(__stop_log_backends = .);
  } > FLASH
  .crypto_data :
  {
    PROVIDE(__start_crypto_data = .);
    KEEP(*(SORT(.crypto_data*)))
    PROVIDE(__stop_crypto_data = .);
  } > FLASH
  .dfu_trans :
  {
    PROVIDE(__start_dfu_trans = .);
    KEEP(*(SORT(.dfu_trans*)))
    PROVIDE(__stop_dfu_trans = .);
  } > FLASH
  .nrf_balloc :
  {
    PROVIDE(__start_nrf_balloc = .);
    KEEP(*(.nrf_balloc))
    PROVIDE(__stop_nrf_balloc = .);
  } > FLASH
  .svc_data :
  {
    PROVIDE(__start_svc_data = .);
    KEEP(*(.svc_data))
    PROVIDE(__stop_svc_data = .);
  } > FLASH
  .nrf_queue :
  {
    PROVIDE(__start_nrf_queue = .);
    KEEP(*(.nrf_queue))
    PROVIDE(__stop_nrf_queue = .);
  } > FLASH

} INSERT AFTER .text

INCLUDE "nrf_common.ld"
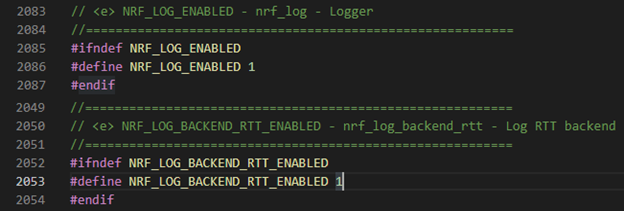
Save and exit the file and open the sdk_config.h file located in
<InstallFolder>\examples\thread\dfu\bootloader_debug\pca10056\blank\config. You need to make sure that these two defines are set to 1:
NRF_LOG_BACKEND_RTT_ENABLED
NRF_LOG_ENABLED
Like this:
After you have checked this, save the file and go back to the dfu folder (<InstallFolder>\examples\thread\dfu\).
Bootloader without logging:
Do nothing and proceed to step 3.
Step 3: Setup for new Client firmware
To save time for our tests we will create a dummy firmware which just lights up the LEDs on the board. Make a copy of the Client folder and name it Client_test. Open the Client_test folder and open main.c, and replace the code with the following snippet:
#include <stdbool.h>
#include <stdint.h>
#include "boards.h"
int main(void)
{
LEDS_CONFIGURE(BSP_LED_0_MASK | BSP_LED_1_MASK | BSP_LED_2_MASK | BSP_LED_3_MASK);
LEDS_ON(BSP_LED_0_MASK | BSP_LED_1_MASK | BSP_LED_2_MASK | BSP_LED_3_MASK);
while (true)
{
;
}
}
Save and exit main.c
Step 4: Generating keys
Step 4: Generating keys
Go back to the dfu folder (<InstallFolder>\examples\thread\dfu\) and open a command prompt window in this folder and run the two commands:
nrfutil keys generate priv.pem
nrfutil keys display --key pk --format code priv.pem --out_file dfu_public_key.c
We need to move and replace the output file of the second command, dfu_public_key.c, with the existing file found in the <InstallFolder>\examples\dfu folder. Read more about keys here. Copy the copy the MBR .hex-file to the dfu folder, the .hex-file is located in the <InstallFolder>\components\softdevice\mbr\nrf52840 folder.
The next step is to create a batch script or a shell script, dependent on which OS you are working on.
Step 5: Command line script
Create a batch script or a shell script dependent on which OS you are working on. Open it in a text editor, and paste the following commands:
make -j -C bootloader_debug\pca10056\blank\armgcc
make -j -C Client\pca10056\blank\armgcc
make -j -C Client_test\pca10056\blank\armgcc
nrfutil pkg generate --hw-version 52 --sd-req 0x00 --application-version 2 --application Client_test\pca10056\blank\armgcc\_build\nrf52840_xxaa.hex --key-file priv.pem app_dfu_package.zip
nrfutil settings generate --family NRF52840 --application Client\pca10056\blank\armgcc\_build\nrf52840_xxaa.hex --application-version 1 --bootloader-version 1 --bl-settings-version 1 settings.hex
mergehex -m Client\pca10056\blank\armgcc\_build\nrf52840_xxaa.hex settings.hex -o dfu_Client.hex
REM Programming section
REM Board 1
nrfjprog -e --snr 683609928
nrfjprog -f nrf52 --program mbr_nrf52_2.4.1_mbr.hex --chiperase --snr 683609928
nrfjprog -f nrf52 --program bootloader_debug\pca10056\blank\armgcc\_build\nrf52840_xxaa_mbr.hex --snr 683609928
nrfjprog -f nrf52 --program dfu_Client.hex --sectorerase --snr 683609928
nrfjprog -r --snr 683609928
This script will compile the Client, bootloader, Client_test, generate the new firmware packet, generate and merge a bootloader settings page with the Client, and program the development kit correctly. If you don't use the bootloader with logging, change the bootloader directory from:
bootloader_debug to bootloader
You need to change the number behind --snr to match the number on your development kit. If you have multiple boards you wish to perform the DFU upgrade on you simply copy the programming section of the script and select a different serial number. It is important that the application-version number for the new firmware packet is larger than the application-version already on the device. As you can see when settings.hex is generate it has version 1 and the new firmware packet has version 2.
Here is a screenshot of my script with two boards:
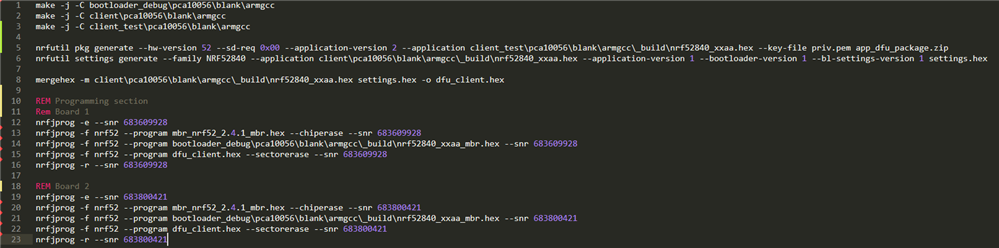
The reason you use the option --chiperase when flashing the MBR is that the bootloader must not be flashed with the --sectorerase option. The nrfutil will refuse to overwrite a section of memory, that was not erased. If you use the --sectorerase option when flashing the bootloader, the MBR will be erased.
Save and exit the script file.
Step 6: Test procedure
Make sure that the nRF Sniffer is still running and logging, the logs will give valuable information about the network traffic. Power up the boards you used in your configuration in Step 5, and power up the board you will use as the Server that will broadcast the new firmware to the Thread network. After you have powered it up you have to check which COM-Port that the Server gets assigned to, in my case it is COM64. When you are ready to start, run the script you created in Step 5, and erase any previous content on the DK you use as a Server. This is the output I have:
λ dfu_debug.bat

make -j -C bootloader_debug\pca10056\blank\armgcc
make: Entering directory `C:/NordicSemi/nRF5_SDK_ThreadZigBeev3/examples/thread/dfu/bootloader_debug/pca10056/blank/armgcc'
DONE nrf52840_xxaa_mbr
make: Leaving directory `C:/NordicSemi/nRF5_SDK_ThreadZigBeev3/examples/thread/dfu/bootloader_debug/pca10056/blank/armgcc'

make -j -C client\pca10056\blank\armgcc
make: Entering directory `C:/NordicSemi/nRF5_SDK_ThreadZigBeev3/examples/thread/dfu/client/pca10056/blank/armgcc'
DONE nrf52840_xxaa
make: Leaving directory `C:/NordicSemi/nRF5_SDK_ThreadZigBeev3/examples/thread/dfu/client/pca10056/blank/armgcc'

make -j -C client_test\pca10056\blank\armgcc
make: Entering directory `C:/NordicSemi/nRF5_SDK_ThreadZigBeev3/examples/thread/dfu/client_test/pca10056/blank/armgcc'
DONE nrf52840_xxaa
make: Leaving directory `C:/NordicSemi/nRF5_SDK_ThreadZigBeev3/examples/thread/dfu/client_test/pca10056/blank/armgcc'

nrfutil pkg generate --hw-version 52 --sd-req 0x00 --application-version 2 --application client_test\pca10056\blank\armgcc\_build\nrf52840_xxaa.hex --key-file priv.pem app_dfu_package.zip
Zip created at app_dfu_package.zip

nrfutil settings generate --family NRF52840 --application client\pca10056\blank\armgcc\_build\nrf52840_xxaa.hex --application-version 1 --bootloader-version 1 --bl-settings-version 1 settings.hex

Note: Generating a DFU settings page with backup page included.
This is only required for bootloaders from nRF5 SDK 15.1 and newer.
If you want to skip backup page generation, use --no-backup option.

Generated Bootloader DFU settings .hex file and stored it in: settings.hex

Bootloader DFU Settings:
* File:                     settings.hex
* Family:                   NRF52840
* Start Address:            0x000FF000
* CRC:                      0xE7969ADC
* Settings Version:         0x00000001 (1)
* App Version:              0x00000001 (1)
* Bootloader Version:       0x00000001 (1)
* Bank Layout:              0x00000000
* Current Bank:             0x00000000
* Application Size:         0x000586F0 (362224 bytes)
* Application CRC:          0xB3A5EB75
* Bank0 Bank Code:          0x00000001
* Softdevice Size:          0x00000000 (0 bytes)
* Boot Validation CRC:      0x00000000
* SD Boot Validation Type:  0x00000000 (0)
* App Boot Validation Type: 0x00000000 (0)


mergehex -m client\pca10056\blank\armgcc\_build\nrf52840_xxaa.hex settings.hex -o dfu_client.hex
Parsing input hex files.
Merging files.
Storing merged file.

REM Programming section

Rem Board 1

nrfjprog -e --snr 683609928
Erasing user available code and UICR flash areas.
Applying system reset.

nrfjprog -f nrf52 --program mbr_nrf52_2.4.1_mbr.hex --chiperase --snr 683609928
Parsing hex file.
Erasing user available code and UICR flash areas.
Applying system reset.
Checking that the area to write is not protected.
Programming device.

nrfjprog -f nrf52 --program bootloader_debug\pca10056\blank\armgcc\_build\nrf52840_xxaa_mbr.hex --snr 683609928
Parsing hex file.
Reading flash area to program to guarantee it is erased.
Checking that the area to write is not protected.
Programming device.

nrfjprog -f nrf52 --program dfu_client.hex --sectorerase --snr 683609928
Parsing hex file.
Erasing page at address 0x1000.
Erasing page at address 0x2000.
Erasing page at address 0x3000.
Erasing page at address 0x4000.
Erasing page at address 0x5000.
Erasing page at address 0x6000.
Erasing page at address 0x7000.
Erasing page at address 0x8000.
Erasing page at address 0x9000.
Erasing page at address 0xA000.
Erasing page at address 0xB000.
Erasing page at address 0xC000.
Erasing page at address 0xD000.
Erasing page at address 0xE000.
Erasing page at address 0xF000.
Erasing page at address 0x10000.
Erasing page at address 0x11000.
Erasing page at address 0x12000.
Erasing page at address 0x13000.
Erasing page at address 0x14000.
Erasing page at address 0x15000.
Erasing page at address 0x16000.
Erasing page at address 0x17000.
Erasing page at address 0x18000.
Erasing page at address 0x19000.
Erasing page at address 0x1A000.
Erasing page at address 0x1B000.
Erasing page at address 0x1C000.
Erasing page at address 0x1D000.
Erasing page at address 0x1E000.
Erasing page at address 0x1F000.
Erasing page at address 0x20000.
Erasing page at address 0x21000.
Erasing page at address 0x22000.
Erasing page at address 0x23000.
Erasing page at address 0x24000.
Erasing page at address 0x25000.
Erasing page at address 0x26000.
Erasing page at address 0x27000.
Erasing page at address 0x28000.
Erasing page at address 0x29000.
Erasing page at address 0x2A000.
Erasing page at address 0x2B000.
Erasing page at address 0x2C000.
Erasing page at address 0x2D000.
Erasing page at address 0x2E000.
Erasing page at address 0x2F000.
Erasing page at address 0x30000.
Erasing page at address 0x31000.
Erasing page at address 0x32000.
Erasing page at address 0x33000.
Erasing page at address 0x34000.
Erasing page at address 0x35000.
Erasing page at address 0x36000.
Erasing page at address 0x37000.
Erasing page at address 0x38000.
Erasing page at address 0x39000.
Erasing page at address 0x3A000.
Erasing page at address 0x3B000.
Erasing page at address 0x3C000.
Erasing page at address 0x3D000.
Erasing page at address 0x3E000.
Erasing page at address 0x3F000.
Erasing page at address 0x40000.
Erasing page at address 0x41000.
Erasing page at address 0x42000.
Erasing page at address 0x43000.
Erasing page at address 0x44000.
Erasing page at address 0x45000.
Erasing page at address 0x46000.
Erasing page at address 0x47000.
Erasing page at address 0x48000.
Erasing page at address 0x49000.
Erasing page at address 0x4A000.
Erasing page at address 0x4B000.
Erasing page at address 0x4C000.
Erasing page at address 0x4D000.
Erasing page at address 0x4E000.
Erasing page at address 0x4F000.
Erasing page at address 0x50000.
Erasing page at address 0x51000.
Erasing page at address 0x52000.
Erasing page at address 0x53000.
Erasing page at address 0x54000.
Erasing page at address 0x55000.
Erasing page at address 0x56000.
Erasing page at address 0x57000.
Erasing page at address 0x58000.
Erasing page at address 0x59000.
Erasing page at address 0xFE000.
Erasing page at address 0xFF000.
Applying system reset.
Checking that the area to write is not protected.
Programming device.

nrfjprog -r --snr 683609928
Applying system reset.
Run.

REM Board 2

nrfjprog -e --snr 683800421
Erasing user available code and UICR flash areas.
Applying system reset.

nrfjprog -f nrf52 --program mbr_nrf52_2.4.1_mbr.hex --chiperase --snr 683800421
Parsing hex file.
Erasing user available code and UICR flash areas.
Applying system reset.
Checking that the area to write is not protected.
Programming device.

nrfjprog -f nrf52 --program bootloader_debug\pca10056\blank\armgcc\_build\nrf52840_xxaa_mbr.hex --snr 683800421
Parsing hex file.
Reading flash area to program to guarantee it is erased.
Checking that the area to write is not protected.
Programming device.

nrfjprog -f nrf52 --program dfu_client.hex --sectorerase --snr 683800421
Parsing hex file.
Erasing page at address 0x1000.
Erasing page at address 0x2000.
Erasing page at address 0x3000.
Erasing page at address 0x4000.
Erasing page at address 0x5000.
Erasing page at address 0x6000.
Erasing page at address 0x7000.
Erasing page at address 0x8000.
Erasing page at address 0x9000.
Erasing page at address 0xA000.
Erasing page at address 0xB000.
Erasing page at address 0xC000.
Erasing page at address 0xD000.
Erasing page at address 0xE000.
Erasing page at address 0xF000.
Erasing page at address 0x10000.
Erasing page at address 0x11000.
Erasing page at address 0x12000.
Erasing page at address 0x13000.
Erasing page at address 0x14000.
Erasing page at address 0x15000.
Erasing page at address 0x16000.
Erasing page at address 0x17000.
Erasing page at address 0x18000.
Erasing page at address 0x19000.
Erasing page at address 0x1A000.
Erasing page at address 0x1B000.
Erasing page at address 0x1C000.
Erasing page at address 0x1D000.
Erasing page at address 0x1E000.
Erasing page at address 0x1F000.
Erasing page at address 0x20000.
Erasing page at address 0x21000.
Erasing page at address 0x22000.
Erasing page at address 0x23000.
Erasing page at address 0x24000.
Erasing page at address 0x25000.
Erasing page at address 0x26000.
Erasing page at address 0x27000.
Erasing page at address 0x28000.
Erasing page at address 0x29000.
Erasing page at address 0x2A000.
Erasing page at address 0x2B000.
Erasing page at address 0x2C000.
Erasing page at address 0x2D000.
Erasing page at address 0x2E000.
Erasing page at address 0x2F000.
Erasing page at address 0x30000.
Erasing page at address 0x31000.
Erasing page at address 0x32000.
Erasing page at address 0x33000.
Erasing page at address 0x34000.
Erasing page at address 0x35000.
Erasing page at address 0x36000.
Erasing page at address 0x37000.
Erasing page at address 0x38000.
Erasing page at address 0x39000.
Erasing page at address 0x3A000.
Erasing page at address 0x3B000.
Erasing page at address 0x3C000.
Erasing page at address 0x3D000.
Erasing page at address 0x3E000.
Erasing page at address 0x3F000.
Erasing page at address 0x40000.
Erasing page at address 0x41000.
Erasing page at address 0x42000.
Erasing page at address 0x43000.
Erasing page at address 0x44000.
Erasing page at address 0x45000.
Erasing page at address 0x46000.
Erasing page at address 0x47000.
Erasing page at address 0x48000.
Erasing page at address 0x49000.
Erasing page at address 0x4A000.
Erasing page at address 0x4B000.
Erasing page at address 0x4C000.
Erasing page at address 0x4D000.
Erasing page at address 0x4E000.
Erasing page at address 0x4F000.
Erasing page at address 0x50000.
Erasing page at address 0x51000.
Erasing page at address 0x52000.
Erasing page at address 0x53000.
Erasing page at address 0x54000.
Erasing page at address 0x55000.
Erasing page at address 0x56000.
Erasing page at address 0x57000.
Erasing page at address 0x58000.
Erasing page at address 0x59000.
Erasing page at address 0xFE000.
Erasing page at address 0xFF000.
Applying system reset.
Checking that the area to write is not protected.
Programming device.

nrfjprog -r --snr 683800421
Applying system reset.
Run.

λ nrfjprog.exe -r --snr 683118922
Applying system reset.
Run.
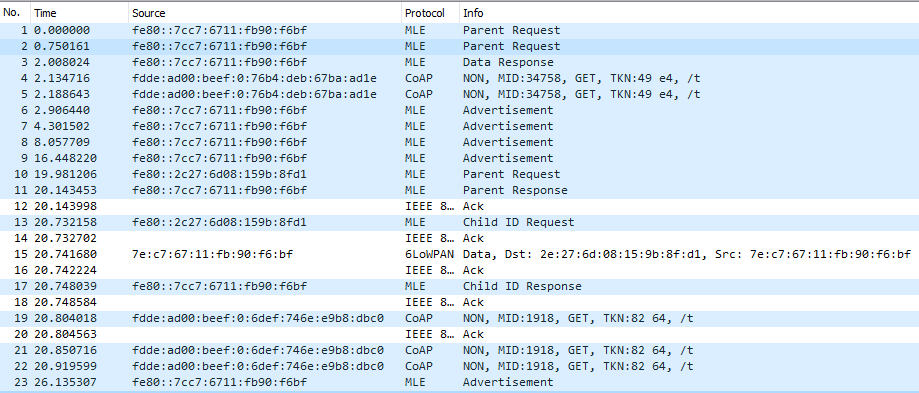
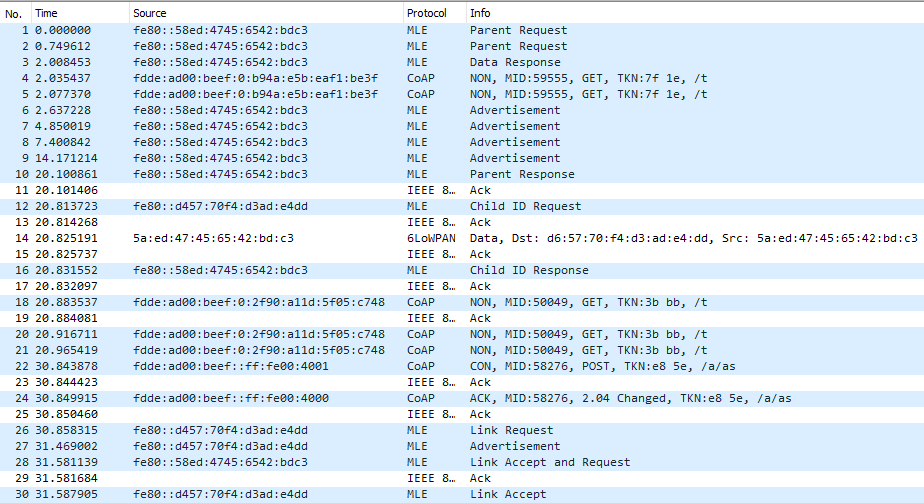
If we take a look at Wireshark, we can see that the first Client starts to form a network. The first Client which has the source address fe80::7cc7:6711:fb90:f6bf sends two Parent Request packets (packet 1 and 2). As there is no router or leader in our network already since it is a new network we get no response. The Client then sends a Data Response packet (packet 3) and creates our Thread network and becomes the leader of this network. When the second DK (fe80::2c27:6d08:159b:8fd1) is flashed with the Client firmware it also sends out a Parent Request (packet 10) to which the leader responds with a Parent Response (packet 11). The process of joining the network for the second Client occurs from packet 10 to packet 18. We can also see that the Clients checks for availability of new firmware packages by sending a trigger packet using the coap_dfu_trigger() function, these packets are the GET trigger packets in the Wireshark log (packet 4, 5, 19, 21, and 22).
As mentioned in the introduction of this tutorial there are two methods of propagating our packets on to the Thread network, unicast and multicast. We will try both starting with multicast mode.
Multicast mode
We will use nrfutil to flash the Server firmware to the Server DK. From the dfu folder (<InstallFolder>\examples\thread\dfu\) open a command prompt window and run the following command:
nrfutil dfu thread -f -pkg app_dfu_package.zip -p COM64 --channel 11 --panid 43981 -r 4 -rs 5000 -a FF03::1
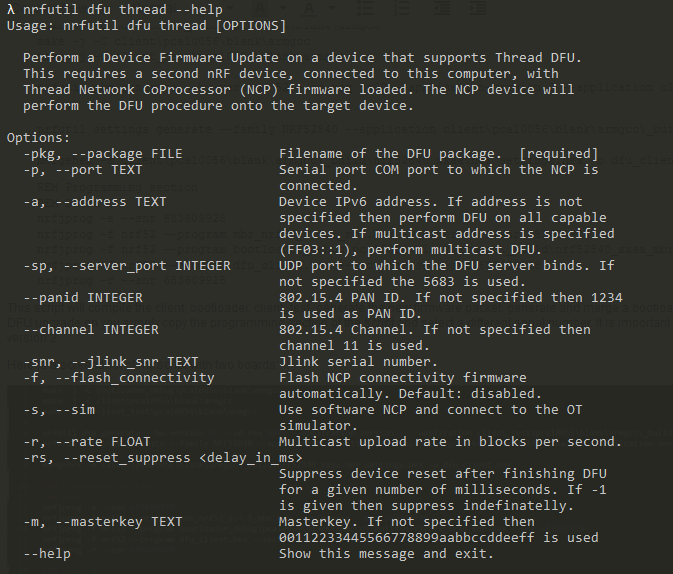
The screenshot above shows the different options for nrfutil, note that you have to select the correct COM-Port.
When we run this command we can see in Wireshark that the Server connects to our network:
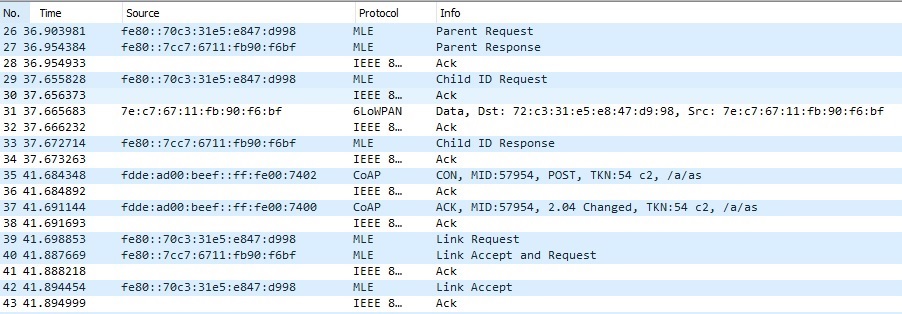
It connects the same way as our first node, and the Server also gets promoted to a router, as we can see that it sends a Link Request which is responded by a Link Accept and Request message. The whole update process log can be found in the attachment at the bottom of the tutorial.
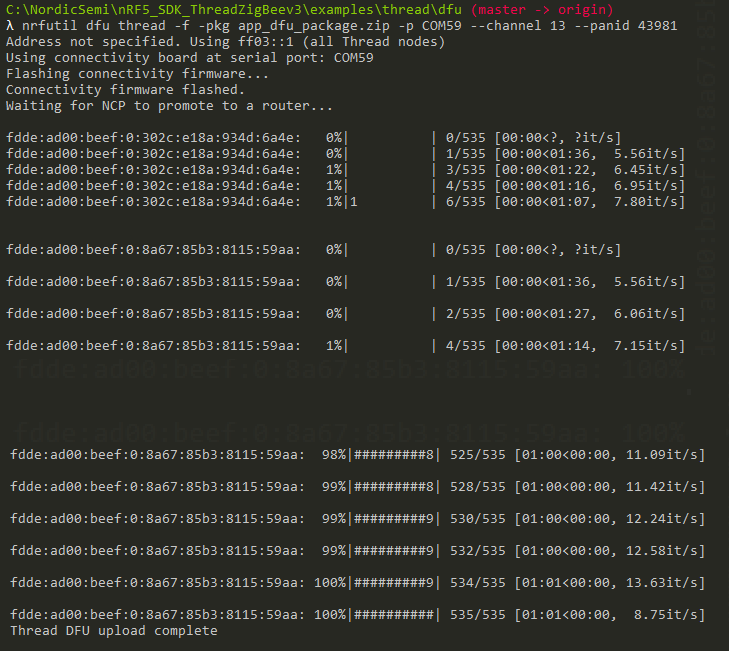
The update procedure took 3 minutes and 12 seconds, below you can see how the command prompt window looks at the start and end of the process.
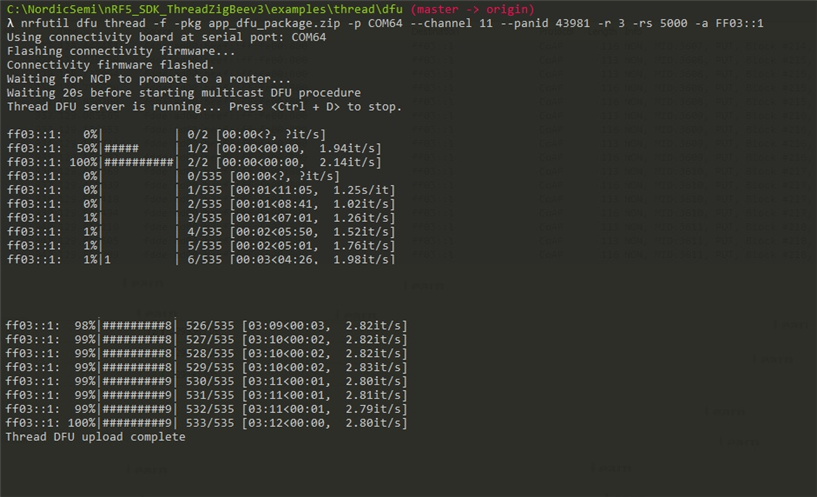
After the upgrade is finished, the boards reset when the Device reset packet is received and all four LEDs turn on, meaning that the new Application is now running on our two Clients.
Unicast mode
We have to clean the boards and flash them again before we try unicast mode. Simply run the script from Step 5 again, and you will also see the same behaviour when the network is forming as for multicast mode.
We can also see that our second node gets promoted to a router from packet 28.
To start the DFU process, simply run the following nrfutil command:
The update procedure took 1 minute and 1 second, below you can see how the command prompt window looks at the start and end of the process.
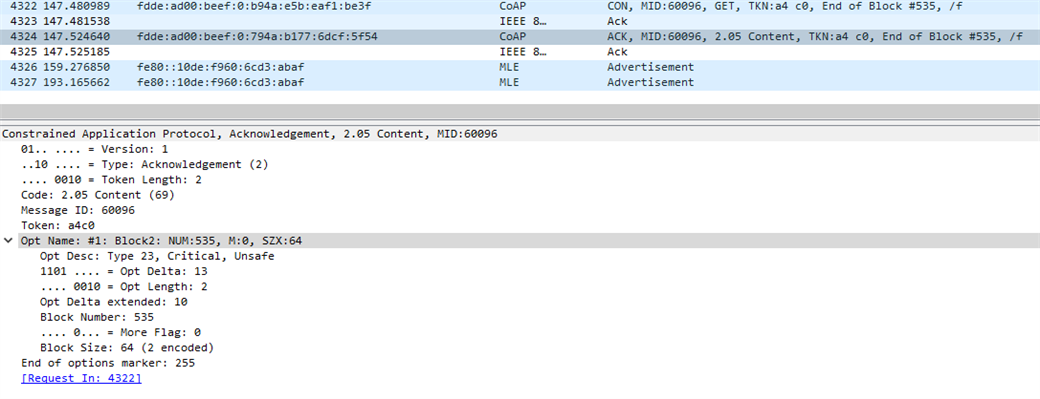
It should be noted that this screenshot has addresses that do not match with the addresses in the screenshot above, this was because I had to do the upgrade a second time to take the screenshot of the console output. The whole update process log can be found in the attachment at the bottom of the tutorial. Unlike in multicast where there is a reset device packet transmitted, the Client checks if we have received a CoAP packet with Opt Name #1 -> M: 0, as shown in the screenshot below. This packet is the last packet of the update procedure and is found in both multicast and unicast, and it is used in unicast mode to determine if all data were transmitted.
Sniffer logging and project files can be downloaded here: Tutorial.zip
The following content is in this .zip file:
|   dfu_debug.bat
|   keys.bat
|
+---bootloader_debug
|   |   main.c
|   |   thread_dfu_bootloader.ld
|   |   thread_secure_dfu_bootloader.eww
|   |
|   \---pca10056
|       \---blank
|           +---arm5_no_packs
|           |       thread_secure_dfu_bootloader_secure_dfu_blank_pca10056.uvoptx
|           |       thread_secure_dfu_bootloader_secure_dfu_blank_pca10056.uvprojx
|           |
|           +---armgcc
|           |       Makefile
|           |
|           +---config
|           |       sdk_config.h
|           |
|           +---iar
|           |       thread_secure_dfu_bootloader_iar_nRF5x.icf
|           |       thread_secure_dfu_bootloader_secure_dfu_blank_pca10056.ewd
|           |       thread_secure_dfu_bootloader_secure_dfu_blank_pca10056.ewp
|           |
|           \---ses
|                   flash_placement.xml
|                   thread_secure_dfu_bootloader_secure_dfu_blank_pca10056.emProject
|                   thread_secure_dfu_bootloader_secure_dfu_blank_pca10056.emSession
|
+---client
|   |   main.c
|   |   thread_secure_dfu_client.eww
|   |
|   \---pca10056
|       \---blank
|           +---arm5_no_packs
|           |       thread_secure_dfu_client_pca10056.uvoptx
|           |       thread_secure_dfu_client_pca10056.uvprojx
|           |
|           +---armgcc
|           |       Makefile
|           |       thread_secure_dfu_client_gcc_nrf52.ld
|           |
|           +---config
|           |       sdk_config.h
|           |
|           +---iar
|           |       thread_secure_dfu_client_iar_nRF5x.icf
|           |       thread_secure_dfu_client_pca10056.ewd
|           |       thread_secure_dfu_client_pca10056.ewp
|           |
|           \---ses
|                   flash_placement.xml
|                   thread_secure_dfu_client_pca10056.emProject
|                   thread_secure_dfu_client_pca10056.emSession
|
+---client_test
|   |   main.c
|   |   thread_secure_dfu_client.eww
|   |
|   \---pca10056
|       \---blank
|           +---arm5_no_packs
|           |       thread_secure_dfu_client_pca10056.uvoptx
|           |       thread_secure_dfu_client_pca10056.uvprojx
|           |
|           +---armgcc
|           |       Makefile
|           |       thread_secure_dfu_client_gcc_nrf52.ld
|           |
|           +---config
|           |       sdk_config.h
|           |
|           +---iar
|           |       thread_secure_dfu_client_iar_nRF5x.icf
|           |       thread_secure_dfu_client_pca10056.ewd
|           |       thread_secure_dfu_client_pca10056.ewp
|           |
|           \---ses
|                   flash_placement.xml
|                   thread_secure_dfu_client_pca10056.emProject
|                   thread_secure_dfu_client_pca10056.emSession
|
\---Sniffer log
        dfu_multicast_one_node.pcapng
        dfu_multicast_two_nodes.pcapng
        dfu_unicast_one_nodes.pcapng
        dfu_unicast_two_nodes.pcapng
Unzip the file and open the log files in Wireshark.
Troubleshooting:
Issues joining the network:
- Do all the devices have the correct channel set up?
- Can you see that the Server is broadcasting in Wireshark?
- Do a memory erase on all devices, delete all generated .hex-files and the firmware package, and start from Step 2.
Issues with upgrading the firmware:
- Is the version number correct?
- Does the new Application run smoothly on another DK?
- Are the correct keys used?
For any questions regarding Thread or this getting started guide, please create a ticket in DevZone.
