Board Support Package
In this tutorial we will use the Board Support Package to control hardware peripherals on the nRF51 or nRF52 DK.
Required tools
- Keil 5.20
- nRF SDK 11
- nRFgo Studio 1.21.2
- Putty
Introduction
The Board Support Package(BSP) is a module that provides a layer of abstraction from the physical board. With it you can target your hardware peripherals, such as buttons, LEDs and UART, across different hardware with the same code.
Adding support for a custom board
In order to make it easy to port projects between different boards, all projects come with a board support package. In the main.c file, it can be seen that bsp.h is included, which in turn includes boards.h. In the latter file we see some preprocessor directives that check if a certain symbol is defined, if it is a corresponding header file will be included. These header files are the board-specific files that map the correct pins to the correct external components. For example, on the nRF52 development kit, LED_1 is connected to pin 17, while on the nRF51 development kit, LED_1 is connected to pin 21. Porting a project to a different board is then a matter of simply defining the correct board in the project.
When you have a project open in Keil, project defines can be entered in the target options.
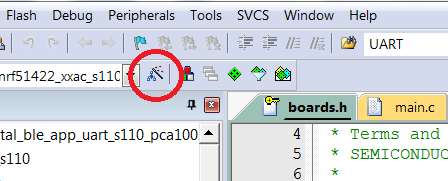
- Go to Projects -> Options for Target, or click the shortcut as shown below image description

-
In the C/C++ tab, change the BOARD_PCA100XX symbol in the list of Preprocessor Symbols to the board you wish.
-
Click Ok
If you want to make your own PCB that works with the board support package, you will need to make a custom board support file with the name custom_board.h. The file needs to be located in a directory in the include path. The easiest way to do this is to start with an existing definition file, for example the one for the PCA10028, and then modify it to your needs. A more detailed description can be found in the SDK.
Using BSP
For this tutorial we will use the zip-style architecture with the Keil IDE.
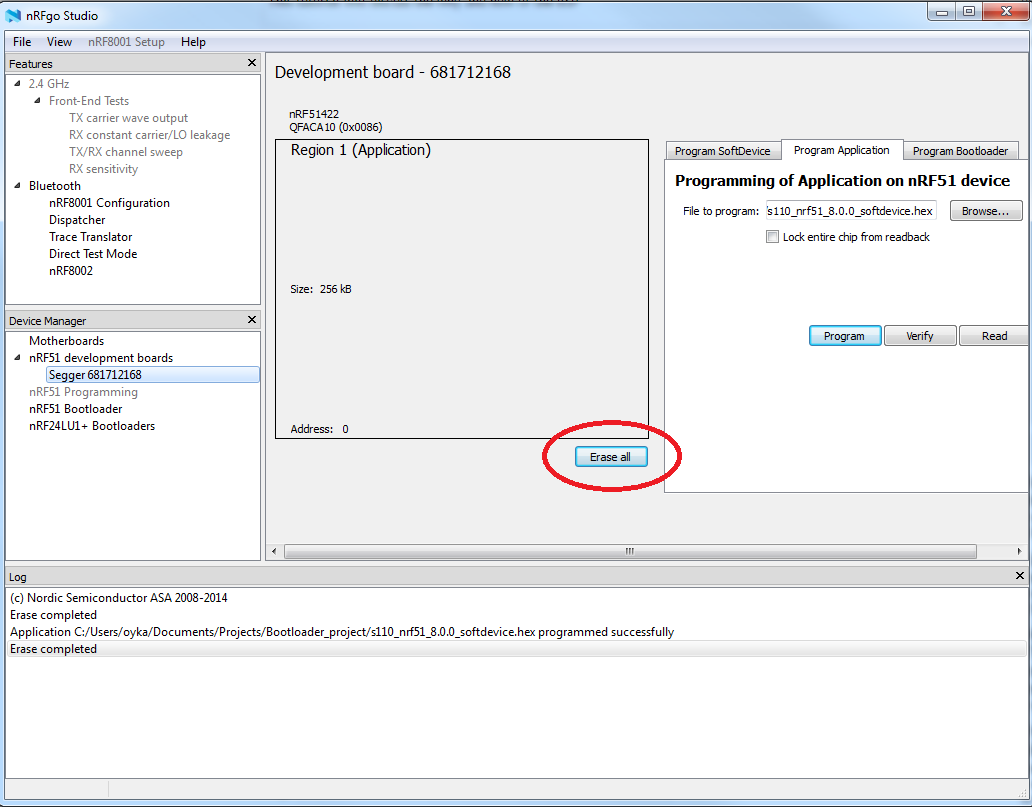
This application does not use a SoftDevice, so in order to program our application we first have to erase what is currently on the development kit. Open nRFgo Studio and hit erase all.

Download and extract the SDK, make sure to use an extraction tool that supports long paths, I prefer 7-zip.
For nRF52 navigate to [YOUR_SDK_LOCATION]\nRF5_SDK_11.0.0_89a8197\examples\peripheral\bsp\pca10040\arm5_no_packs and open the µVision5 project bsp_pca10040.
For nRF51 navigate to [YOUR_SDK_LOCATION]\nRF5_SDK_11.0.0_89a8197\examples\peripheral\bsp\pca10028\arm5_no_packs and open the µVision5 project bsp_pca10028.
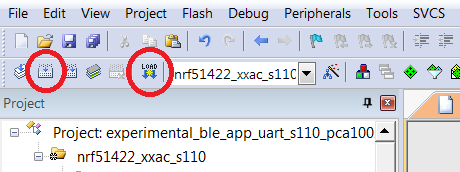
- Go to Project -> Build Target, or press the Build button shown on the left below.

- Next flash the application to your development kit by pressing the download button shown above
For the next step we will use a terminal program to listen to a serial COM port. For this tutorial I will use the terminal program Putty, however there are multiple options. First we need to figure out which COM-port has been assigned to your development kit, one way to do this is to check the device manager and look for JLink applications. Once you have found which COM-port to use open Putty.
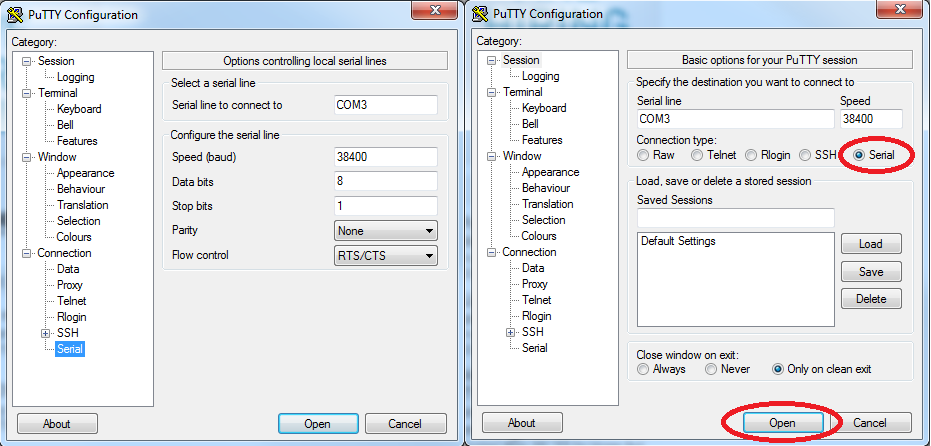
- Configure the Connection -> Serial tab as shown to the left below.
- In the Session tab choose Serial as the Connection type, and hit open.

Pressing Button 1 and Button 2 on the development kit will now cycle through the different BSP indication states, showing which state it is in via UART on the terminal window, and blinking according to the Indication states.
Event handler configuration
Lets make some changes to the code. We want each button 1-4 to change the light on a set LED.
The BSP uses interrupts, when an interrupt is triggered, e.g. when a button gets pressed, an interrupt handler is called. The BSP interrupt handler in the BSP_PCA100XX example is called bsp_evt_handler(). This event handler is set when calling bsp_init() inside main. This interrupt handler is called when a set of events are flagged, these events are described in the SDK.
Lets change the event handler from
void bsp_evt_handler(bsp_event_t evt)
{
	uint32_t err_code;
	switch (evt)
	{
    	case BSP_EVENT_KEY_0:

        		if (actual_state != BSP_INDICATE_FIRST)
            		actual_state--;
        		else
            		actual_state = BSP_INDICATE_LAST;
        		break;

    	case BSP_EVENT_KEY_1:

        		if (actual_state != BSP_INDICATE_LAST)
            		actual_state++;
        		else
            		actual_state = BSP_INDICATE_FIRST;
        		break;

    	default:
        		return; // no implementation needed
	}

	err_code = bsp_indication_text_set(actual_state, indications_list[actual_state]);
	APP_ERROR_CHECK(err_code);
}
}
To
void bsp_evt_handler(bsp_event_t evt)
{
		switch (evt)
		{
    		case BSP_EVENT_KEY_0: //On Button 1 press
				LEDS_INVERT(BSP_LED_0_MASK); //Changes the current state of LED_1
				break;

			case BSP_EVENT_KEY_1: //On Button 2 press
				LEDS_INVERT(BSP_LED_1_MASK); //Changes the current state of LED_2
				break;

    		case BSP_EVENT_KEY_2: //On Button 3 press
				LEDS_INVERT(BSP_LED_2_MASK); //Changes the current state of LED_3
				break;

			case BSP_EVENT_KEY_3:	//On Button 4 press
				LEDS_INVERT(BSP_LED_3_MASK); //Changes the current state of LED_4
				break;

    		default:
        		return; // no implementation needed
		}
		uint32_t err_code = NRF_SUCCESS;
		APP_ERROR_CHECK(err_code);
	}
}
- Go to Project -> Build Target, or press the Build button shown on the left below.

- Next flash the application to your development kit by pressing the download button shown above
To verify that things work correctly try pressing Button 1-4 and see if the corresponding LED is lit or unlit upon pressing each of the four buttons.
Board support setup
Now that we've seen how to use the BSP in an example project, lets go through how to set it up for your own project. First we need to cover some dependencies. Depending on what support you need the following things need to be configured:
-
Application Timer for LED support
-
GPIOTE Handler for button support
-
UART module for UART support
To initialize BSP we need to call the function:
uint32_t bsp_init (uint32_t type, uint32_t ticks_per_100ms, bsp_event_callback_t callback)
Where the type is which support you would like to include, e.g. if you want to include LED, BUTTON and UART this would be:
BSP_INIT_LED | BSP_INIT_BUTTONS | BSP_INIT_UART
Next we need to configure how often we want the application timer to tick, for example APP_TIMER_TICKS(100, APP_TIMER_PRESCALER)
The callback is the function that should be called when you get a BSP event. This function is typecast to return void and take a bsp_event_t as input.
Further reading
For more BSP-functions see the section in the SDK on Board Support Package

Top Comments