
###Note: This tutorial is for the legacy DFU module included in SDK version 11 and earlier. To get started with the new DFU included in SDK 12 and above, please see the SDK documentation in the Infocenter here
In this tutorial we will implement and test a dual bank bootloader on the nRF51 DK using either a nRF51 dongle, or an Android based smartphone.
Necessary equipment and software
-
nRF51 Dongle or a smartphone with the nRF Toolbox app
-
Master Control Panel (MCP) V3.9.0 or a smartphone with the nRF Toolbox app
-
Keil V5.20 or later
Other kits, dongles and software versions might work as well, but are not covered by this tutorial. Software setup is not covered by this tutorial.
Necessary prior knowledge
This tutorial is intended to be accessed after completing BLE Advertising, a beginner’s tutorial. It is also a good idea to access the SDK documentation, particularly the section on BLE DFU Bootloader, which this tutorial is heavily based on.
Motivation and theory
A bootloader is a piece of software that is always executed first on system startup, it is responsible for the initial loading of system software onto hardware. In our case this system is the SoftDevice, any applications and the bootloader itself. Since the bootloader is responsible for loading the system, we can tell the bootloader to load a new file instead of the old one or replace the old image with the new one.
So what are the applications of a bootloader? For a chip with radio capabilities, such as the nRF51 or nRF52, a bootloader means that you can remotely update your device, which is the goal of this tutorial.
A dual bank bootloader means that the old application, bootloader and SoftDevice is stored, while software is being updated. If the update fails, the bootloader can fall back to the original and still valid application. This makes a dual bank bootloader a secure option.
If you want to update only your application, SoftDevice or bootloader you can do this with the advantage of having more swap memory available, this is described well in this video. The video also describes how single bank bootloading works.
Programming the DFU bootloader
Connect the development kit, and make sure it is programmed with SoftDevice S132 V2 for nRF52 and S130 for nRF51, as explained in this tutorial.
-
Download and extract the zip version of SDK V11 to your project folder, for example "C:\Users\username\Documents\Projects\Bootloader_project"
-
For nRF51: Navigate to "..\your_project_folder\examples\dfu\bootloader\pca10028\dual_bank_ble_s130\arm5_no_packs" and open the Keil project file "dfu_dual_bank_ble_s110_pca10028"
-
For nRF52: Navigate to "..\your_project_folder\examples\dfu\bootloader\pca10040\dual_bank_ble_s132\arm5_no_packs" and open the Keil project file "dfu_dual_bank_ble_s132_pca10040"
The project should now be open in a new Keil window. Hit build(F7) to compile.
Flashing the development kit
- Select Project -> Options for Target, or press the hotkey as shown below

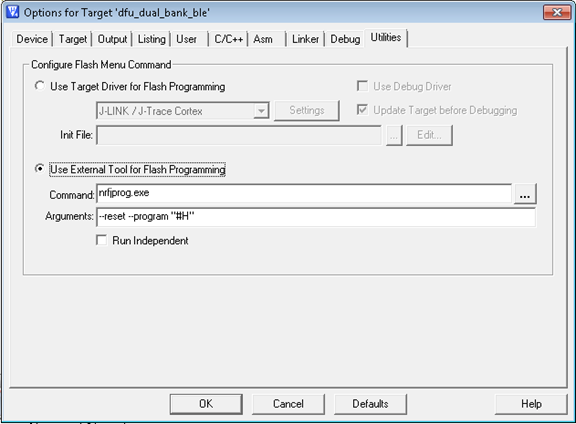
We need to make sure that nrfjprog.exe is configured as the tool for flash programming in project options. The default J-link target driver cannot correctly program the bootloader, this is because J-link can not write directly to the User Information Configuration Registers(UICR) from a hex file. The example project is preconfigured to use nrfjprog.exe, which is installed with the command line tools, and must be in the Windows system path. If you are having trouble with nrfjprog, setup and integration with Keil is described in this blogpost.
- Configure the Utilities tab as shown below
Program the DFU bootloader by pressing Download. If you have several J-link emulators connected, chose the one that contains the development kit.
The LEDs are now assigned like this:
- LED1: Advertising
- LED2: Connected
- LED3: Bootloader mode active
Verify that everything is working properly by examining that the advertising and bootloader LEDs are lit. If the bootloader LED is not lit, try pressing Button 4 during startup, this will put the device into bootloader mode. If nothing lights up, try power cycling.
Testing the DFU
In this tutorial we will be covering programming from a PC using the nRF51 dongle, and programing from a smartphone using the nRF Toolbox app. To program our device over BLE we need a zip file containing a bootloader, SoftDevice or application hex file(or a combination of these three), and a corresponding initialization packet.
- Notes on creating these zip files can be found here.
For our tutorial we will be using a ready-made zip file called “dfu_test_app_hrm_s13x.zip”, located in “SDK_FOLDER\examples\dfu\hci_dfu_send_hex\test_images_dual_bank_update_nrf5x”. SDK 11 BUG: due to wrong SoftDevice settings in nRF52 version of file you should use this zip package instead.
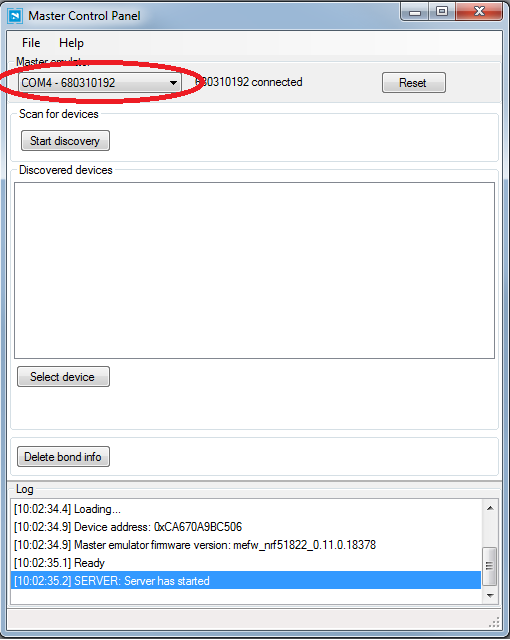
Option A: nRF51 dongle programming Connect the nRF51 Dongle, and check which virtual COM-port has been assigned to it.
- Select the dongle in the device list, then press File -> Flash Programming and press Program
-
Press Start discovery
-
Locate DFU Targ, select it in the list, then click Select device
-
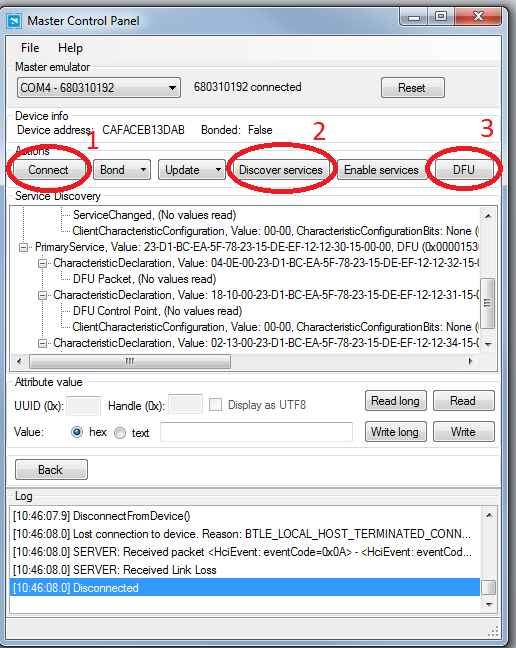
A new menu will open, press Connect(1). Once connected, click Discover services(2)
-
Updating the application over BLE: Press DFU(3), and select the "dfu_test_app_hrm_s13x.zip” file, press program and wait for the firmware to update
Option B: Android smartphone programming
-
Transfer “dfu_test_app_hrm_s13x.zip” to your smartphone
-
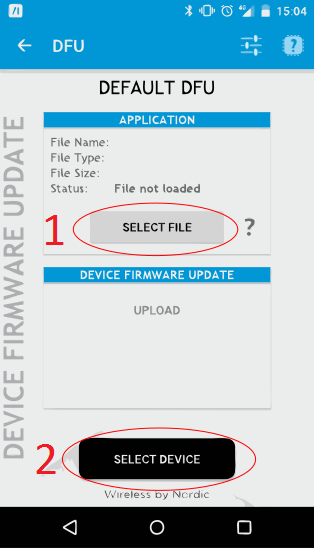
Open the nRF Toolbox, and press DFU
-
Press Select device(2) and chose DFU Targ
-
Press Select file(1) and chose the .zip file you added earlier, then press upload
Checking correctness
To check that the firmware was properly transferred to the nRF51 DK, notice that LED1 is now blinking when advertising. Next open Master Control Panel, and look for the nRF51 DK under its new name Dfu_HRM. Hit select, then connect, and you should notice that LED1 is no longer blinking, but is constantly lit, signifying an ongoing connection.
To reenter bootloader mode, we can either hold down a button, button 4 in this case, or implement a buttonless version as described here.
This post is not actively monitored, if you see any issues please post them as a question on DevZone.
Further reading
On size constraints using a dual bank bootloader
A quick presentation on how nRF51 DFU works
-

Alexej Gerstmaier
-
Cancel
-
Vote Up
0
Vote Down
-
-
More
-
Cancel
Comment-

Alexej Gerstmaier
-
Cancel
-
Vote Up
0
Vote Down
-
-
More
-
Cancel
Children