
Before we begin
Table of content
Topics that will be covered include:
-
- Before we begin
- Basic theory
- Attribute tables in nRFConnect Bluetooth Low Energy application
- Description of the example
- Adding a characteristic
- Updating the characteristic and sending notifications
Equipment and software
To complete this tutorial you will need the following:
-
- [nRF52 DK]( https://www.nordicsemi.com/eng/Products/Bluetooth-low-energy/nRF52-DK)
- [nRF52 Dongle or an additional development kit]( https://www.nordicsemi.com/eng/Products/nRF52840-Dongle)
- Keil uVision V5.xx or SEGGER Embedded Studio (SES).
- [nRF Connect for Desktop](https://www.nordicsemi.com/eng/Products/Bluetooth-low-energy/nRF-Connect-for-Desktop). You can also use nRF Connect for mobile found in both Google Play on Android and App Store for iPhone.
- [SDK V15.0.0]( https://developer.nordicsemi.com/nRF5_SDK/nRF5_SDK_v15.x.x/).
- [Softdevice S132 V6.x.x]( https://www.nordicsemi.com/eng/nordic/Products/nRF52832/S132-SD-v6/67248).
- [Example files](https://github.com/NordicSemiconductor/nrf5-ble-tutorial-characteristic/tree/master) found on github. There is also a folder you can look at with the finished code including solutions to the challenges.
Other kits, dongles and software versions might work as well, but this is what I have used. This tutorial will not cover how to install and setup the software.
Necessary prior knowledge
This tutorial is intended to be a natural continuation of the BLE Services, a beginner's tutorial and BLE Advertising, a beginner's tutorial. It is recommended, but not necessary, to go through these tutorials first. It is expected that you have basic knowledge of how to use Keil or SES and the nRF Connect BLE app. Read the tutorial Setting up an example project on the nRF51 DK to learn how to use your equipment and compile your first BLE application.
If you run into troubles please browse devzone, look for documentation on our Infocenter, and read the user guides for your kits. You can also check out the "Solution" folder for a proposed solution. I urge you to post any questions you might have on the forum and not below the tutorial. This makes it easier for other users and Nordic employees to see and search for your questions and you will most likely get a faster response(!).
Some basic theory
The Attribute Protocol and the Generic Attribute Profile
My goal in this tutorial is to have as little theory as possible, but still get you up and running with a “springboard” application. An application it is easy to customize and expand upon. Yet the Attribute Protocol (ATT) and Generic Attribute Profile (GATT) are so essential to BLE that there is no way around a brief introduction. Basic knowledge of the ATT and the GATT is useful later in this tutorial, although when you make simple applications and work with Nordic’s SoftDevices and SDKs these are not concepts you have to worry much about. You should be able to skip the theory and still complete the tutorial, but as mentioned we will refer to the following concepts as we go.
Attribute Protocol (ATT)
As shown in the figure below the BLE protocol is built upon a number of layers.
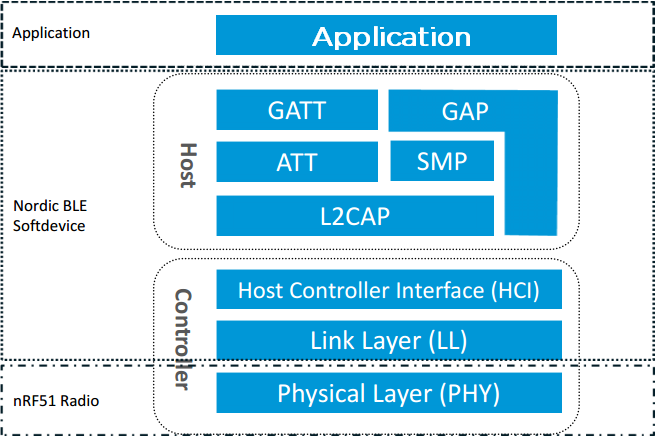
Notice how the application layer is right above the GATT which in turn is built upon the ATT. The ATT is based on a Client <–> Server relationship. The server holds information like sensor values, the state of a light switch, position data, etc. This information is organized in a table, referred to as an attribute table. Each attribute in the table is a value or piece of information with some associated properties. So when a client wants the sensor data it refers to e.g. row 11 in the table. If it wants the state of the light switch it might refer to row 16, and so on. Here is an excerpt from the Bluetooth Core Specification V4.2 (Hereafter referred to as BCS):
Vol 3:, Part F, Ch. 2, “Protocol Overview”:
The attribute protocol defines two roles; a server role and a client role. It allows a server to expose a set of attributes to a client that are accessible using the attribute protocol. An attribute is a discrete value that has the following three properties associated with it: (1) an attribute type, defined by a UUID, (2) an attribute handle, (3) a set of permissions that are defined by each higher layer specification that utilizes the attribute; these permissions cannot be accessed using the Attribute Protocol.
The attribute type specifies what the attribute represents. Bluetooth SIG defined attribute types are defined in the Bluetooth SIG assigned numbers page, and used by an associated higher layer specification. Non-Bluetooth SIG attribute types may also be defined.
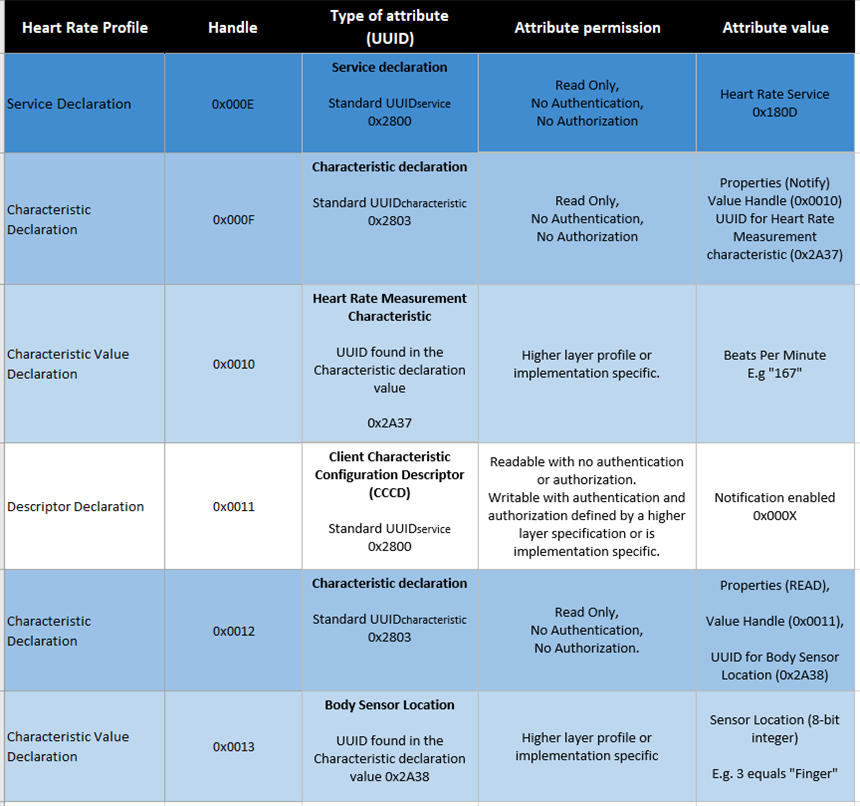
Let us relate this to a typical application, namely the Heart Rate Profile. In Table 1 each and every row is an attribute, and each attribute has a handle, a type, a set of permissions, and a value.
Table 1:
Attribute Handles
The attribute handle uniquely identifies an attribute on a server, allowing a client to reference the attribute in read or write requests. To simplify things then handle can be considered as the row number in the attribute table. Although the handle number might not be sequential. The handles are 16-bit numbers and you will see later on that the SoftDevice use handles extensively to refer to various attributes. From a programmer’s perspective it is actually a quite effective way to pass values and information between functions. It makes it easy for your application to keep track of the attributes and to grab whatever information it needs. The handle numbers vary depending on how many attributes you have.
Attribute Types (UUIDs)
A Universally Unique ID (UUID) is a 16 or 128-bit value used to identify the type of every attribute. In Table 1 there are five different types of attributes; one of type “Service Declaration” (0x2800), two of type “Characteristic Declaration” (0x2803), one of type “Heart Rate Measurement Characteristic Value” (0x2A37), one of type “Body Sensor Location Characteristic Value” (0x2A38), and finally one of type “Descriptor Declaration” (0x2902). Six attributes in total. There are more attribute types, and later on in the tutorial we will make our own.
Attribute Permissions
Permissions define some rules of how you can interact with a specific attribute. It defines whether an attribute should be readable and/or writeable and what kind of authorization is required to do the operations. Note that these permissions only apply to the attribute value, not the handle, type, and the permission field itself. This allows a client to look through a server’s attribute table and discover what the server can provide. Although not necessarily read and write the values.
Attribute Values
The value can be anything. It can be a heart rate value measured in beats per minute, the state of a light switch, or a string like “Hello World”. And sometimes it is information about where to find other attributes and their properties. For example, in the Service Declaration attribute in Table 1 (handle 0x000E) the value holds a UUID (0x180D) identifying what kind of service it is (notice the "Assigned Number" field for the Heart Rate service, almost at the top of this page). The Characteristic Declaration value (handle 0x000F) holds information about the subsequent Characteristic Value Declaration (Properties, Handle, and Type). Finally, the Heart Rate Measurement Characteristic Value (handle 0x0010) eventually holds the actual number of heart beats per minute.
The Generic Attribute Profile (GATT)
The concept of the GATT is to group attributes in an attribute table together in a very specific and logical order. The heart rate profile in Table 1 is an example of such a group.
Service Declaration attribute
At the top of each group you always have a Service Declaration attribute. Its type is always 0x2800, the standard UUID for Service Declarations. Its handle depends on how many attributes are already present in the table. Its permissions are always Read Only without any authentication or authorization required. The value is another UUID defining what kind of service this is. In Table 1 the value is 0x180D, the Bluetooth SIG defined UUID for a Heart Rate Service. Later in the tutorial we will make our own attribute table with a service declaration containing our own custom UUID.
Characteristic Declaration
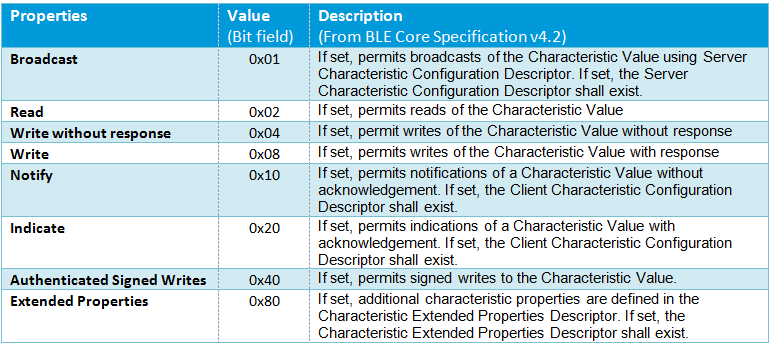
Immediately after this follows a Characteristic Declaration (there is a rare exception to this rule, but that is out of scope for this tutorial). The Characteristic Declaration is similar to the Service Declaration. The type is always 0x2803, the standard UUID for Characteristic Declarations. And the permissions are always Read Only without any authentication or authorization required. The value however, contains some interesting data. It always contains a handle, a UUID, and a set of properties. These three elements describe the subsequent Characteristic Value Declaration. The handle naturally points to the Characteristic Value Declaration’s place in the attribute table. The UUID describes what type of information or value we can expect to find in the Characteristic Value Declaration. For example, a temperature value, the state of a light switch, or some custom arbitrary value. And finally, the properties describe how the characteristic value can be interacted with. Table 2 shows the characteristic properties bit field. Don’t worry about understanding the details of the table now. We will circle back to it later.
Now you might wonder why we have read/write permissions for an attribute and read/write properties for the characteristic value. Shouldn’t they always be the same? And that is a legitimate question. The properties for the characteristic value are actually only guidelines for the client, used in the GATT and application layers. They are just clues, if you will, of what the client can expect from the Characteristic Value Declaration attribute. The permissions for the attribute (on the ATT layer) will always overrule the characteristic value properties (on the GATT layer). Now you might ask again “but why do we need both permissions and properties?”. And the simple, but disappointing, answer is: “Because the Bluetooth Core Specification says so”. It is confusing, but has implications for how we will set up our characteristic later so it needs to be said.
Characteristic Value Declaration
After the Characteristic Declaration follows the Characteristic Value Declaration. This is the attribute that finally contains the actual value. And again, the value might be a temperature value, the state of a light switch, etc., etc. The Characteristic Value Declaration’s type is the same as specified in the Characteristic Declaration’s value field and the permissions are defined in the application layer (or us).
Descriptor Declaration
After the Characteristic Value Declaration follows either
- a new Characteristic Declaration (there can be many characteristics grouped in a service).
- a new Service Declaration (there can be many services in a table).
- a Descriptor Declaration.
In the case of the Heart Rate Measurement Characteristic in Table 1 the Characteristic Value Declaration is followed by a Descriptor Declaration. The descriptor is an attribute with additional information about the characteristic. There are several kinds of descriptors, but in this tutorial we will only deal with the Client Characteristic Configuration Descriptor (CCCD). More about this later.
Attribute tables in nRF Connect Bluetooth Low Energy app
Let us now compare what we just learned with the information displayed in the nRF Connect app when we run the Heart Rate Service example from the SDK (examples/ble_peripheral/ble_app_hrs). After you have connected your device the nRF Connect app should now show the entire attribute table.Each line is an attribute and they are grouped in services and with characteristics as subgroups.
The following screenshots show the list of services displayed in the nRF Connect BLE app when connected to my nRF52 DK board running the HRS example.
Figure 1:
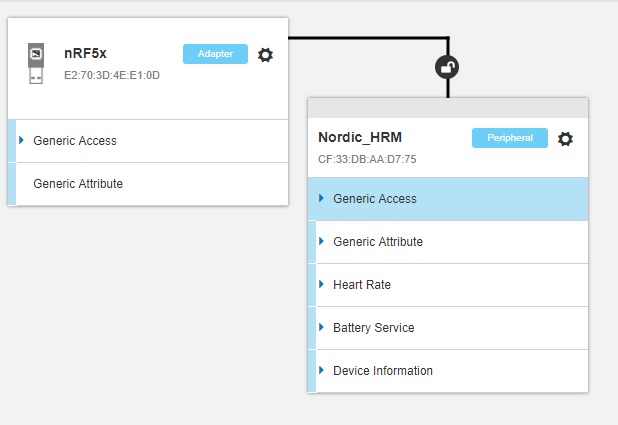
Here our example uses two services that are typically used in a heart rate monitor sports watch for example, a Heart Rate Service and a Battery Service. Our device have also a Device Information service.
To view the handle and UUID of an attribute, move the mouse pointer over the attribute name and a hover text would be displayed.
Figure 2:
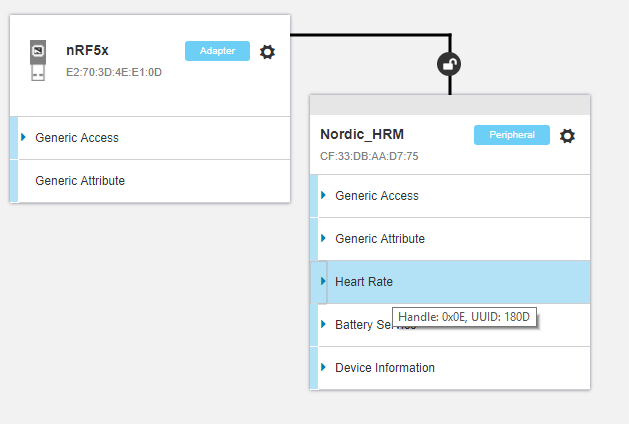
As you can see in the figure above, the type of attribute (UUID) for the Hear Rate Service is 0x180D. To view the characteristics of a service, click the Expand/Collapse icon.
Figure 3:
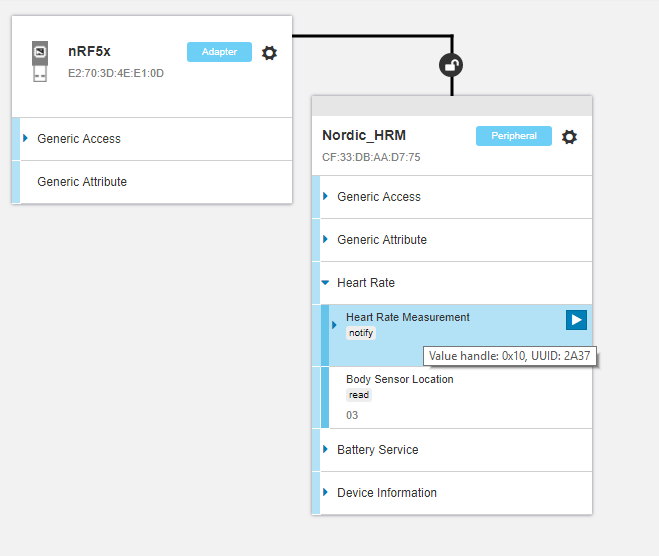
Here we see that the Heart Rate service have two characteristics (https://www.bluetooth.com/specifications/gatt/viewer?attributeXmlFile=org.bluetooth.service.heart_rate.xml):
- A Heart Rate Measurement characteristic, which is mandatory as discussed before, which holds the heart rate value and is used to send a heart rate measurement. (https://www.bluetooth.com/specifications/gatt/viewer?attributeXmlFile=org.bluetooth.characteristic.heart_rate_measurement.xml)
- An optional Body Sensor Location characteristic, which is used to describe the intended location of the heart rate measurement for the device. (https://www.bluetooth.com/specifications/gatt/viewer?attributeXmlFile=org.bluetooth.characteristic.body_sensor_location.xml)
The Heart Rate Measurement Characteristic ‘s type of attribute (UUID) is 0x2A37 and the “notify” property is also shown. If you want to view the descriptors you can again click the Expand/Collapse icon to expand the characteristics.
Figure 4:
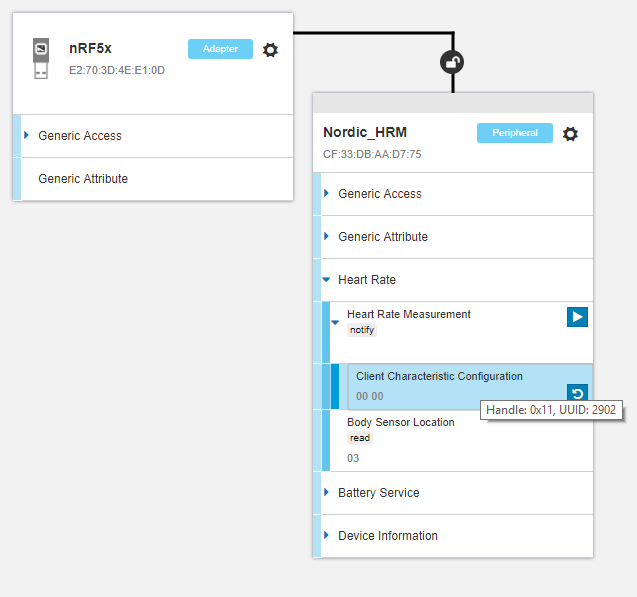
Finally, we can see the values of the CCCD attribute. You can see the predefined descriptor UUID (0x2902) and that the value is 0x0000. This means that notification is currently switched off. If a service or a characteristic does not have any child attributes, the list is empty when you click the Expand/Collapse icon.
The example
It is time to get our hands dirty! I figured that as an example we will make a readable and writeable characteristic first. Then, after we have enjoyed manually reading and writing some data, we will include the temperature of the nRF5x's CPU core in the characteristic. In case you didn't know already the nRF5x actually has its own internal temperature sensor. It is not very accurate, but it is the simplest way for us to get started with some actual dynamic sensor values. Finally, we will enable notification to update the temperature values. First thing first: download the example code. To compile it, extract the example to "your_SDK_folder\examples\ble_peripheral". If you need help with this please have a look at this thread on devzone: [Compiling github projects](https://devzone.nordicsemi.com/question/35068/compiling-github-projects/). Open the project file and hit “Build”. It should compile without any errors and if you browse through the files you will see that it pretty much continues where the [service tutorial](https://devzone.nordicsemi.com/tutorials/8/ble-services-a-beginners-tutorial/) ended.
The important files in this tutorial are our_service.c, our_service.h, and of course main.c. In these files you will find various comments beginning with:
// FROM_SERVICE_TUTORIAL:
// ALREADY_DONE_FOR_YOU:
// OUR_JOB: Step X.X
FROM_SERVICE_TUTORIAL means that this is code we looked at in the previous tutorial. A few places you will see ALREADY_DONE_FOR_YOU. This marks very basic code that I have already prepared for you so that we don't have to go through the less important stuff in detail. Finally, OUR_JOB: Step X.X indicates what and when things need to be done in the tutorial.
To-do list
This is what needs to be done to get our characteristic up and running:
- Step 1: Add service. This was completed in the last tutorial when we made our own custom service with a custom base UUID and a service UUID.
- Step 2: Declare and configure the characteristic.
- Step 3: Add a CCCD to let the characteristic send notifications at regular intervals or whenever the temperature values are changing.
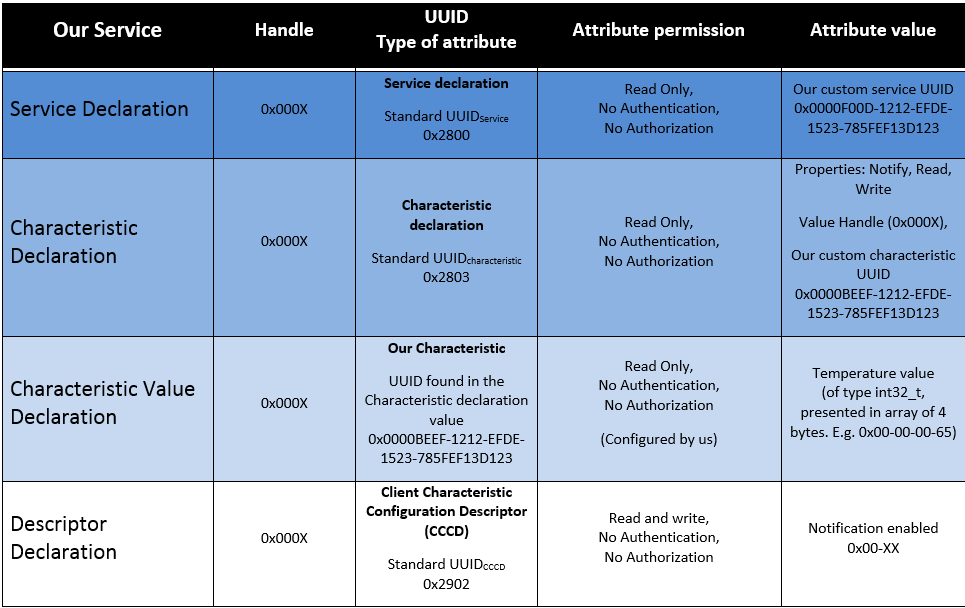
This is what our attribute table should include to achieve all this:
Table: 3
Step 1: Add the service
As mentioned above this step was completed in the last tutorial, but let us take a quick look at what our work looks like in the nRF Connect app so far. It should look something like this:
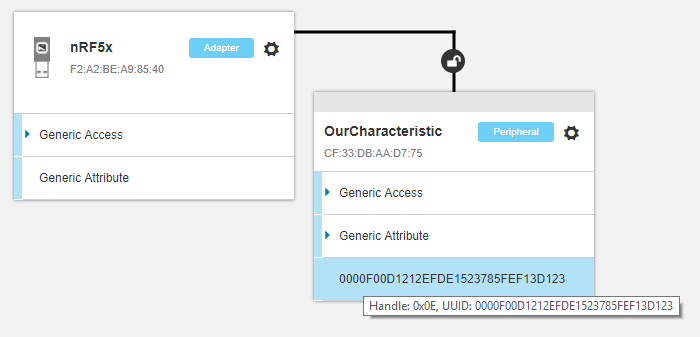
The highlighted line is the Service Declaration declaring our service. Unfortunately, the nRF Connect app does not display the attribute type for the declarations, but as we know from Table 1 attribute type for the Service Declaration is 0x2800. When we hover over the Service Declaration for our new service we can see that the attribute handle is 0x000C, and the attribute value is our 128-bit custom UUID.
Step 2: Add the Characteristic
Calling the SoftDevice function sd_ble_gatts_characteristic_add() is our first goal. This function will add both the Characteristic Declaration and the Characteristic Value Declaration to our attribute table. However, in order to get there we have to do a few things first. sd_ble_gatts_characteristic_add() takes four parameters:
@param[in]  uint16_t                        service_handle.
@param[in]  ble_gatts_char_md_t const *     p_char_md
@param[in]  ble_gatts_attr_t const *        p_attr_char_value
@param[out] ble_gatts_char_handles_t *      p_handles
As you can see the function has three input parameters and one output parameter. The three input parameters need to be populated with details that will define the characteristic attributes. These parameters define the properties, read/write permissions, descriptors, characteristic values, etc. In fact, you have more than 70 properties at your disposal when you are defining your characteristic. It sounds daunting, but don't give up and throw away your dev kit just yet. Most of the parameters are optional and almost all of them work just fine if you initialize them to zero using memset(¶meter, 0, sizeof(parameter));. Pretty neat!
We will start by populating only the essential parameters we need to get started. In fact, all we need to do is to choose where in memory to store the characteristic attributes and define a characteristic value type using our custom UUID. In the function our_char_add() I have already declared all the necessary variables for you and initialized them to zero. The order of which I have declared them might be a little confusing, but since the necessary parameters are nested into structures, and these structures might be nested into other structures, this is unfortunately the way it has to be. I have also selected names that might seem a little cryptic, but these are naming conventions used throughout the SDKs and I chose to go for consistency.
The three most important variables are:
ble_gatts_attr_md_t attr_md, The Attribute Metadata: This is a structure holding permissions and authorization levels required by characteristic value attributes. It also holds information on whether or not the characteristic value is of variable length and where in memory it is stored.ble_gatts_char_md_t char_md, The Characteristic Metadata: This is a structure holding the value properties of the characteristic value. It also holds metadata of the CCCD and possibly other kinds of descriptors.ble_gatts_attr_t attr_char_value, The Characteristic Value Attribute: This structure holds the actual value of the characteristic (like the temperature value). It also holds the maximum length of the value (it might e.g. be four bytes long) and it's UUID.
So let's start populating the parameters. To make things a little easier I have tried to assign each step a number:
Step 2.A, Use custom UUID to define characteristic value type
The characteristic will need its own UUID just as the service did. And in fact, we can add this the exact same way as we did with the service UUID. So type in the following at Step 2.A inside the our_char_add() function:
uint32_t            err_code;
ble_uuid_t          char_uuid;
ble_uuid128_t       base_uuid = BLE_UUID_OUR_BASE_UUID;
char_uuid.uuid      = BLE_UUID_OUR_CHARACTERISTC_UUID;
err_code = sd_ble_uuid_vs_add(&base_uuid, &char_uuid.type);
APP_ERROR_CHECK(err_code);
This will use the same base UUID as the service, but add a different 16-bit UUID for the characteristic. The UUID is defined as 0xBEEF in our_service.h. Note that this base UUID was added to the vendor specific table in the previous tutorial when we created the custom service. All subsequent calls with the same base UUID will return a reference to the same ID in the table. This way we will save some memory by not needing to store a large array of 128-bit long IDs.
Step 2.B, Configure the Attribute Metadata
The following three lines are the bare minimum of what we need to describe the attributes of the characteristic. The only thing the lines do is to decide where in memory to store the attributes. We are going to store it in the SoftDevice (aka the stack) controlled part of memory and hence, we use BLE_GATTS_VLOC_STACK. The only other valid option is to use BLE_GATTS_VLOC_USER to store the attributes in the user controlled part of memory.
ble_gatts_attr_md_t attr_md;
memset(&attr_md, 0, sizeof(attr_md));
attr_md.vloc        = BLE_GATTS_VLOC_STACK;
In the attribute metadata structure ble_gatts_attr_md_t you also have the option to define the permissions with associated authorization requirements. For example if you need Man In The Middle protection (MITM) or a passkey to access your attribute. We will circle back to this.
Step 2.C, Configure the Characteristic Value Attribute
Now that we have made our self a new UUID and decided where to store the characteristic we will store this information in the Characteristic Value Attribute:
ble_gatts_attr_t    attr_char_value;
memset(&attr_char_value, 0, sizeof(attr_char_value));
attr_char_value.p_uuid      = &char_uuid;
attr_char_value.p_attr_md   = &attr_md;
Step 2.D, Add handles for the characteristic to our struct
We need to add a variable holding the relevant handles for our characteristic in our service structure. So head over to the ble_os_t definition in our_service.h and add the line shown below:
typedef struct
{
    uint16_t                    conn_handle;
    uint16_t                    service_handle;
    // OUR_JOB: Step 2.D, Add handles for our characteristic
    ble_gatts_char_handles_t    char_handles;
}ble_os_t;
As you can see, the ble_os_t struct already has a field for the service declaration handle. The connection handle, conn_handle, is there to keep track of the current connection and don't really have anything to do with the attribute table handles. If you go to the definition of ble_gatts_char_handles_t you can see that our new variable can hold 16-bit handles for the characteristic value, user descriptor, its CCCD, and also something called Server Characteristic Configuration Descriptor (SCCD) which is not within the scope of this tutorial.
Step 2.E, Add the new characteristic to the service
Then we are ready to add the new characteristic to our attribute table and it is as simple as this:
err_code = sd_ble_gatts_characteristic_add(p_our_service->service_handle,
                                   &char_md,
                                   &attr_char_value,
                                   &p_our_service->char_handles);
APP_ERROR_CHECK(err_code);
As you can see, we are giving the SoftDevice information about what service the characteristic belongs to (the service_handle), the Characteristic Metadata, and the Characteristic Value Attributes. The stack then processes the parameters and initiates the characteristic. Then it stores the handle values of our characteristic into our p_our_serice structure.
Now compile and download your application to the kit. Make sure that you have remembered to program the SoftDevice to the kit as well. Open the nRF Connect BLE app, connect to your kit, and do a service discovery. You should see something like this:
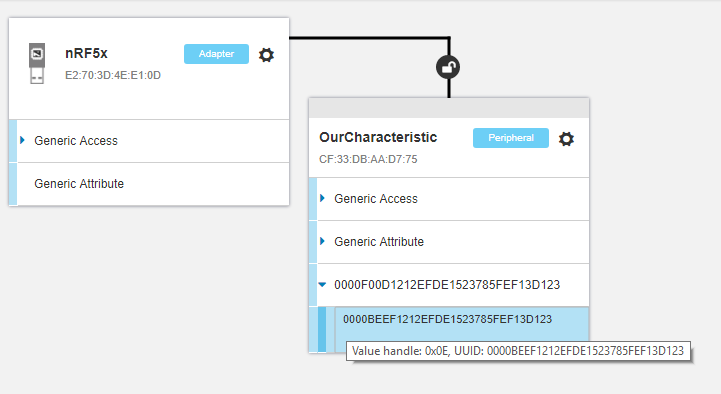
As you can see there is a new characteristic in our service, but it doesn't do anything useful at all. It has no value and you can neither read from it nor write to it. This is what happens when we initialize the read/write attribute permissions to zero.
Step 2.F, Add read/write properties to our characteristic value
To be able to read and write to the characteristic there are a couple of things we need to do. First go to Step 2.F in our_char_add() and add the following lines:
ble_gatts_char_md_t char_md;
memset(&char_md, 0, sizeof(char_md));
char_md.char_props.read = 1;
char_md.char_props.write = 1;
This will populate the characteristic metadata with read and write properties. Do another service discovery in nRF Connect and note that the "Properties" field in the Characteristic Declaration has changed to "Read, Write":
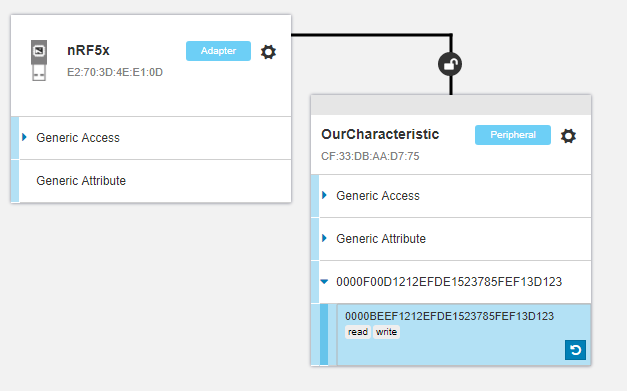
Now you can try to read some values to the characteristic by pressing the “Read” button or type in some hexadecimal number in the value field and hit the “Write” button.
But, wait, what is this?? You are still getting READ and WRITE_NOT_PERMITTED errors?
You should, if you have followed the tutorial to the letter so far. This is because what we just did was just setting the properties in the characteristic declaration and as discussed earlier they are just guidelines. So even though these properties are exposed when your nRF Connect app does a service discovery we have yet to set the required permissions for read and write operations. Before we have done this the SoftDevice doesn't know what to allow and simply denies any reads and writes of the characteristic.
Step 2.G, Set read/write permissions to our characteristic
So let's add some read/write permissions. Since this is a beginners tutorial we will keep it simple and leave the doors wide open. No security, encryption, or passkey needed. A simple way of doing this is to use the macro BLE_GAP_CONN_SEC_MODE_SET_OPEN(). Go to Step 2.G in our_char_add() and add the following two lines:
BLE_GAP_CONN_SEC_MODE_SET_OPEN(&attr_md.read_perm);
BLE_GAP_CONN_SEC_MODE_SET_OPEN(&attr_md.write_perm);
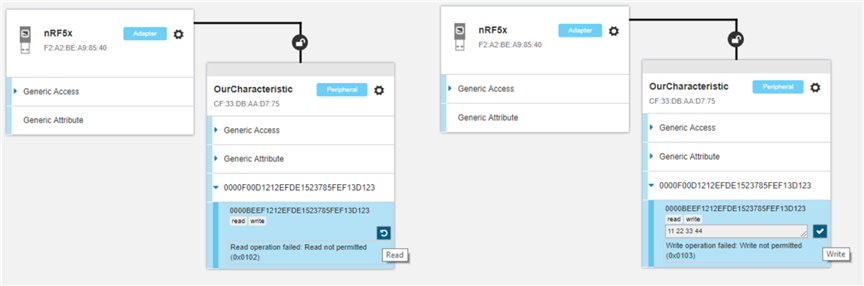
Now do yet another service discovery. When you try to read from the characteristic now then this should pop up in the log window nRF Connect:

Great success! We have just read 0, zero(!), bytes from our new characteristic because we have not yet assigned a value or a value length to it.
Next, try to write e.g. the value 0x12 to the characteristic. You should get the following error because the value attribute length is initialized to zero:
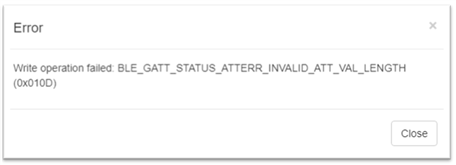
Step 2.H, Set characteristic length
So how do we fix the errors above? Go to Step 2.H and add the following lines:
attr_char_value.max_len     = 4;
attr_char_value.init_len    = 4;
uint8_t value[4]            = {0x12,0x34,0x56,0x78};
attr_char_value.p_value     = value;
This will set the initial length, and also the maximum allowed length, of the characteristic value to 4 bytes. And just to be a little thorough we will also set the initial value to 12-34-56-78. Once again, try to read from your characteristic and then write a couple of bytes. You should see that the value is updated. Even if you disconnect and reconnect the new value should be retained.
Challenge 1:
- Try to write a single byte to the characteristic. E.g. '12'.
- Try to write four bytes to the characteristic. E.g. '12-34-56-78'.
- Try to write five or more bytes to the characteristic. E.g. '12-34-56-78-90'.
What happens? Why are you not allowed to write more than four bytes to your characteristic and how can you fix it?
Challenge 2:
Try to experiment with the attr_md permissions and the following permission macros:
- BLE_GAP_CONN_SEC_MODE_SET_NO_ACCESS()
- BLE_GAP_CONN_SEC_MODE_SET_OPEN()
- BLE_GAP_CONN_SEC_MODE_SET_ENC_NO_MITM()
Try to do some reads and writes. See what happens and watch out for error messages in the nRF Connect log window. Hint on number 3: If you click "Bond" in nRF Connect and bond with your kit you will automatically add encryption (ENC) to your BLE link. However, you are not required to use Man In The Middle (MITM) protection when bonding.
Step 3: Client Characteristic Configuration Descriptor (CCCD)
So this is pretty cool, right? Not cool enough though. Let us add some dynamic temperature data, and while we are at it, let's also make our kit a little more independent and useful by making it periodically push data to our client. To achieve this we will need to:
- Add some sort of push functionality.
- Do some housekeeping of our BLE connection and services.
- Set up a timer to trigger the temperature updates.
The BCS defines two ways of "pushing" data:
Vol 3: Part G, Ch. 4.10 & 4.11:
Indication - This sub-procedure is used when a server is configured to indicate a Characteristic Value to a client and expects an Attribute Protocol layer acknowledgement that the indication was successfully received.
Notification - This sub-procedure is used when a server is configured to notify a Characteristic Value to a client without expecting any Attribute Protocol layer acknowledgment that the notification was successfully received.
The subtle, but important difference here is that by using indication your kit (the server) will require an application level acknowledgment in return after every transmission of updated data. By using notification, on the other hand, our kit will just "mindlessly" transmit data and not care about whether it is acknowledged by the application in the other end or not. So sticking to the "keep it simple"-philosophy of this tutorial we will use the latter. To add notification functionality we need to add a descriptor to our attribute table, namely the Client Characteristic Configuration Descriptor (CCCD). The BLE Core Specifications has the following to say about the CCCD:
Vol 3: Part G, Ch 3.3.3.3:
The Client Characteristic Configuration declaration is an optional characteristic descriptor that defines how the characteristic may be configured by a specific client [...]
What is written in between these cryptic lines is that the CCCD is a writable descriptor that allows the client, i.e. your nRF Connect for Desktop or phone, to enable or disable notification or indication, on your kit.
Step 3.A, Configuring CCCD metadata
This is what we need to do to add the CCCD to our characteristic.
ble_gatts_attr_md_t cccd_md;
memset(&cccd_md, 0, sizeof(cccd_md));
BLE_GAP_CONN_SEC_MODE_SET_OPEN(&cccd_md.read_perm);
BLE_GAP_CONN_SEC_MODE_SET_OPEN(&cccd_md.write_perm);
cccd_md.vloc                = BLE_GATTS_VLOC_STACK;
char_md.p_cccd_md           = &cccd_md;
char_md.char_props.notify   = 1;
- We declare a metadata structure for the CCCD to hold our configuration.
- Using the same method as we did on the characteristic, we make sure that no security, encryption or passkeys are necessary to read or write to the CCCD.
- Also as we did with the characteristic, we decide where to store the descriptor, and once again we store it in the SoftDevice controlled part of memory.
- Then we store the CCCD metadata structure in our characteristic metadata structure.
- Enable notification by setting the notify property bit.
Compile, download, run, and connect to your kit. Now you should be able to see the CCCD added to your characteristic:
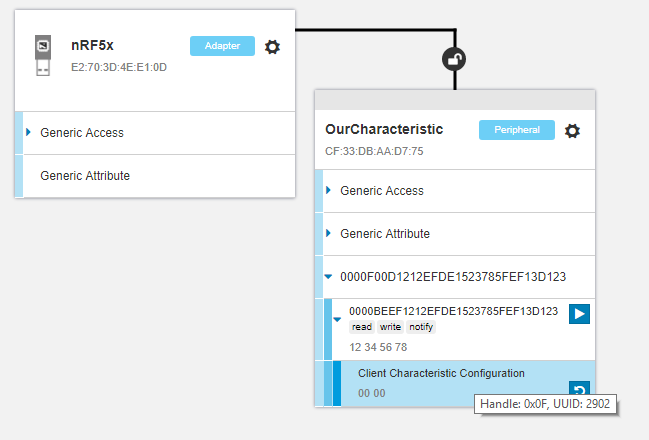
Notice also that "Notify" is added to the Characteristic Declaration's properties field. The UUID value of the CCCD is 0x2902 as we have seen earlier and the value is 0x0000 meaning that notification and indication is currently switched off. If you want you can enable notification right away, but since we have not yet set up any mechanisms updating the values nothing fancy will happen. Anyway, try to click the "Enable services" button. You should see that the value field of the CCCD is updated to 0x0001, meaning that notification is indeed enabled. You can also use the "Write" button and write to the CCCD manually.
Step 3.B, Housekeeping part 1: Give our service connection handle a default value
In a simple example like ours housekeeping like this might actually not be necessary. However, it is crucial when developing slightly more advanced applications. Furthermore, since this sort of housekeeping is done in virtually every BLE examples in Nordic's SDKs I thought I would make an exception from our "keep it simple"-philosophy and show you how it can be done.
Our service structure, the ble_os_t, has a field called "conn_handle". This shall hold the handle of the current connection as provided by the BLE stack and we have to initialize it during system startup. Naturally, since we are not in a connection at system startup, the handle should be initialized to some "invalid" value. In the SDKs this value is defined as BLE_CONN_HANDLE_INVALID (with value 0xFFFF). So head over to the our_service_init() function in our_service.c and type in the following.
p_our_service->conn_handle = BLE_CONN_HANDLE_INVALID;
Step 3.C, Housekeeping part 2: Responding to connect and disconnect events
In main.c there is a function called ble_stack_init(). In this function it is possible to register BLE stack event observers to receive BLE events information from the SoftDevice Handler.
An observer is essentially a piece of code that listens for events. It consists on a handler function and its associated parameter – a context. This handler function is called by the SoftDevice when a BLE stack event has occurs. To keep our service up to date with the latest connection events we want to call our handler function ble_our_service_on_ble_evt() when a BLE event is observed:
NRF_SDH_BLE_OBSERVER(m_our_service_observer, APP_BLE_OBSERVER_PRIO, ble_our_service_on_ble_evt, (void*) &m_our_service);
Step 3.D, Housekeeping part 3: Handling BLE events related to our service
Go back to our_service.c and find the function ble_our_service_on_ble_evt(). Inside we will make a short switch case statement. In our example the only thing the statement will do is to update the connection handle stored in the service structure. On a connection event we will store the current connection handle as provided by the BLE stack. On a disconnect event we will set the handle back to "invalid".
switch (p_ble_evt->header.evt_id)
{
    case BLE_GAP_EVT_CONNECTED:
        p_our_service->conn_handle = p_ble_evt->evt.gap_evt.conn_handle;
        break;
    case BLE_GAP_EVT_DISCONNECTED:
        p_our_service->conn_handle = BLE_CONN_HANDLE_INVALID;
        break;
    default:
        // No implementation needed.
        break;
}
Step 3.E, Update characteristic value
We are closing in on our goal. Now find the function our_temperature_characteristic_update(). This is where we will implement the notification. First implement an if-statement like this:
if (p_our_service->conn_handle != BLE_CONN_HANDLE_INVALID)
{

}
Here we check whether or not we are in a valid connection, and this is where the housekeeping comes in handy. If you try to send out notifications when not in a connection the SoftDevice will get grumpy and give you errors. That is why we need this if-statement and why we implemented the housekeeping to keep the connection handle updated. Now, inside the if-statement type in the following:
uint16_t               len = 4;
ble_gatts_hvx_params_t hvx_params;
memset(&hvx_params, 0, sizeof(hvx_params));

hvx_params.handle = p_our_service->char_handles.value_handle;
hvx_params.type   = BLE_GATT_HVX_NOTIFICATION;
hvx_params.offset = 0;
hvx_params.p_len  = &len;
hvx_params.p_data = (uint8_t*)temperature_value;

sd_ble_gatts_hvx(p_our_service->conn_handle, &hvx_params);
First you might wonder what hvx stands for? It is not very intuitive, but it stands for Handle Value X, where X symbolize either notification or indication as the struct and function can be used for both. So to do a notification we declare a variable, hvx_params, of type ble_gatts_hvx_params_t. This will hold the necessary parameters to do a notification and provide them to the sd_ble_gatts_hvx() function. Here is what we will store in the variable:
- handle: The SoftDevice needs to know what characteristic value we are working on. In applications with two or more characteristics naturally we will need to reference the handle of the specific characteristic value we want to use. Our example only has one characteristic and we will use the handle stored in
p_our_service->char_handles.value_handle. - type: The SoftDevice needs to know what "hvx type" we want to do; a notification or indication. As we are doing a notification we use
BLE_GATT_HVX_NOTIFICATION. The other option would beBLE_GATT_HVX_INDICATION. - offset: Your characteristic value might be a sequence of many bytes. If you want to transmit only a couple of these bytes and the bytes are located in the middle of the sequence you can use the offset to extract them. Since we want to update all of our four bytes we will set the offset to zero.
- p_len: The SoftDevice needs to know how many bytes to transmit. There is no need to send 20 bytes every time if you only have four bytes of relevant data. As an example, let's say you have a characteristic with the following sequence of bytes: 0x01, 0x02, 0x03, 0x04, 0x05 and you want to send just the 3rd and the 4th byte. Then set offset to 2 and len to 2.
- p_data: Here we add a pointer to the actual data.
Finally we pass this structure into the sd_ble_gatts_hvx(). We also provide the function with the relevant connection handle. In some applications you might work with several concurrent connections and this is why the function also needs to know what handle to use. Now we have set up everything that has to do with the characteristic and notification.
Step 3.F, Update the characteristic with temperature data
The rest is simply a matter of providing some data to send. We need to measure and collect the data we want to send and we need some mechanism to trigger each measurement. So find and uncomment the function timer_timeout_handler() in main.c and type in the following:
int32_t temperature = 0;
sd_temp_get(&temperature);
our_temperature_characteristic_update(&m_our_service, &temperature);
nrf_gpio_pin_toggle(LED_4);
- temperature: We need a temporary variable to store the measured temperature.
- sd_temp_get(): This is a very simple SoftDevice function that does everything for us. Just pass a pointer to our temperature variable and your measurements are done. Note that the result of the
sd_temp_get()function is the nRF5 die temperature in 0.25 degrees celsius as documented here. I will leave it up to you to decide how to present the value. You can e.g. make a function to convert the value to Fahrenheit. - our_temperature_characteristic_update(): Make a call to the characteristic update function we made in Step 3.E and pass along a pointer to our service variable and the measured temperature.
- nrf_gpio_pin_toggle(): Toggle LED 4 on the nRF5x DK kit just for show.
Step 3.G, Declare a timer ID and a timer interval
Not quite there yet. We need something to trigger the measurements. A trigger could for example be the push of a button or some command received from the client side. In our case though, we will use a timer to periodically measure the temperature. The first thing we need to do is defining the timer interval and we need a timer ID to identify this particular timer. So, locate Step 3.G somewhere at the top of main.c and type in the following:
APP_TIMER_DEF(m_our_char_timer_id);
#define OUR_CHAR_TIMER_INTERVAL     APP_TIMER_TICKS(1000) // 1000 ms intervals
This will instantiate a timer ID variable and define a timer interval of 1000 ms.
Step 3.H, Initiate the timer
To initialize our timer this is all we have to do:
app_timer_create(&m_our_char_timer_id, APP_TIMER_MODE_REPEATED, timer_timeout_handler);
We pass:
- Our timer ID
- An enumeration called
APP_TIMER_MODE_REPEATED. This tells the timer library to set up a timer that triggers at regular intervals. The other option isAPP_TIMER_MODE_SINGLE_SHOTwhich sets up a timer that triggers only once. - A pointer to our timer timeout handler which is supposed to be executed on every timer event.
Step 3.I, Start our timer
Now it is time to start our engines!
Most often in Nordic's libraries the fact that a module is initiated does not mean that it is started, so we have to call one last function to reach our goal:
app_timer_start(m_our_char_timer_id, OUR_CHAR_TIMER_INTERVAL, NULL);
We pass:
- Our timer ID variable
- Our defined timer interval
- You have the option to pass a general purpose pointer that will be passed to the timeout handler when the timer expires. We won't bother with this so we will just ignore it and exercise our right to pass a simple
NULL.
Compile, download, connect, and discover services. Now to the moment of truth: Click "Toggle notifications". If we have done everything right the characteristic value should update every second. You should see LED 4 and the value line in nRF Connect blink green every second. You should also see values ticking in in the Log window in nRF Connect like this:

If you now put your finger on the nRF5 chip you should also see that the values are changing. The reason why the values are Least Significant Byte first is discussed here.
Challenge 1:
Try to alter our_temperature_characteristic_update() so that you only send a notification when the temperature has changed. Remember that BLE is all about saving energy so why spend resources on transmitting the same value over and over again? Hint: Use a variable to store the current temperature value and compare it to the new one on the next measurement.
Challenge 2:
Try to modify the timer so that the temperature value is only measured when you are in a connection. I.e. start the timer on a connection event and stop it on a disconnect event. Why spend energy on measurements if you don't use them, right? Hint: Look for a timer start and stop function in the app_timer library. Then see if you can do some magic in the ble_event_handler() function in main.c.
Summary
And that is it! You have now made a custom attribute table with a basic characteristic transmitting data from your server to your client. It is somewhat limited though, in the sense that it is only one way communication and it has no security or other advanced features. However I hope that I achieved my goal; that you gained at least some new knowledge and that the code is something you can expand upon.
Once again I urge you to post any questions you have in the Questions-section on the forum, not here. You will most likely get faster response that way. Positive or negative critique though is very welcome in the comment section below. Also remember to check out the "Solution" folder on github if you have any issues.
Top Comments