how to use "HID configurator for nRF Desktop"?

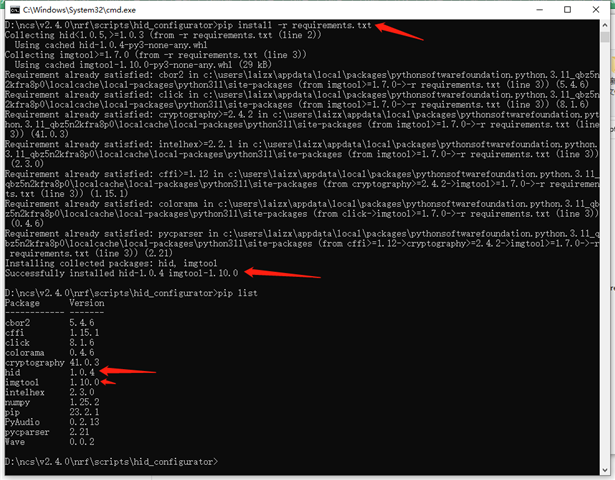
when i use the HID configurator for nRF Desktop . i use windows,  do as "py -3 -m pip install -r requirements.txt" like:

{(Download the HIDAPI library from HIDAPI releases. Use the bundled DLL or build it according to instructions in HIDAPI library.) where the DLL put? the document say download, not say where ues it?}

--------------------

i download 5340DK like:

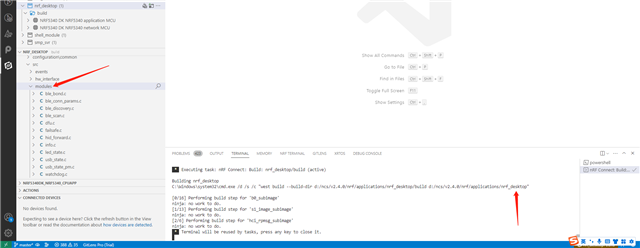
{the LED1 and LED2 ok, LED2 like breath, i think the 5340DK is ok. then i use micro usb plug into 'nRF USB' on board, and connect usb to my windows pc}

-----------------

then i do as "python3 configurator_cli.py -h" like:

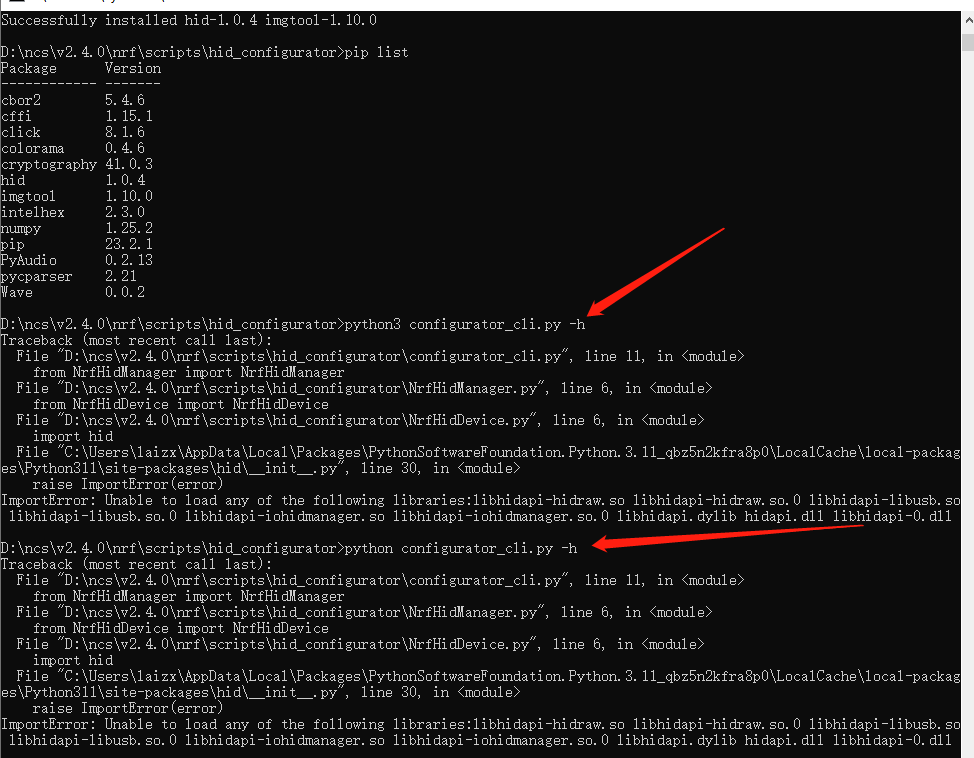
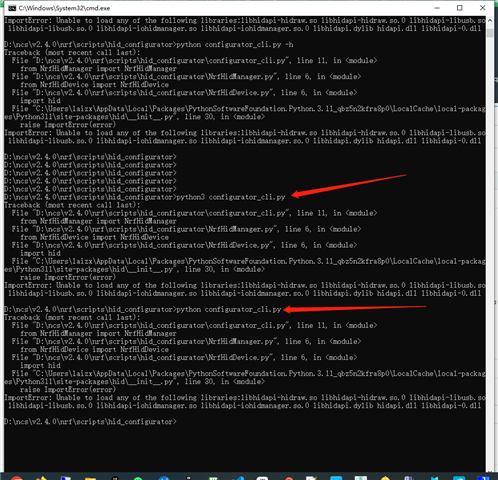
get error. where is wrong?

Parents
  • Hi upupsky,

    I believe that your issue is exactly related to this confusion point:

    {(Download the HIDAPI library from HIDAPI releases. Use the bundled DLL or build it according to instructions in HIDAPI library.) where the DLL put? the document say download, not say where ues it?}

    The Python module hid does not have the HIDAPI files that you download where it needed. That is why you ran into the errors that you did.

    I found that this issue is addressed in this Stack Overflow post: https://stackoverflow.com/questions/62620247/how-to-determine-where-to-install-hidapi-dll.

    In my case, I successfully uses the hid Python module after I put the DLL file in the same folder as my python.exe.

    Hieu

  • Some more instructions on my side for testing DFU on a nRF52840DK (however I didn't test on nRF53). This should address your question on HIDAPI. Attached at the bottom the hidapi-win.zip


    A) If you have already the nRF Connect SDK in your PC, you can find the "HID Configurator" folder with the python code already in nRF Connect SDK in your PC (here the path in the nRF Connect SDK: \nrf\scripts\hid_configurator);

    B) Install the requirements/dependences:

    B.1) for Windows:
    step 1) UnZip the hidapi-win.zip and copy the HIDAPI.dll (from x64 or x86 subfolders, depending on your PC) in right location so that it is visible to Python. In most cases, this can be simply in the python installation folder, next to python.exe;
    Here how to find python location in your PC (open cmd from inside HID Configurator folder and type the following commands):
    py -3
    import os
    import sys
    os.path.dirname(sys.executable)

    step 2) From inside the "HID Configurator" folder (in nRF Connect SDK), open command line and run:
    py -3 -m pip install -r requirements.txt

    B.2) for Debian/Ubuntu/Linux
    follow the instructions listed under requirements in this link
    developer.nordicsemi.com/.../README.html

    - add the DFU file into the HID configurator folder

    - from inside the HID Configurator folder, open the terminal and list the connected devices (the script will return the "DEVICE" name, which can be identified by type, board or HWID):
    py -3 configurator_cli.py
    or (if not working)
    python3 configurator_cli.py


    - check FW version by using the following command (in this example, as DEVICE we use the type name "gaming_mouse"; we expect this command to return FW 0.0.0.1):
    py -3 configurator_cli.py gaming_mouse fwinfo

    - now trigger DFU:
    py -3 configurator_cli.py gaming_mouse dfu dfu_application_1_to_2.zip

    - confirm by typing:
    y

    - DFU will start by downloading the image in the background silently so you can still use the mouse/DK to move the pointer

    - when completed the download, trigger the reset to swap image and complete DFU
    py -3 configurator_cli.py gaming_mouse fwreboot

    - verify new FW version (FW should be 0.0.0.2 now)
    py -3 configurator_cli.py gaming_mouse fwinfo

    hidapi-win.zip

Reply
  • Some more instructions on my side for testing DFU on a nRF52840DK (however I didn't test on nRF53). This should address your question on HIDAPI. Attached at the bottom the hidapi-win.zip


    A) If you have already the nRF Connect SDK in your PC, you can find the "HID Configurator" folder with the python code already in nRF Connect SDK in your PC (here the path in the nRF Connect SDK: \nrf\scripts\hid_configurator);

    B) Install the requirements/dependences:

    B.1) for Windows:
    step 1) UnZip the hidapi-win.zip and copy the HIDAPI.dll (from x64 or x86 subfolders, depending on your PC) in right location so that it is visible to Python. In most cases, this can be simply in the python installation folder, next to python.exe;
    Here how to find python location in your PC (open cmd from inside HID Configurator folder and type the following commands):
    py -3
    import os
    import sys
    os.path.dirname(sys.executable)

    step 2) From inside the "HID Configurator" folder (in nRF Connect SDK), open command line and run:
    py -3 -m pip install -r requirements.txt

    B.2) for Debian/Ubuntu/Linux
    follow the instructions listed under requirements in this link
    developer.nordicsemi.com/.../README.html

    - add the DFU file into the HID configurator folder

    - from inside the HID Configurator folder, open the terminal and list the connected devices (the script will return the "DEVICE" name, which can be identified by type, board or HWID):
    py -3 configurator_cli.py
    or (if not working)
    python3 configurator_cli.py


    - check FW version by using the following command (in this example, as DEVICE we use the type name "gaming_mouse"; we expect this command to return FW 0.0.0.1):
    py -3 configurator_cli.py gaming_mouse fwinfo

    - now trigger DFU:
    py -3 configurator_cli.py gaming_mouse dfu dfu_application_1_to_2.zip

    - confirm by typing:
    y

    - DFU will start by downloading the image in the background silently so you can still use the mouse/DK to move the pointer

    - when completed the download, trigger the reset to swap image and complete DFU
    py -3 configurator_cli.py gaming_mouse fwreboot

    - verify new FW version (FW should be 0.0.0.2 now)
    py -3 configurator_cli.py gaming_mouse fwinfo

    hidapi-win.zip

Children
No Data
Related