ST7789 display connected to a nRF5340DK board

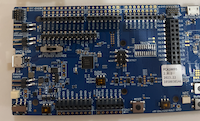
I am trying to test a nRF5340 with a 1.3 inch waveshare 240x240 display using a st7789 driver. How would I connect the display to the board:

VCC

3.3v

GND

Ground

DIN

Serial Data

CLK

Serial Clock

CS

Chip Select

DC

Data Command/Control

RST

Reset

BL

Backlight

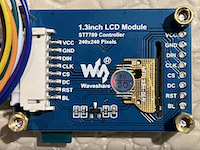
and create an overlay file representing the display connections?

Parents Reply Children
  • Shields are confusing me a little.

    I see &arduino_spi  in the st7789v_st7789v_waveshare_240x240 file does that mean I need to create a reference for the nrf5340dk_nrf5430_cpuapp? Is that what is meant by "boards must also provide a configuration matching their supported connectors." Does that mean I need to create a specific one for the nrf5340?

    I am use to changing things in a local overlay but not really changing the command line (since I'm using the nrf connect for visual studio adding), so I think I would use the kconfig option for actviation.

    Is all of this an alternative to creating an overlay file?

  • So create an overlay file for the board and copy the st7789, correct? Where do I connect the wires from the display to the 5340dk?

    I see these two display settings in the pinetime dts and the shield. They are both under a spi, is there some way I should set this up for the nrf5340dk?

    &arduino_spi {

    status = "okay";

    cs-gpios = <&arduino_header 16 GPIO_ACTIVE_LOW>;        /* D10 */


    st7789v_st7789v_waveshare_240x240: st7789v@0 {

    compatible = "sitronix,st7789v";

    spi-max-frequency = <20000000>;

    reg = <0>;

    cmd-data-gpios = <&arduino_header 15 GPIO_ACTIVE_LOW>;        /* D9 */

    reset-gpios = <&arduino_header 14 GPIO_ACTIVE_LOW>;        /* D8 */

    width = <240>;

    height = <240>;

    x-offset = <0>;

    y-offset = <0>;

    vcom = <0x19>;

    gctrl = <0x35>;

    vrhs = <0x12>;

    vdvs = <0x20>;

    mdac = <0x00>;

    gamma = <0x01>;

    colmod = <0x05>;

    lcm = <0x2c>;

    porch-param = [0c 0c 00 33 33];

    cmd2en-param = [5a 69 02 01];

    pwctrl1-param = [a4 a1];

    pvgam-param = [D0 04 0D 11 13 2B 3F 54 4C 18 0D 0B 1F 23];

    nvgam-param = [D0 04 0C 11 13 2C 3F 44 51 2F 1F 1F 20 23];

    ram-param = [00 F0];

    rgb-param = [CD 08 14];

    };

    };

    &spi1 {

    /* Sitronix ST7789V LCD */

    st7789v: st7789v@1 {

    compatible = "sitronix,st7789v";

    reg = <1>;

    spi-max-frequency = <8000000>; /* 8MHz */

    cmd-data-gpios = <&gpio0 18 GPIO_ACTIVE_LOW>;        /* DET */

    reset-gpios = <&gpio0 26 GPIO_ACTIVE_LOW>;        /* RESX reset */

    width = <240>;

    height = <240>;

    x-offset = <0>;

    y-offset = <0>;

    vcom = <0x19>;

    gctrl = <0x35>;

    vrhs = <0x12>;

    vdvs = <0x20>;

    mdac = <0x00>;

    gamma = <0x01>;

    colmod = <0x05>;

    lcm = <0x2c>;

    porch-param = [0c 0c 00 33 33];

    cmd2en-param = [5a 69 02 01];

    pwctrl1-param = [a4 a1];

    pvgam-param = [D0 04 0D 11 13 2B 3F 54 4C 18 0D 0B 1F 23];

    nvgam-param = [D0 04 0C 11 13 2C 3F 44 51 2F 1F 1F 20 23];

    ram-param = [00 F0];

    rgb-param = [CD 08 14];

    };

    };

  • So if you want to use the shield you should be able to add the CMAKE argument in the build configuration in VSC.  so select "ADD Argument" under the extra cmake argument option.  in that field type

    -DSHIELD=st7789v_tl019fqv01

    this should add the shield in the build and you can see that in the build/zephyr folder with the Zephyr.dts file.

    if you want to just use the overlay like above then you add the SPI features above the child node definition for the ST7789.  you will also need to define the pin_cntrl for those pins.  something like this:

    &spi1 {
    	compatible = "nordic,nrf-spim";
    	status = "okay";
    	pinctrl-0 = <&spi_master_default>;
    	pinctrl-1 = <&spi_master_sleep>;
    	cs-gpios = <&gpio0 11 GPIO_ACTIVE_LOW>;
    	st7789v_st7789v_tl019fqv01: st7789v@0 {
    	compatible = "sitronix,st7789v";
    	spi-max-frequency = < 0x1312d00 >;
    	reg = < 0x0 >;
    	cmd-data-gpios = < &arduino_header 0xf 0x1 >;
    	reset-gpios = < &arduino_header 0xe 0x1 >;
    	width = < 0x140 >;
    	height = < 0xaa >;
    	x-offset = < 0x0 >;
    	y-offset = < 0x23 >;
    	vcom = < 0x2b >;
    	gctrl = < 0x35 >;
    	vrhs = < 0xf >;
    	vdvs = < 0x20 >;
    	mdac = < 0x60 >;
    	gamma = < 0x1 >;
    	colmod = < 0x55 >;
    	lcm = < 0x2c >;
    	porch-param = [ 0C 0C 00 33 33 ];
    	cmd2en-param = [ 5A 69 02 01 ];
    	pwctrl1-param = [ 52 A1 ];
    	pvgam-param = [ D0 00 02 07 0B 1A 31 54 40 29 12 12 12 17 ];
    	nvgam-param = [ D0 00 02 07 05 15 2D 44 44 1C 18 16 1C 1D ];
    	ram-param = [ 00 F8 ];
    	rgb-param = [ CD 08 14 ];
    	};
    }
    
    &pinctrl {
    	spi_master_default: spi_master_default {
    		group1 {
    			psels = <NRF_PSEL(SPIM_SCK, 0, 6)>,
    					<NRF_PSEL(SPIM_MOSI, 0, 7)>,
    					<NRF_PSEL(SPIM_MISO, 0, 25)>;
    		};
    	};
    
    	spi_master_sleep: spi_master_sleep {
    		group1 {
    			psels = <NRF_PSEL(SPIM_SCK, 0, 6)>,
    					<NRF_PSEL(SPIM_MOSI, 0, 7)>,
    					<NRF_PSEL(SPIM_MISO, 0, 25)>;
    			low-power-enable;
    		};
    	};
    	};

  • How does the backlight (BL) connect to the board and where is it referenced in the overlay?

Related