DFU over BLE using external Flash TESTING

Hello Engineer
Greetings Of the Day 


We performed DFU over BLE with secondary slot in External flash that operates using SPI .

I needed some clarification on the outcomes .

-> My running application of Primary Slot was of 256KB 
-> To perform DFU I did minor tweaks in my running application , say , added a printing Line that says "NEW FIRMWARE"
-> Then executed Build and took out the app_update.bin file that is binary that I will flash thru my BLE DFU process , it was obviously around 256KB , as changes were minor 
-> I undo'ed all tweaks and build it and flashed to my custom board (nrf 52833) 
->Then I did dfu using nordic app on my phone 

-> DFU was successful and I observed new application running in my custom board , successfully .


To Verify that DFU took place according to my External flash settings 

-> I made a special application that reads my external flash (this application was tested before with spi_flash example and it worked perfectly fine)
-> to be precise with my testing I made sure that flash was all erased prior to my DFU testing sequence
-> when I went to read , start of my flash (area partitioned for McuBoot_Secondary slot )
-> I observed only some odd 30 bytes were written 

My First question is , why only 30Bytes were written on my external flash when my new image was of around 256KB ?
Is MCUboot that intelligent that I can see the changes and only write the update that I have made in my application  ?


My second question is , how I can verify that my DFU over BLE is done using External Flash only , not inbuilt SOC flash (this haunts me ) .


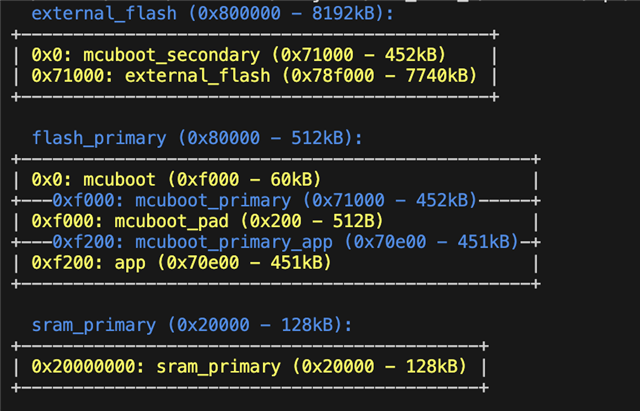
This image represents my Partition table 


Also if you insuniate with possible tasks that can verify my DFU BLE using external slots , would be really helpful . 


Thanks & Regards 

  • Hi S,

    Good questions, I'll clarify them for you

    My First question is , why only 30Bytes were written on my external flash when my new image was of around 256KB ?
    Is MCUboot that intelligent that I can see the changes and only write the update that I have made in my application  ?

    I assume that you read and observe this after you've powercycled/restarted the device after performing DFU. If this is the case, then the reason for why you only see some arbitrary 30 byte on MCUboot secondary is due to how the DFU procedure works:

    1. First you run your original image on MCUboot Primary
    2. Then you enter the DFU procedure mode and upload the new image to MCUboot secondary
    3. When the new image in MCUboot secondary has been uploaded it starts the swapping procedure, i.e it swaps around the images in Primary and secondary so that the new image is now in MCUboot primary and the original is in MCUboot secondary,
    4. If the new image (which is now in MCUboot primary) is tested and approved (i.e that it seems to be a valid firmware), it approves the swap and deletes the original image which is in MCUboot secondary, making room for future images to be uploaded to the MCUboot secondary slot.
    My second question is , how I can verify that my DFU over BLE is done using External Flash only , not inbuilt SOC flash (this haunts me ) .

    If you're using MCUboot, then the procedure is simply that MCUboot is programmed to use MCUboot primary application and MCUboot secondary application slots for DFU. Primary is used for the running image, and secondary is used to temporarily store the update image, and to hold the image that is swapped.

    As you can see in your image, the secondary MCUboot application partition resides in your external flash from 0x0 to 0x71000, meaning that it has to be done through external flash. If you place your secondary partition on the internal flash area, it will only use your internal flash for DFU.

    I recommend that you also have a look at https://academy.nordicsemi.com/courses/nrf-connect-sdk-intermediate/lessons/lesson-8-bootloaders-and-dfu-fota/ for some more information regarding how this works!

    Kind regards,
    Andreas

  • Hi Andreas 
    Thank you for your valuable input , i will go thru the link you provided , also is there any way -

    1) that i can stop the erase of secondary slot after swap procedure .

    2) this is bit off topic , is there any way i can encrypt my app_update.bin file , for better security of our product .


    Regards 

  • Sankton said:
    1) that i can stop the erase of secondary slot after swap procedure .

    You can modify the MCUboot code for your project and create your own custom procedure where you can manually delete the contents on the secondary partition, but I'm not 100% sure why you would want to do this. Could you expand upon why so that I might see differently?

    Sankton said:
    2) this is bit off topic , is there any way i can encrypt my app_update.bin file , for better security of our product .

    Yes, this should be possible according to https://docs.nordicsemi.com/bundle/ncs-latest/page/mcuboot/encrypted_images.html.

    Kind regards,
    Andreas

  • You can modify the MCUboot code for your project and create your own custom procedure where you can manually delete the contents on the secondary partition, but I'm not 100% sure why you would want to do this. Could you expand upon why so that I might see differently?

    This is because we have our encrypted OTA file to be tested now ,  so direct jump to step of  confirmation and swap shouldnt take place .


    Also thanks for the link regarding encrypted images , that will be for my personal educational pursuits ,

    Thanks & Regards 
    S

  • Sankton said:
    This is because we have our encrypted OTA file to be tested now ,  so direct jump to step of  confirmation and swap shouldnt take place .

    Ah, my bad. I see I mighte caused some confusion with the ordering of things. Let me know if the explanation under removes your desire to want to stop the erase:

    Here's the general process of how MCUboot testing, confirming, and swapping work:
    1. Building and Loading Images: First, you need to build and load MCUboot and the firmware images for the primary and secondary slots. The commands for building and loading MCUboot and the firmware images may vary depending on the specific use case. For example, you might use the newt tool to build and load MCUboot and the firmware images (source).

    2. Testing the Image: After uploading the firmware image to the secondary slot, you can test the image by obtaining its SHA and ensuring it boots. This can be done using the imgtool verify and mcumgr image test commands (source, source).

    3. Confirming the Image: If the image in the secondary slot is tagged as "confirm", MCUboot will swap it into the primary slot permanently. If the image is tagged as "test", MCUboot will swap it into the primary slot for one reset cycle. Unless the image is then confirmed while running, MCUboot will swap back the old application to the primary slot on its next reset (source).

    4. Swapping the Images: If everything works as expected, you can proceed with requests for permanent swap to the image in the secondary slot and do random swaps. When the swap finishes, the previous secondary image should now be in the primary slot and vice-versa (source).

    5. Reverting the Images: If the device crashes immediately upon booting a new (bad) image, MCUboot will revert to the old (working) image at the next device reset, rather than booting the bad image again. This allows device firmware to make test swaps permanent only after performing a self-test routine (source).

    Kind regards,
    Andreas

Related