thingy:53 I have damage to the sw2 pin and I am unable to enter the DFU

Hi,

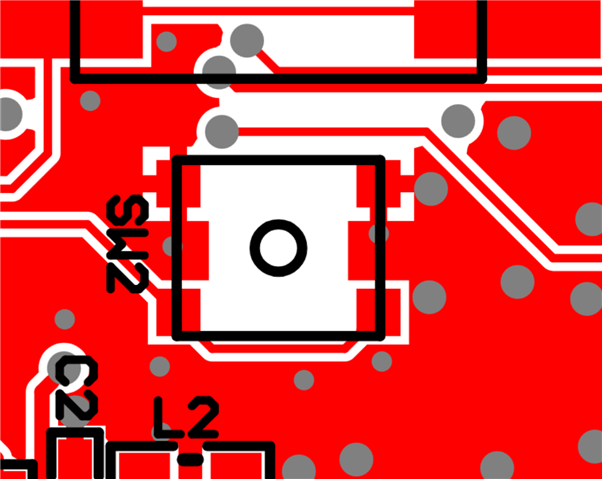
I have thingy:53 and I have damage to the sw2 pin and I am unable to enter the DFU. I lost two tiny pieces that go just above the one in the photo and not even using a needle, it seems to me that the button (which was not working before) now doesn't work anymore

My question is: What would be another way in the circuit to put sw2 under pressure (while I throw sw1 to ON) other than pressing this "button"

I stay trying this: https://academy.nordicsemi.com/flash-instructions-for-the-thingy53/  (USB-C Mode)

Note01: I still have the two tiny pieces that came off the top of the sw2, but I don't know how to solder them back and I don't even know if that would solve the problem.

Parents
  • Hello,
    I wish I could assist you with making a video on how to replace or replicate the functionality of the button on your board. We don't have the capacity to do that. 
    I assume you've had a look at the button layout as shown below. You need to short one of the bottom two corners to one of the top two corners (from the view of this picture). That's how the button works. It pull the gpio connected to SW2 down to indicate that it's been pressed. 
    1. How have you installed the new button? Is it a button the holds the connection or is it a click and release button? You don't need to have the button there, you can just hold two wires together to replicate the button push.
    Best regards
    Asbjørn
Reply
  • Hello,
    I wish I could assist you with making a video on how to replace or replicate the functionality of the button on your board. We don't have the capacity to do that. 
    I assume you've had a look at the button layout as shown below. You need to short one of the bottom two corners to one of the top two corners (from the view of this picture). That's how the button works. It pull the gpio connected to SW2 down to indicate that it's been pressed. 
    1. How have you installed the new button? Is it a button the holds the connection or is it a click and release button? You don't need to have the button there, you can just hold two wires together to replicate the button push.
    Best regards
    Asbjørn
Children
  • I need to say that I need a video just for that: ""replicate the functionality of the button on your board."

    Evidently, I saw this picture. You say: "You need to short one of the bottom two corners to one of the top two corners"

    The button already conducts (on the continuity scale, beep, of the multimeter) in this region, that is, in the parallel from top to bottom. So, connecting the wires ai would not solve anything after pressing the button. I made the wire connections, etc... And just lastly, I soldered the wires to the button, hoping that with the 4 wires connected, it would work. But it never works and then I asked for a video

Related