Enable BLE OTA DFU in nRF52832 (Arduino framework)

Dear Dev Team,

I am currently working on implementing OTA DFU on the nRF52832-DK using the Arduino framework. However, I have not been able to find any suitable options or support for this requirement.

I attempted to use Adafruit's nRF52 Arduino core, but I encountered a (0x8):GATT CONN TIMEOUT error while uploading the Zip file in nRF connect application. Due to this issue, I am exploring alternative approaches to enable OTA DFU on the nRF52832-DK within the Arduino framework.

If anyone has experience working with nRF52 series boards and the Arduino framework, I would appreciate any guidance or suggestions on enabling OTA DFU.

Best regards,

Bharani Dharan R

Parents
  • Dear Bharani,

    Here’s a detailed step-by-step guide I followed to perform OTA-DFU (Over-the-Air Device Firmware Update) using the Adafruit Feather nRF52832:

    1) Enable DFU in Your Code (Using PlatformIO & Arduino Framework)

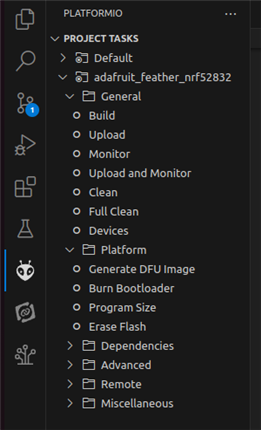
    If you're using PlatformIO for software development with the Arduino framework, start by enabling DFU mode in your code using dfu.begin(). In the PlatformIO interface, you’ll see an option called “Generate DFU Image”. Click on it, and it will generate a firmware.zip file. Transfer this ZIP file to your phone.

    2) Use the “nRF Device Firmware Update” App

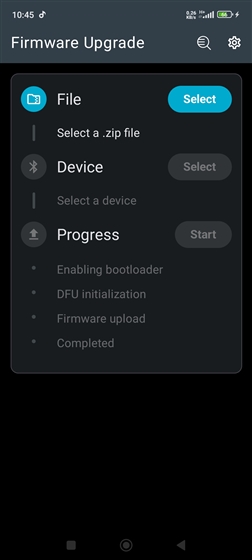
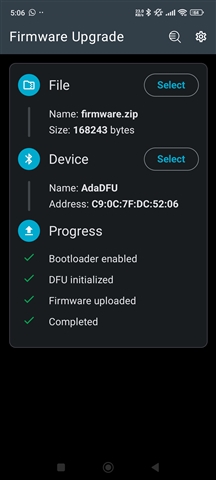
    Download the nRF Device Firmware Update app on your phone. Build and flash your code with the DFU changes. Open the app — you’ll see an interface where you can select a .zip file. Note: On some phones, the firmware.zip file might not appear. In that case, upload the ZIP to a Google Drive folder, and access it from there via the app. After selecting the file, choose your device from the list, You can choose your device by MAC ID and name of the device. Make sure Bluetooth is enabled on your phone. Once selected, tap Start to initiate the firmware update.

    3) Handling Bootloader and DFU Mode

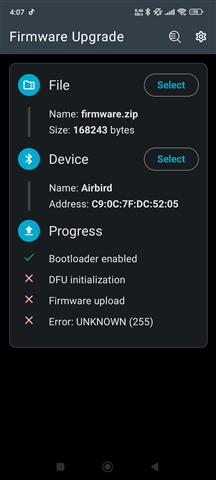
    After clicking Start, you’ll see a message like “Bootloader enabled”. At this point, the device will switch to DFU mode, and its name will change to “DfuTarg” or something similar. You must now select this device (e.g., “AdaDfu”) to continue. However, you may encounter an error like “DFU Initialized” followed by “Error: Unknown (255)” during the upload.

    4) Fixing the Error (Unknown 255)

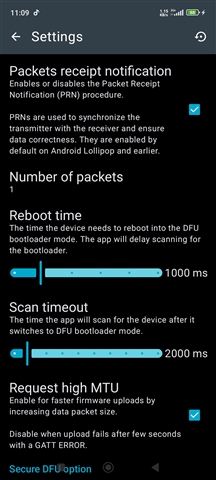
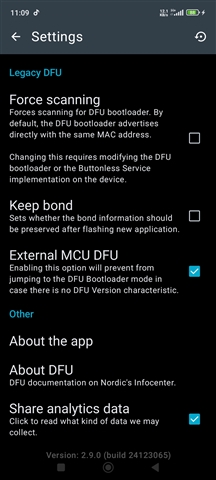
    To resolve this, go to the app’s settings and Set Packet Receipt Notification (PRNs) to 1 (default is 12). Increase the reboot time to 2000ms or 3000ms. Then, repeat Steps 2 and 3. This should allow the firmware upload to proceed successfully.

    5) Preventing Reconnection Errors

    To avoid the error in Step 3 (having to reselect “AdaDfu”), enable the setting “External MCU DFU” in the app. With this enabled, repeat Steps 2 and 3. This time, your firmware.zip should upload, and you should see messages like “Firmware uploaded” and “Completed”.

    Thank you, Regards

    Arjun G

Reply
  • Dear Bharani,

    Here’s a detailed step-by-step guide I followed to perform OTA-DFU (Over-the-Air Device Firmware Update) using the Adafruit Feather nRF52832:

    1) Enable DFU in Your Code (Using PlatformIO & Arduino Framework)

    If you're using PlatformIO for software development with the Arduino framework, start by enabling DFU mode in your code using dfu.begin(). In the PlatformIO interface, you’ll see an option called “Generate DFU Image”. Click on it, and it will generate a firmware.zip file. Transfer this ZIP file to your phone.

    2) Use the “nRF Device Firmware Update” App

    Download the nRF Device Firmware Update app on your phone. Build and flash your code with the DFU changes. Open the app — you’ll see an interface where you can select a .zip file. Note: On some phones, the firmware.zip file might not appear. In that case, upload the ZIP to a Google Drive folder, and access it from there via the app. After selecting the file, choose your device from the list, You can choose your device by MAC ID and name of the device. Make sure Bluetooth is enabled on your phone. Once selected, tap Start to initiate the firmware update.

    3) Handling Bootloader and DFU Mode

    After clicking Start, you’ll see a message like “Bootloader enabled”. At this point, the device will switch to DFU mode, and its name will change to “DfuTarg” or something similar. You must now select this device (e.g., “AdaDfu”) to continue. However, you may encounter an error like “DFU Initialized” followed by “Error: Unknown (255)” during the upload.

    4) Fixing the Error (Unknown 255)

    To resolve this, go to the app’s settings and Set Packet Receipt Notification (PRNs) to 1 (default is 12). Increase the reboot time to 2000ms or 3000ms. Then, repeat Steps 2 and 3. This should allow the firmware upload to proceed successfully.

    5) Preventing Reconnection Errors

    To avoid the error in Step 3 (having to reselect “AdaDfu”), enable the setting “External MCU DFU” in the app. With this enabled, repeat Steps 2 and 3. This time, your firmware.zip should upload, and you should see messages like “Firmware uploaded” and “Completed”.

    Thank you, Regards

    Arjun G

Children
No Data
Related