How to automate the entrance in bootloader mode on nRF52840 USB dongle?

Dear DEVZONE,

We are working on Nordic nRF58480 USB dongle for Thread activities.

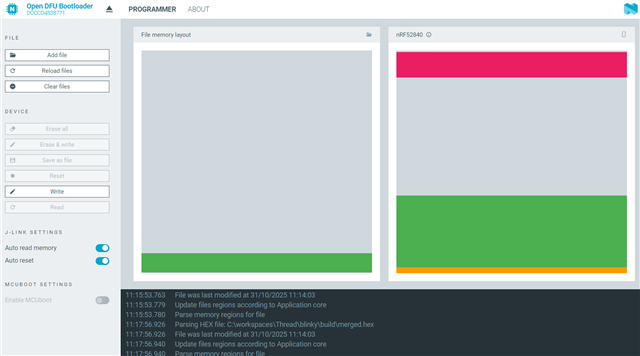
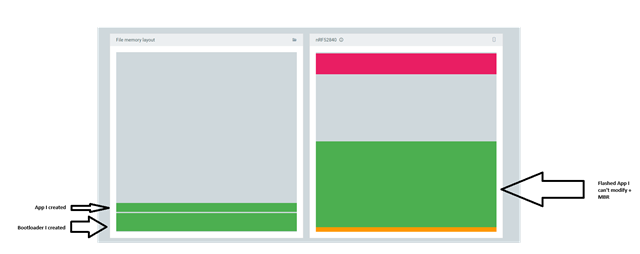
We are using one testbench on which we need to automate with Python scripts reprogramming of the USB dongle with a new firmware.

To this end, we need to reflash the USB dongle; but nRF52480 requires a pression on a small button to enter into bootloader mode, and this is incompatible with automation.

We may find an HW fix to solve this limitation but we are rather wondering whether you have another solution you could propose?


We found a DFU trigger library (USB) thread but we did not succeed in exploiting it.

nRF5 SDK v17.0.2: DFU Trigger Library (USB)


Similarly, we found this document specifying the Device Firmware Upgrade over USB.

DFU_1.1.doc


Could you please support or advise us?

Warm regards

Cedric

Parents
  • Hi there,

    AFAIK, there are 3 , YMMV Fingers crossed tone2

    Totally doable—even if you can’t touch the app. You just make MCUboot do the work.

    Here are the bootloader-only ways to enter DFU (no app changes):

    1) “Always give me a DFU window” (most common)

    MCUboot waits at boot for serial/USB DFU for N milliseconds; if nothing connects, it boots the app.

    In your application prj.conf:

    CONFIG_BOOTLOADER_MCUBOOT=y

    • Create child_image/mcuboot/prj.conf (this configures the bootloader image that sysbuild makes):

    # Turn on MCUboot serial recovery
    CONFIG_BOOT_SERIAL=y
    
    # Choose one transport:
    CONFIG_BOOT_SERIAL_UART=y         # DFU over UART
    # or
    CONFIG_BOOT_SERIAL_CDC_ACM=y      # DFU over USB CDC (shows up as a COM port)
    
    # Enter recovery automatically at boot and wait for host
    CONFIG_BOOT_SERIAL_WAIT_FOR_DFU=y
    CONFIG_BOOT_SERIAL_WAIT_FOR_DFU_TIMEOUT=2000   # ms; 0 = wait forever
    # Optional: don’t require any detect pin
    CONFIG_BOOT_SERIAL_DETECT_NONE=y
    

    UX: Power/reset the board → bootloader opens a ~2s DFU window →

    • If you start an upload, it stays in DFU.

    • If not, it boots the third-party app.|

    2) Hardware strap (no button on the device, but you can pull a pin)

    If you can wire a pin at reset (e.g., test pad or baseboard):

    In child_image/mcuboot/prj.conf:

    CONFIG_BOOT_SERIAL=y
    CONFIG_BOOT_SERIAL_CDC_ACM=y     # or _UART
    CONFIG_BOOT_SERIAL_WAIT_FOR_DFU=y
    CONFIG_BOOT_SERIAL_DETECT_PIN=y
    
    …and in child_image/mcuboot/overlay.dts set which GPIO = “enter DFU when held” (active level per your wiring). That way you can clip a probe or jig the pin at power-on to force DFU. App still untouched.
    3) “Forever DFU” mode for bring-up

    Same as #1 but:

    CONFIG_BOOT_SERIAL_WAIT_FOR_DFU_TIMEOUT=0
    

    Point left  Sunglasses

    Bootloader always sits in DFU until you upload something. Useful during recovery; change back once you’re done.

    if you can't put mcumgr in with app then the last option might work or a Strapping pin (something on the board that needs pulled high on boot or always could be useful to connect with.

    HTH

    GL :-) PJ :v:

    Good topic 

    From the trigger lib doc.

    This information applies to the nRF52840 SoC only.

    When the trigger library is added to an application, it allows a connected USB host to remotely tell the app to reboot into the bootloader to allow it to be updated via DFU. When asked to enter bootloader mode, it pulls its own reset pin using the GPIO pin BSP_SELF_PINRESET_PIN (by default, only available on PCA10059). As a consequence, the library requires the following:

    • a GPIO pin connected to the RESET pin which is true for the PCA10059 dongle,
    • a bootloader that enters DFU mode on pin reset.

    The experimental Open USB bootloader example is configured in this way, and newer versions of the nRF Connect PC app are equipped to communicate with the Trigger module.

  • Thanks for the detailed explanation. I’d like to implement option 1 (DFU window at boot), but I’m not sure which base project you're starting from.

    I don’t have a specific application to modify—my goal is to build a bootloader-only image, since the application is already flashed and cannot be changed. It resides at address range 0x00001000 - 0x000557F7, so I assume the second image (to update the app) should be placed at 0x00000000 - 0x00001000.

    Also, I’ve seen two ways to create bootloaders:

    • Using the nRF5 SDK from Nordic: nRF5 SDK (in maintenance mode). I saw a example called dfu/open-bootloader/pca10059_usb that seems to do the thing I want. But when I'm flashing the bootloader and reset my dongle it seems to jump on my application without waiting in DFU mode.  
    • Generating projects from samples via the nRF Connect for VSCode extension (with the nRF Connect SDK)

    Could you clarify what's the base project you tell me to modify ? 

  • Using the Nrf dongle with any of the example apps, build the bootloader example. The trigger Options are what you might be missing. I use the NRF_SDK with Visual Studio also .

    Make changes to the PRJ.conf file and try that.

    I would use option 3, it will just wait forever. 

    HTH

    GL :-) PJ :v:

  • Hey,
    Thanks for your reply.

    Here’s the process I’m following using the nRF extension in VSCode:

    1. Create a new application
    2. Copy a sample
    3. Search for: "blinky"
    4. Click on: "Blinky Sample" (zephyr/samples/basic/blinky)
    5. Add at the top of prj.conf:
      CONFIG_BOOTLOADER_MCUBOOT=y
    6. Create the child_image/mcuboot/prj.conf as you previously described
    7. Add a build configuration: select the nrf52840dongle target (Shall I config something else here ?)
    8. Generate and build

    Now I have two .hex images generated:

    • blinky/build/merge.hex
    • blinky/build/blinky/zephyr/zephyr.hex

    When I open the Programmer tool, the memory layout shows that these files are located at the end of the Application region.

    Am I missing something in the process ? 

    Tom.


  • Hi there,

    So looks like you may be mixing the two methods... You need to decide which path gives you the best function for your situation.

    You built Blinky with CONFIG_BOOTLOADER_MCUBOOT=y and a child mcuboot/prj.conf, then targeted nrf52840dongle/nrf52840. Now you see hex images and a memory layout that looks “off” and can’t auto-jump to bootloader.

    That’s because there are two distinct approaches:

    A) Keep the factory Nordic USB DFU bootloader (shipped on PCA10059)

    • You do not build/flash MCUboot.

    • You enter DFU (bootloader) either by the dongle’s button at reset or by software using GPREGRET.

    • You flash your application-only image (no MCUboot) using the Programmer tool or nrfutil dfu.

    B) Replace the factory bootloader with MCUboot

    • You do build MCUboot as a child image and flash the merged.hex that contains MCUboot + your app.

    • To auto-enter recovery, you enable MCUboot’s serial/USB DFU or pin-detect in the child Kconfig and trigger it.

    You have done a bit of B while expecting behavior from A. :grin:

    Path A — Use the factory Nordic USB DFU bootloader (simplest, safest for the dongle)

    1. Remove CONFIG_BOOTLOADER_MCUBOOT=y from the app. Don’t build MCUboot.

    2. Build your app normally for nrf52840dongle/nrf52840.

    3. To auto-enter bootloader from your app, write the GPREGRET and soft reset:

      #include <zephyr/sys/reboot.h>
      #include <hal/nrf_power.h>  // or <nrfx/hal/nrf_power.h> depending on includes
      
      static void enter_factory_dfu_now(void)
      {
          /* Nordic factory bootloader (nRF5 SDK DFU) looks for 0xB1 in GPREGRET */
          nrf_power_gpregret_set(NRF_POWER, 0, 0xB1);
          sys_reboot(SYS_REBOOT_WARM);
      }
      

    • Call enter_factory_dfu_now() when you want the dongle to pop into DFU.

    • In Programmer you’ll then see the bootloader enumerate as a DFU device over USB.

    • Do not flash anything that overwrites the bootloader region, or you lose this convenience.

    If it’s not entering DFU with 0xB1, try 0xB0. Different bootloader variants sometimes use 0xB0 vs 0xB1. 99% of the time on PCA10059 it’s 0xB1.

    What about the two hex files?

    • zephyr.hex = just your application.

    • merged.hex (when you had MCUboot enabled) = bootloader + app; don’t use that in Path A or you risk overwriting the factory bootloader.

    Path B — Switch to MCUboot (Zephyr-native boot + recovery)

    If he really wants MCUboot (e.g., standardizing across boards), then commit and configure it right:

    1. Keep CONFIG_BOOTLOADER_MCUBOOT=y in the app.

    2. In child_image/mcuboot/prj.conf, enable a recovery method. Options:

      • Pin-based serial recovery (handy on dongle’s single button, P1.06):

    CONFIG_BOOT_SERIAL=y
    CONFIG_BOOT_SERIAL_DETECT_PORT=y
    CONFIG_BOOT_SERIAL_DETECT_PIN=1,6      # Port 1, pin 6 = P1.06 (SW1)
    CONFIG_BOOT_SERIAL_DETECT_PIN_VAL=0    # Active low when button held
    CONFIG_BOOT_SERIAL_DETECT_PIN_PULL_UP=y
    CONFIG_SERIAL=y
    

    USB DFU in MCUboot (if you want host-side dfu-util/USB):

    CONFIG_BOOT_USB_DFU=y
    CONFIG_USB_DEVICE_STACK=y
    CONFIG_USB_DEVICE_PRODUCT="MCUboot DFU"
    

    3. Build and flash the merged.hex (this replaces the factory bootloader with MCUboot).

    4. To auto-enter MCUboot from the app, you have two easy options:

    • Hold the button at reset (pin detect above), or
    • Put the system into recovery via a software trigger supported by your chosen recovery path (for serial, many folks wire a “virtual detect” pin or just prompt the user).

    Note: MCUboot doesn’t use the factory 0xB1 GPREGRET convention. That’s why mixing A & B is a dead end.

    On the dongle, the DTS/partition keeps a bootloader region at the end. If you build with MCUboot, your app slot is different than a bare app. If you’re still seeing partitions “at the end of Application,” that’s just the board’s partition layout and does not imply an error — but it’s a red flag if you intended to keep the factory bootloader (Path A) while flashing a merged.hex (Path B).

    It all comes down to Do you want to keep the factory USB DFU?
    YES: Don’t enable MCUboot. Use GPREGRET=0xB1 + warm reset to auto-enter DFU. Flash app-only images (zephyr.hex) via Programmer/DFU.
    NO: Enable MCUboot, pick serial or USB DFU in the child image, and flash merged.hex once to install MCUboot. Then use button-detect or MCUboot DFU to recover/upgrade.

    HTH

    GL :-) PJ :v:

    for my solutions, for the nRF52840 USB Dongle, stick with Path A unless you have a compelling reason to standardize on MCUboot there. The factory DFU is rock solid, and the GPREGRET trick makes “enter bootloader” 100% software-driven—perfect for remote “press a button in the app to put the dongle in DFU mode.” Thumbsup

  • Hi PJ,

    Thanks again for your detailed explanation — it really helped me understand the two approaches better.

    With your advices I succeed to create my own bootloader. Thanks for that !

    I’d like to clarify my specific situation:

    • I cannot modify the application itself, as it’s provided to me in a precompiled .zip format (standardized across projects).
    • My goal is to replace the factory bootloader on the nRF52840 USB Dongle with a custom one that:
      • Stays in DFU mode for a short period after reset, waiting for a potential firmware update.
      • Then jumps to the existing application if no update is received.

    So I’m only looking to compile and flash the bootloader, without touching or rebuilding the application. This would allow me to update the app via DFU when needed, without requiring any changes to the app itself.

    From my perspective, it seems that Path B (MCUboot) might be closer to what I’m trying to achieve — assuming I can configure it to enter DFU mode temporarily after reset, even without cooperation from the application.


    Is there a way to overwrite the factory bootloader by a custom bootloader ?


    Tom.

  • Hi there,

    SO i'm not in way left field :grin:

    you want to use the Dongle with custom Bootloader and Firmware App.

    The Bootloader presently is immutable(can't be update, by code). You would need to erase the device completely. Program/SWD and Add your bootloader (MCUboot)maybe and recommended.

    When it's in DFU mode. give it your app and cross your fingers is what I see? , Now perhaps there is a software method in your Bootloader to Reboot and PAUSE ?(allows app update ONLY) , X-seconds and continues to app installed...

    Feels very Generic and Vanilla to me. 

    LMK ?

    And others will comment...

    HTH

    GL :-) PJ V

Reply
  • Hi there,

    SO i'm not in way left field :grin:

    you want to use the Dongle with custom Bootloader and Firmware App.

    The Bootloader presently is immutable(can't be update, by code). You would need to erase the device completely. Program/SWD and Add your bootloader (MCUboot)maybe and recommended.

    When it's in DFU mode. give it your app and cross your fingers is what I see? , Now perhaps there is a software method in your Bootloader to Reboot and PAUSE ?(allows app update ONLY) , X-seconds and continues to app installed...

    Feels very Generic and Vanilla to me. 

    LMK ?

    And others will comment...

    HTH

    GL :-) PJ V

Children
No Data
Related