This post is older than 2 years and might not be relevant anymore
More Info: Consider searching for newer posts

Programming SoftDevice to custom PCB: Unable to find or open the JLinkARM dll

I've been trying to program a custom PCB with an nRF52832, using the nRF52 Development Kit and nRFgo Studio.

When I connect just the nRF52 Development Kit to my computer and program the SoftDevice (s132_nrf52_3.0.0_softdevice.hex), it programs successfully.

Connected only to dev kit.

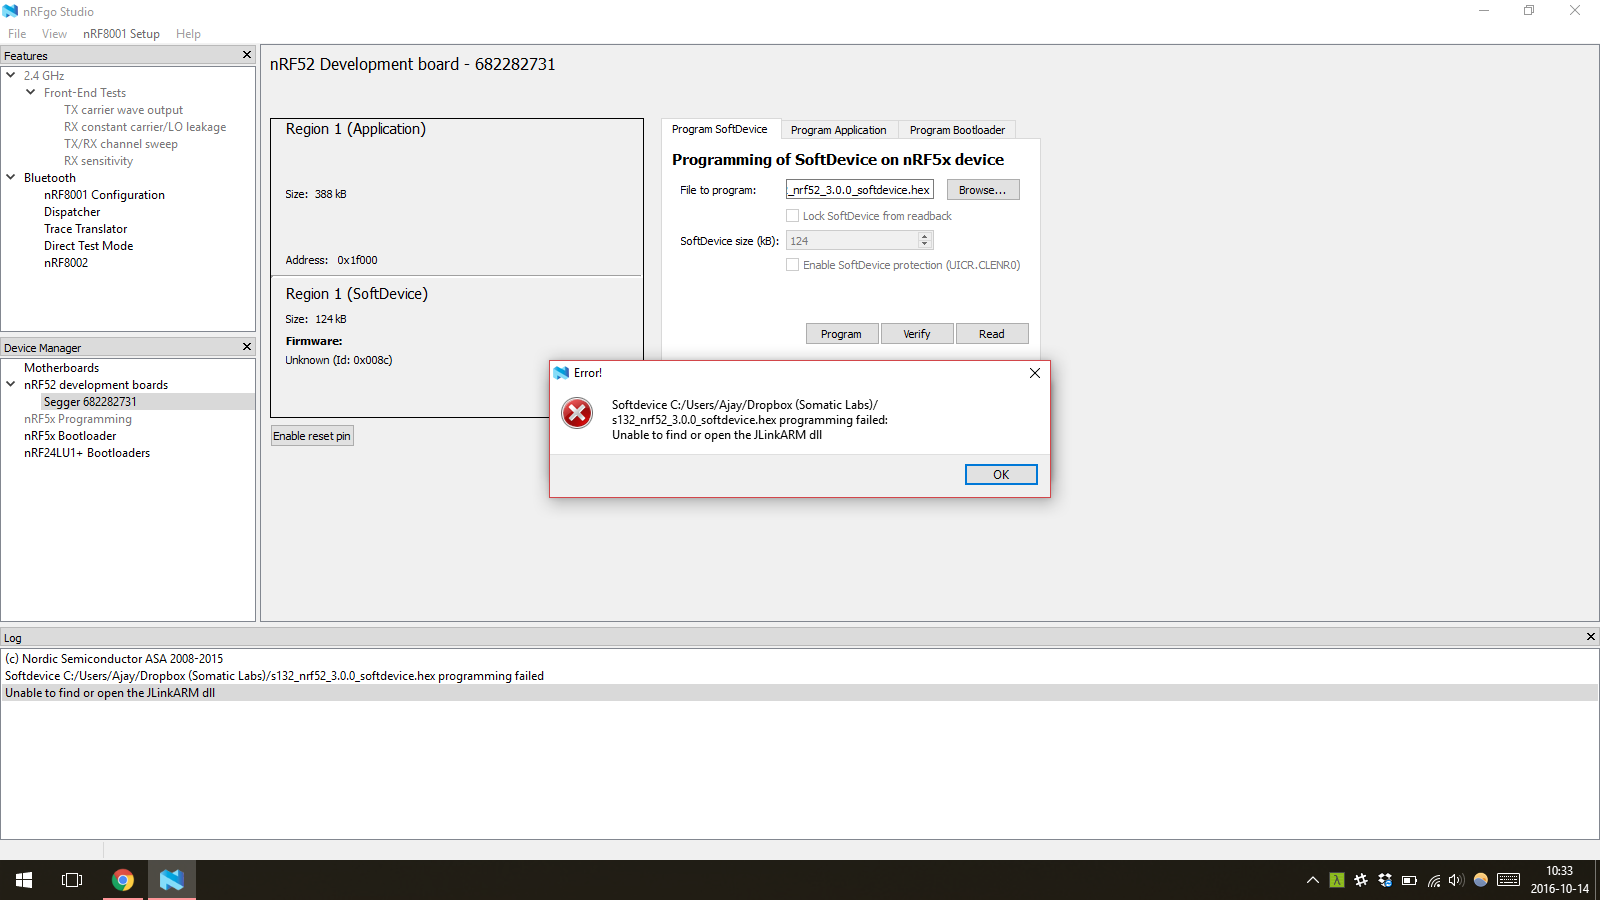
However, when I connect the Development Kit to my custom PCB using the TC2030-NL cable, I get an error saying Softdevice ... programming failed: Unable to find or open the JLinkARM dll.

Error when connected to PCB.

The dll evidently exists and is usable, since I'm able to flash the SoftDevice when just the dev kit is connected, but not when the PCB is also connected. What could be causing this issue?

I suspect it could be some configuration or setting I need to change in nRFgo Studio (or perhaps a bug with nRFgo Studio itself).

Please let me know if you have any ideas. Thank you!

EDIT: I tried some subsequent tests using nrfjprog.exe , and I ran into a different error message when attempting to enable the reset pin.

I used these commands:

nrfjprog.exe --memwr 0x10001200 --val 0x00000015 nrfjprog.exe --memwr 0x10001204 --val 0x00000015

And subsequently received this error message both times:

ERROR: Cannot connect to any nRF device. Please make sure a device is

ERROR: connected to the debugger and supplied.

I also attempted to do a device recovery with the following command:

nrfjprog --log --family nrf52 --recover

It resulted in the following error message:

ERROR: JLinkARM DLL reported an error. Try again. If error condition

ERROR: persists, run the same command again with argument --log, contact Nordic

ERROR: Semiconductor and provide the generated log.log file to them.

Parents
  • Based on the nrfjprog logs you attached, it looks like you have an error with how you are connecting your custom PCB to your computer.

    Both nRFGo Studio and nrfjprog require the user of a J-Link debugger. So your connection should look something like:

    computer usb port -> j-link debugger -> nRF5 SoC

    nRF5 Dev Kits make this really easy because they have an on-board J-Link debugger. So all you have to do is connect the dev kit to your computer and it works right away.

    When programming a custom board, the first step is to make sure the debugger you are using is J-Link (if you want to use Nordic's tools):

    • nRF5 Dev Kits have an on board J-link debugger that you can use for you custom PCB by connecting the Debug Out port on the nRF5 DK to your debug header on your custom PCB with a connector like this. Then your connection looks like computer usb port -> nRF5 Dev Kit -> nRF5 Debug Out -> Custom PCB
    • or you can use an external j-link debugger and then your connection looks like computer usb port -> external j-link debugger -> custom pcb

    Now with this connection everything should work. I would reccomend using nrfjprog over nRF Go Studio because it will give you better error logs and you will be able to figure out what is going on. plus you have more control

Reply
  • Based on the nrfjprog logs you attached, it looks like you have an error with how you are connecting your custom PCB to your computer.

    Both nRFGo Studio and nrfjprog require the user of a J-Link debugger. So your connection should look something like:

    computer usb port -> j-link debugger -> nRF5 SoC

    nRF5 Dev Kits make this really easy because they have an on-board J-Link debugger. So all you have to do is connect the dev kit to your computer and it works right away.

    When programming a custom board, the first step is to make sure the debugger you are using is J-Link (if you want to use Nordic's tools):

    • nRF5 Dev Kits have an on board J-link debugger that you can use for you custom PCB by connecting the Debug Out port on the nRF5 DK to your debug header on your custom PCB with a connector like this. Then your connection looks like computer usb port -> nRF5 Dev Kit -> nRF5 Debug Out -> Custom PCB
    • or you can use an external j-link debugger and then your connection looks like computer usb port -> external j-link debugger -> custom pcb

    Now with this connection everything should work. I would reccomend using nrfjprog over nRF Go Studio because it will give you better error logs and you will be able to figure out what is going on. plus you have more control

Children
Related