This post is older than 2 years and might not be relevant anymore
More Info: Consider searching for newer posts

51822 PWM unstable

Hi guys,

I use the 51822's PWM recently, PWM is made by GPIOTE+PPI+TIMER, and the PWM source code as below(I use TIMER1, GPIOTE[0], PPI_CH[0], PPI_CH[1], period and duty means ticks with 16MHz):

void startPwm1(uint16_t period, uint16_t duty)
{
	NRF_TIMER1->INTENCLR = TIMER_INTENSET_COMPARE0_Enabled << TIMER_INTENSET_COMPARE0_Pos; 
	NVIC_DisableIRQ(TIMER1_IRQn);
	
	NRF_GPIOTE->CONFIG[0] = GPIOTE_CONFIG_MODE_Task << GPIOTE_CONFIG_MODE_Pos |
							GPIOTE_CONFIG_POLARITY_Toggle << GPIOTE_CONFIG_POLARITY_Pos |
							WAVE_PWM << GPIOTE_CONFIG_PSEL_Pos | 
							GPIOTE_CONFIG_OUTINIT_Low << GPIOTE_CONFIG_OUTINIT_Pos;
	
	NRF_PPI->CH[0].EEP = (uint32_t) &NRF_TIMER1->EVENTS_COMPARE[0];
	NRF_PPI->CH[0].TEP = (uint32_t) &NRF_GPIOTE->TASKS_OUT[0];
	
	NRF_PPI->CH[1].EEP = (uint32_t) &NRF_TIMER1->EVENTS_COMPARE[1];
	NRF_PPI->CH[1].TEP = (uint32_t) &NRF_GPIOTE->TASKS_OUT[0];
	NRF_PPI->CHENSET = (PPI_CHENSET_CH0_Enabled << PPI_CHENSET_CH0_Pos) | (PPI_CHEN_CH1_Enabled<< PPI_CHEN_CH1_Pos);
	
	NRF_TIMER1->TASKS_STOP = 1;
	NRF_TIMER1->TASKS_CLEAR = 1;
	
//	NRF_TIMER1->PRESCALER = 0;
	NRF_TIMER1->CC[0] = period;  	
	NRF_TIMER1->CC[1] = period - duty;	
	NRF_TIMER1->SHORTS = TIMER_SHORTS_COMPARE0_CLEAR_Enabled << TIMER_SHORTS_COMPARE0_CLEAR_Pos;
	NRF_TIMER1->INTENCLR = TIMER_INTENSET_COMPARE0_Enabled << TIMER_INTENSET_COMPARE0_Pos; 
	NRF_TIMER1->TASKS_START = 1;
}

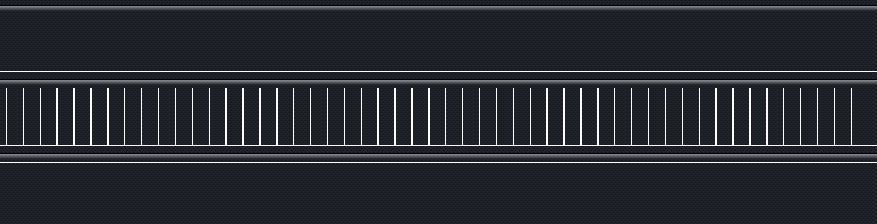
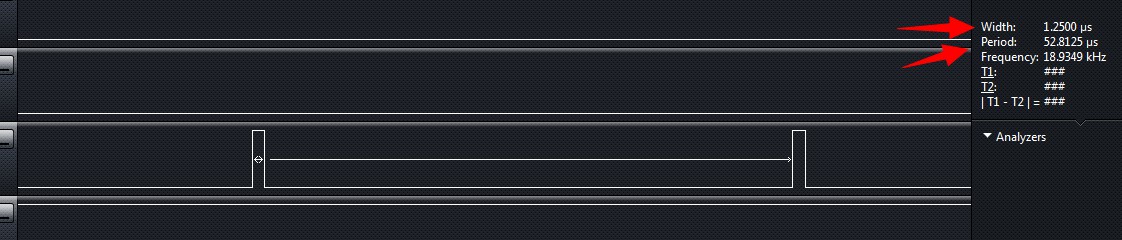
When I download the program to the development board, PWM works well(period is 842 ticks, duty is 20 ticks), As shown below:

image description image description

Then power off the development board, and connected other 3.3V power supply to any 51822's GPIO port, then disconnected, power the development board, Now the PWM does not work well, as show below: image description

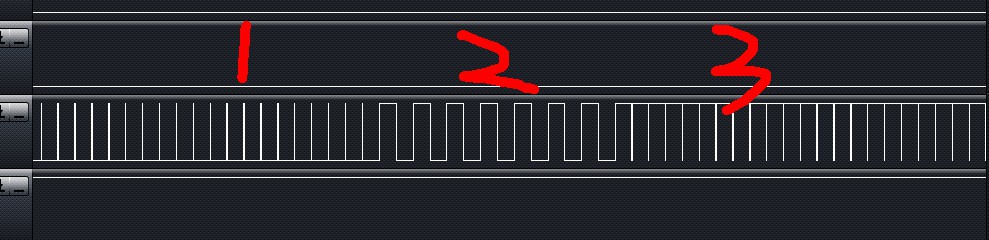
1 pwm works well, 3 looks like Inverted. It seems like GPIOTE's response is not in time.

So have you encountered this situation?

Parents
  • Hi, AmbystomaLabs ,

    The reason is power_manager () function in while(1), When pwm is working, I need to disable power_manager () function, then pwm works well.

    Now the pwm works well on nrf51 DK board, and the time control is very accurate, such as I set the PWM period to 800 ticks(800/16M = 50us),and set the PWM duty to 20 ticks(20 /16M = 1.25us), I find the PWM works well through the logic analyzer.

    But I encountered a new problem on our own board, the PWM duty can not be controlled, it is smaller than the value I set, and the smaller value will be some changes, such as :
    I set the PWM duty to 20 ticks(1.25us), In fact, there is no PWM output;
    I set the PWM duty to 60 ticks(3.75us), In fact, I find the PWM duty is perhaps 1.5us or greater than 1.5us or less than 1.5us;

    Can you help me, What information do I need to provide? Such as PCB?.

  • I think you should clarify if you are picking up the signal directly at MUC_PWM or off of Q1_E and Q4_E. You need to remove or bypass all that junk in between. U4 and U5 have huge 2.2mH inductors and a diode output with a 1uF cap. It looks like it was designed to be a boost DC/DC switcher converting Vbat to some higher voltage.

    If you are actually ahead (ie, on the base side ) of U4, U5 then not only should you remove the cap but also the series resistance that goes to the base of the transistor.

    I don't know what type of project you have in mind, but this is a very poor module to use for it. The module looks like it was designed for a specific application. Normally the modules route the gpio out directly.

Reply
  • I think you should clarify if you are picking up the signal directly at MUC_PWM or off of Q1_E and Q4_E. You need to remove or bypass all that junk in between. U4 and U5 have huge 2.2mH inductors and a diode output with a 1uF cap. It looks like it was designed to be a boost DC/DC switcher converting Vbat to some higher voltage.

    If you are actually ahead (ie, on the base side ) of U4, U5 then not only should you remove the cap but also the series resistance that goes to the base of the transistor.

    I don't know what type of project you have in mind, but this is a very poor module to use for it. The module looks like it was designed for a specific application. Normally the modules route the gpio out directly.

Children
No Data
Related