The developer kit is impressive, and I was able to get a test app running quickly using the UART thru the USB connection. However, the example BLE apps feel a great deal like I'm trying to hack my way thru some downloaded garage-shop freeware. I am able to get the demo to run and advertise, and it's remarkably easy with the firmware automatically downloaded upon compile. But they just don't line up with the documentation, with just enough connection to suggest that I do indeed have the correct docs for the code. I am running the CGMS demo, and going step-by-step thru the provided instructions, referenced by number below.
1) Compile and it's advertising. So far so good.
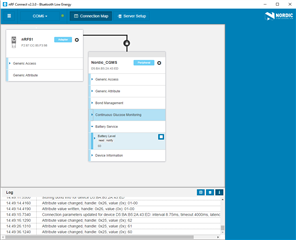
2) nRF Connect, seems to work. Once I figured out that the little anonymous starburst thingy is the "settings button", I got past that. The rest of this step sometimes appears to work, sometimes not ("Pairing" remains red). However, the serial port reports bonding to a previously connected device, when Pairing stays red. OK.
3) What "Play" button? I see nothing that says Play, nor anything the looks like a play button, and none of the buttons offer any hover text. My best guess at this point is that the little arrows on the left that expand each of the 6 displayed areas under the device might also serve to "Play". If I open the Battery Service section, for instance, and now find what looks to be a Play button on the Battery Level subarea, and I see notifications every 10 seconds, or every 3 seconds by modifying the code in the demo.
4) I think I "started a play session" by opening the Continuous Glucose Monitoring section, and finding and then clicking what appears to be a Play button on the CGM Measurement subtopic. Writing 1A to the Specific Operations subtopic yields the documented 1C 1A 01 response perhaps one time in 20. The Write and Indicate buttons never seem to do anything that would be suggested by their names. It appears that the only way to have the 1A accepted is to press Enter immediately after typing a value; none of the buttons seem to work.
5) After I figured out it wants Enter, I get the expected 1C 1A 01 response.
6) "Observe that measurement notifications are received on the Measurement characteristic (UUID 0x2AA7)." This is the whole point of the exercise - and no matter what I do, there is no Measurement characteristic displayed.
If I could get the above sorted out I can probably hack my way thru the rest, but it surely doesn't feel very professional. I keep looking for some kind of configuration utility or even a configuration file whereby I can declare the BLE variables, linkages, update intervals, etc. Hints?
Here are the instructions from the Nordic documentation for reference:
Testing
Test the Continuous Glucose Monitoring Application with the nRF Toolbox app, which is available on both iOS (App Store) and Android (Google Play).
You can also test the application with nRF Connect by performing the following steps:
- Compile and program the application. Observe that the BSP_INDICATE_ADVERTISING state is indicated.
- Connect to the device from nRF Connect (the device is advertising as 'Nordic_CGMS'), then bond to the device. To bond, click the settings button for the device in nRF Connect, select "Pair", check "Perform Bonding", and click "Pair". Wait until the bond is established before you continue. Observe that the BSP_INDICATE_CONNECTED state is indicated.
- Observe that the services are shown in the connected device and that you can start receiving values by clicking the 'Play' button. Battery Level notifications are received every ten seconds.
- Start a CGM session by clicking the 'Play' button and then write '1A' to the Specific Operations Control Point (UUID 0x2AAC).
- Observe that the notification '1C 1A 01' (Response code 1C - Session start 1A - Success 01) is received on the Specific Operations Control Point (UUID 0x2AAC)
- Observe that measurement notifications are received on the Measurement characteristic (UUID 0x2AA7). An example measurement is '06 00 05 00 01 00' (length 06, flags 00, Glucose Concentration 0005, offset 0001).
- Do a Read all records operation:
- Write '01 01' (OpCode : REPORT_STORED_RECORDS, Operator : ALL_STORED_RECORDS) to Record Access Control Point Characteristic (UUID 0x2A52).
- Observe that you receive notifications of the glucose measurements(UUID 0x2AA7) and one indication of the RACP indicating success (06000101).
- Read the number of stored records:
- Write '04 01' (OpCode: REPORT_NUM_STORED_RECORDS, Operator: ALL_STORED_RECORDS) to Record Access Control Point (UUID 0x2A52).
- Observe that you get an indication of the RACP giving you the number of records. For example, 05000400 is 4 records (Number of records response opcode 05, Operator 00, least significant byte of record number 04, most significant byte of record number 00).
- Test the Bond Management Service by deleting the bond that the application has with nRF Connect:
- Disconnect the device and reconnect in nRF Connect. Observe that the devices are still bonded. (Link encryption is ON.)
- Observe that the Feature characteristic (0x2AA5) of the Bond Management Service (0x181E) displays '20 08 00'. This means that the deletion of the bonds for the current connection is supported.
- Write '03 41 42 43 44' (Command to delete current bond 03, authorization code ABCD) to the Bond Management Service Control Point characteristic (0x2AA4).
- Disconnect the device. This will trigger the bond deletion procedures.
- Connect to the device again and observe that the pairing request fails, ending in a link loss. (BLE_HCI_REMOTE_USER_TERMINATED_CONNECTION)