This post is older than 2 years and might not be relevant anymore
More Info: Consider searching for newer posts

How to reach < 10 uA current in PSM mode with the nrf9160 DK?

Hi everyone!

We are currently trying to use the nrf9160 DK in order to test the LTE-M coverage & low-power capacity. We ran into some issues regarding the low-power measurement on the board :  

* Software

- We are using the asset_tracker software on tags/v0.3.0 (on Segger Embedded Studio on Windows). We activated the flag "CONFIG_POWER_OPTIMIZATION_ENABLE=y" in order to use eDRX and PSM (PSM is the mode we want to test the most). When the board starts, we send packets to the nrfcloud via the "Switch 1" (it shows a "FLIP" message on the nrfcloud website each time we flip "Switch 1"). We are not sure that the PSM is correctly engaged.

- We disabled a UART parameter ("nRF UART nrfx drivers") in the "Project > Configure nrf Connect SDK Project" window.

* Hardware

- We have cut the SB44 link to avoid current leakage from U25.

- We supply the 5V voltage and GND through the P28 pins

- We measure the current with a multimeter  connected to the P24 pins (the 2 pins far from the USB connector)

* Results

- We manage to send packets to the nrfcloud, with a current consumption fluctuating between around 1 mA and around 20 mA when PSM is enabled. This consumption is far higher than the 7 uA we expected in low-power mode.

* Questions

- How can we ensure that the nrf9160 entered the PSM mode correctly and that the packets sent to the nrfCloud are sent during PSM mode?

- What could we do to reach <10 uA when using PSM mode ?

- We somehow reckon that the MCU inside the nrf9160 should also be put to sleep (WFI or another sleep mode), but we could not find any intel on how to do this either in the User Guide or in this forum. Is the Cortex-M33 put to sleep automatically when the PSM is activated (this would be surprising)?

Thank you very much for your help!

Best regards,

Étienne

Parents
  • Hi Étienne,

    I am sorry for the delay.
    [Note that the FW is not quite completed with regards to power optimizations.]

    That being said you should be able to reach a much lower current consumption than you are measuring.


    First thing that needs to be modified is the secure_boot application.

    • We need to disable the Serial Drivers

    '

    Or directly modify the "prj.conf" file by setting:

    CONFIG_SERIAL=n

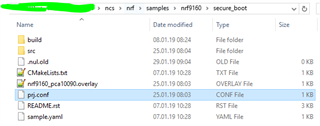
    The "prj.conf" file is located in the same folder as where the CMakeLists.txt is located:

    [Build and flash the new secure_boot FW]


    Regarding the Asset_tracker sample, it is not power optimized to the fullest, so there may be some peripherals/clocks running in the background.

    I need more time to debug and look at this. I will update this case.

Reply
  • Hi Étienne,

    I am sorry for the delay.
    [Note that the FW is not quite completed with regards to power optimizations.]

    That being said you should be able to reach a much lower current consumption than you are measuring.


    First thing that needs to be modified is the secure_boot application.

    • We need to disable the Serial Drivers

    '

    Or directly modify the "prj.conf" file by setting:

    CONFIG_SERIAL=n

    The "prj.conf" file is located in the same folder as where the CMakeLists.txt is located:

    [Build and flash the new secure_boot FW]


    Regarding the Asset_tracker sample, it is not power optimized to the fullest, so there may be some peripherals/clocks running in the background.

    I need more time to debug and look at this. I will update this case.

Children
No Data
Related