This post is older than 2 years and might not be relevant anymore
More Info: Consider searching for newer posts

Programming the nRF52840-DK

I am new to the NRF52840-DK. To burn the program into the kit, I have lots of tries to install nrfGo studio but it gives me the "no board detected readback protection" error. So, I installed nRF Connect v3.0.0 PC tool and add programmer app.

By using this app, I am able to load the program into the board.

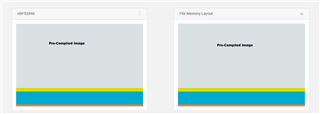
Here, my concern is that when I am loading the pre-compiled .hex file given by Nodic, it has included three memory region- MBR or Application, SoftDevice, and Application.

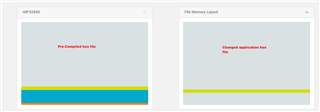
Now, I have made little change in the code and compiled my project which is generated .hex file. When I tried to load this file, it has shown me only the Application region and When I am loading this by doing "Erase and Write" option in the tool it is not working.

There is one option in the tool for only "Write" but it is not enabled.

What should I do here? If we only want to load application image what we do here? Like we have the option in nRFgo studio for selection Application, Boot-loader, and SofDevice.
Parents
  • Hi,

    I am new to the NRF52840-DK. To burn the program into the kit, I have lots of tries to install nrfGo studio but it gives me the "no board detected readback protection" error. So, I installed nRF Connect v3.0.0 PC tool and add programmer app.

    nRFgo Studio is legacy software that does not support nRF52840. Going with nRF Connect Programmer is the most sense if you want a stand-alone GUI programming interface.

    Here, my concern is that when I am loading the pre-compiled .hex file given by Nodic, it has included three memory region- MBR or Application, SoftDevice, and Application.

    Now, I have made little change in the code and compiled my project which is generated .hex file. When I tried to load this file, it has shown me only the Application region and When I am loading this by doing "Erase and Write" option in the tool it is not working.

    The .hex file generated by your toolchain when you build the application will always only contain the application only (or the bootloader only if you compiled the bootloader project). The reason the example .hex files contain both SoftDevice (including MBR) and application is that the SoftDevice .hex file and application hex files have been merged using the mergehex tool before being shipped. So in this case you have to program both the SoftDevice and application .hex. This can be done in several ways, for example by adding both hex files before programming using the nRF Connect Programmer app.

    Now, I have made little change in the code and compiled my project which is generated .hex file. When I tried to load this file, it has shown me only the Application region and When I am loading this by doing "Erase and Write" option in the tool it is not working.

    This is expected. The .hex file contains only the application, and the "Erase &write" option will erase all flash in the chip before programming the selected .hex file(s). Since you only have selected the application it is the only thing that will be programmed. This will not work since it depends on the SoftDevice.

    There is one option in the tool for only "Write" but it is not enabled.

    The "Write" button is enabled if you have read the device flash content and the current content does not overlap with the selected .hex file(s). If they overlap, the only option is to erase before writing.

    What should I do here? If we only want to load application image what we do here? Like we have the option in nRFgo studio for selection Application, Boot-loader, and SofDevice.

    Fron nRF Connect the only option is to add both the SoftDevice and the application .hex files (either at the same time or program them one after the other, since they do not overlap). Alternatively, you can merge the hex files, but that is just a waste of time in my opinion. A simpler approach is to use the IDE as suggests, or just use nrfjprog on the command line together with the --sectorerase option. This will make the tool erase only the sectors that you are writing to, keeping the SoftDevice pages etc. untouched.

  • The "Write" button is enabled if you have read the device flash content and the current content does not overlap with the selected .hex file(s). If they overlap, the only option is to erase before writing.

    I tried this but not working. How it does not overlap the section?

    If I want to merge the bootloader and softdevice where I can get those .hex files?

    A simpler approach is to use the IDE as suggests,

    I am using the IAR Workbench. How I did the programming into the NRF52840? Can you give step by step guidance?

  • We have. That is the nRF Connect Programmer app that you have been trying, In my opinion, nRF Connect Programmer is more userfriendly, especially since it shows you the memory map of the hex files you have added and the target. So you can easily see how everything fits together. There is, of course, a need to understand the memory layout for it to make sense, but that is something you need to understand when you develop for a uC.

    Yes, it is a better tool to do it but as you know the problem I am facing to load only application image. Please give me the solution to do it.

  • at the starting phase, all this stuff is a little bit confusing for me

    Yes - that's why I recommend that you do not start with a SoftDevice example!

    And     recommend that you do not start with a bootloader example!

  • Yes, I am not starting to bootloader and softdevice example. 

    I think you are some miss-understanding. I just only working on an application so by using nRF Connect Programmer how I load the only application image?

    As I said in the programmer I have found the issue of image over-written by doing "Erase and write" and when I tried to only "Write" option but it is always disabled.

    Better to provide a solution for this.

  • Sector erase is a limitation of nRF Connect Programmer. So if you want to overwrite an existing application you need to use a tool that supports that (using sector erase). Those were described in earlier posts, so I will just recap briefly: nrfjprog with the "--sectorerase" option or most embedded IDE´s that you use to build the application.

    please spend a few minutes to understand the tools and memory layout of whatever you are trying to program. Then I think you will find that this is quite straightforward.

  • most embedded IDE´s that you use to build the application

    +1.

    Or the GUI or command-line utilities of your programmer (J-Link, in this case).

    This is really no different to any other microcontroller.

Reply Children
No Data
Related