This post is older than 2 years and might not be relevant anymore
More Info: Consider searching for newer posts

How to connecting the Power Profiler Kit to a computer and measuring current without an nRF5 DK?

In spec "PPK_User_Guide_v2.3.1" ,chapter " 6.6 Measuring current on custom hardware without an nRF5 DK "
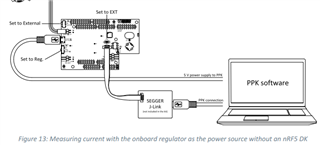
I connect PPK to computer as the picture above, micro USB for power supply and J-Link for PPK connection. But the app "nRF connector-power profiler" can only find J-Link but can't find PPK device.

What may cause this problem? Is this connection method right? Or what kind of J-Link we should use? 

Parents
  • That's unfortunate. Sadly, we don't have a written guide for the Power profiler app in specific (you can use the PPK user guide and the nRFConnect documentation together as documentation here), but I have watched the video and will write a brief synopsis of what it touches upon for you:

    First, make sure your Power Profiler Kit is mounted properly to your DK according to the PPK User Guide. Now you can power on the DK, and LED2 should light up on the PPK. Then, choose the COM port you've connected the PPK to. When the PPK started message appears in the log at the bottom of the app, you can start the measurement by pressing start. You can stop it by either pressing the stop button or zooming in on the graph.

    When the measurement graph is stopped, you have a few options: 

    • You can place a marker by holding Shift while clicking and dragging the mouse along the graph. The values below the graph will update to reflect the marked area, so this would be the way to find the lowest current (mark a small amount of the graph when it is at its lowest point for example).
    • You can zoom by using the mouse wheel, pan and drag sideways, and increase/decrease values on both axes by dragging holding the right mouse button.

    You can also press the Power OFF/ON button in order to measure the current when the chip is turned off.

    Next is the trigger chart. This will trigger once and measure in the window you set when the trigger level reaches what you set it as on the right-hand side. This will yield a much better resolution than the average chart. You can do the same things in the trigger chart when that is stopped as well. 

    Finally, the PPK has a voltage regulator that can be adjusted within the app (right-hand side). This can be adjusted at any time between 1850 and 3600 mV.

    That is generally it for what's to know about the Power Profiler app. Please ask if anything is unclear, and I'll try to help you out.

    Best regards,

    Simon

Reply
  • That's unfortunate. Sadly, we don't have a written guide for the Power profiler app in specific (you can use the PPK user guide and the nRFConnect documentation together as documentation here), but I have watched the video and will write a brief synopsis of what it touches upon for you:

    First, make sure your Power Profiler Kit is mounted properly to your DK according to the PPK User Guide. Now you can power on the DK, and LED2 should light up on the PPK. Then, choose the COM port you've connected the PPK to. When the PPK started message appears in the log at the bottom of the app, you can start the measurement by pressing start. You can stop it by either pressing the stop button or zooming in on the graph.

    When the measurement graph is stopped, you have a few options: 

    • You can place a marker by holding Shift while clicking and dragging the mouse along the graph. The values below the graph will update to reflect the marked area, so this would be the way to find the lowest current (mark a small amount of the graph when it is at its lowest point for example).
    • You can zoom by using the mouse wheel, pan and drag sideways, and increase/decrease values on both axes by dragging holding the right mouse button.

    You can also press the Power OFF/ON button in order to measure the current when the chip is turned off.

    Next is the trigger chart. This will trigger once and measure in the window you set when the trigger level reaches what you set it as on the right-hand side. This will yield a much better resolution than the average chart. You can do the same things in the trigger chart when that is stopped as well. 

    Finally, the PPK has a voltage regulator that can be adjusted within the app (right-hand side). This can be adjusted at any time between 1850 and 3600 mV.

    That is generally it for what's to know about the Power Profiler app. Please ask if anything is unclear, and I'll try to help you out.

    Best regards,

    Simon

Children
No Data
Related