This post is older than 2 years and might not be relevant anymore
More Info: Consider searching for newer posts

NRF USB fails after cutting SB40 bridge

Hi!
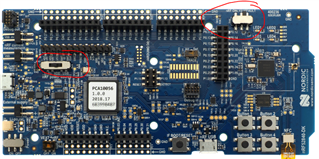
A strange problem we encountered is a different behavior of our boards before and after cutting the SB40 bridge and place a jumper on P22.

First part which works as expected, we use the Nordic usbd_cdc example:
1. Flash a program which uses NRF USB  port J3 to debug by receiving messages over USB CDC. We used this one from the examples folder provided: nRF5_SDK_15.3.0_59ac345\examples\peripheral\usbd_cdc_acm. Program works well and messages are received and displayed without problems via putty.

2. Following Preparing the development kit board for current measurement we cut the SB40 bridge, place the switches in the appropriate position, and performed a current measurement.

3. We then wanted to restore normal kit function to the DK, so we placed a jumper on P22, as instructed in the link in step 2.

The J3 USB connection identifies properly under the device manager, and can be used without issues.

Second part which does not work as expected, we use our own code:

We follow the same steps detailed above, only this time we use our own code which uses the usb connection as a debug the same way usbd_cdc example uses it.
So we:
1. Flash our own software and use the USB as debug. USB identifies and works well.
2. We cut the SB40 bridge and place a jumper on P22 to restore normal kit function to the DK.
3. With the exact same software which worked in step 1, the SB40 cut and the P22 jumper in place, the J3 USB connection now does not identify under the device manager and can not be used anymore.

This seems to be a software+hardware problem, so we are confused as to the possible cause. I was hoping someone could point me in the right direction without having to include my code in the question, so this can be helpful to others. If needed I will post a private questions to the Nordic team.

Thanks!

Parents
  • Hi Asaf, 

    Please try/confirm the following to help us identify the problem:

    1. Did the boards power up with the battery supply? 
    2. Could you double-check that the switches are set:

      SW6 - DEFAULT

      SW9 - VDD 

      and take out the coin-cell battery if you are powering via USB.

      Also, make sure that the USB cable is not a power-only cable but can actually transfer data as well.

    3. Does the device show up in Device Manager on your computer? Please try to connect and disconnect the kit a few times. It might show up with unexpected names. Also, try with J2. 
    4. Have you tried a different USB cable? Faulty cables are surprisingly often the problem.
    5. Have you tried using a different computer? If it works on a different computer we know that the kit is not broken and that it is probably a driver issue.
    6. Have you tried to press the IF BOOT/RESET button while power cycling the kit? It should then show up as a Removable Storage Device. Then you can drag-and-drop the J-LINK interface MCU firmware found here (v170724) onto the storage device to reprogram the JLINK firmware.
    7. Have you measured the supply voltage on the kit? It should be somewhere between 2.8V-3.3V. If it isn't, then the hardware is probably broken.
    8. Have you made sure that you are using the latest J-Link driver version? https://www.segger.com/downloads/jlink
    9. Can the PC detect the other USB device?

    -Amanda H.

Reply
  • Hi Asaf, 

    Please try/confirm the following to help us identify the problem:

    1. Did the boards power up with the battery supply? 
    2. Could you double-check that the switches are set:

      SW6 - DEFAULT

      SW9 - VDD 

      and take out the coin-cell battery if you are powering via USB.

      Also, make sure that the USB cable is not a power-only cable but can actually transfer data as well.

    3. Does the device show up in Device Manager on your computer? Please try to connect and disconnect the kit a few times. It might show up with unexpected names. Also, try with J2. 
    4. Have you tried a different USB cable? Faulty cables are surprisingly often the problem.
    5. Have you tried using a different computer? If it works on a different computer we know that the kit is not broken and that it is probably a driver issue.
    6. Have you tried to press the IF BOOT/RESET button while power cycling the kit? It should then show up as a Removable Storage Device. Then you can drag-and-drop the J-LINK interface MCU firmware found here (v170724) onto the storage device to reprogram the JLINK firmware.
    7. Have you measured the supply voltage on the kit? It should be somewhere between 2.8V-3.3V. If it isn't, then the hardware is probably broken.
    8. Have you made sure that you are using the latest J-Link driver version? https://www.segger.com/downloads/jlink
    9. Can the PC detect the other USB device?

    -Amanda H.

Children
No Data
Related