This post is older than 2 years and might not be relevant anymore
More Info: Consider searching for newer posts

How can I turn on time-optimisation of one small section of code in a "debug" build.

I have a time-critical code section in a call-back routine which is too slow to work when run as a "debug" build, but works fine when run as a "release" build.

This is a problem because I can't set break points etc in a release build to help me debug the rest of the project.

Is there any way (using the SEGGER IDE) to use pre-processor directives ( e.g. #pragma optimize( "", on ) and #pragma optimize( "", off ) ) around the critical section to optimise that code whilst still allowing the overall build-level to be "debug" so that debugging can still take place on rest of the project code?

NB: I have one specific function call that takes 6.5ms to complete in a "debug" build, but it only takes 1.25ms to complete in a "release" build.

Parents
  • You should be able to turn on optimizations for just that file.  If you right click on the file name on the Project Explorer view you can override the inherited Optimization Level under the Code Generation menu for this specific file.

    I am assuming of course that the code you are trying to make faster in debug doesn't have an print statements or extra work that is not performed in the release build.

    Cheers,

    Darren 

  • Ah, of course!

    For anyone else reading this, here is some useful explanation of the different optimisation levels and what they do (assuming SEGGER and the GCC compiler).

    gcc offers four compilation levels, plus a size optimisation level.

    • O0. No optimization. This is the default. There is a clear relationship between each line of code and each resulting machine instruction. The compiler is actually slower at this level, as dead-code elimination and other unperformed optimizations minimize the amount of work the compiler needs to do. Moreover, some warnings are not available with optimization disabled as the compiler cannot detect certain issues without using its optimizer. The only use case for this level is debugging, but I try to debug in my standard level if at all possible.
    • O1. Enables basic optimizations. There generally isn't a reason to use this level over the next.
    • O2. Enables even more optimizations. This mode turns on nearly all optimizations that do not incur significant space-time tradeoffs. This is the default for many software projects, including the Linux kernel and all GNU projects. Because it is the default for so many (important) projects, it is the most tested option. This level is my recommendation.
    • O3. Enables yet more optimizations. This includes optimizations that incur a space-time tradeoff in favor of time, such as loop unrolling and automatic function inlining. Your binary will almost certainly be larger. Your program may be faster.
    • Os. Optimize for size. This mode is similar to O2, except a handful of optimizations are disabled and a handful of new ones are enabled. Your binary will almost certainly be smaller than with O2. It is also likely to be slower, although it may be faster, due to improved cache utilization.

    Right clicking on the file you want to modify in the project tree and selecting "options".
    Select the build type you want to modify the settings for, in the top left of the IDE. (release or debug).
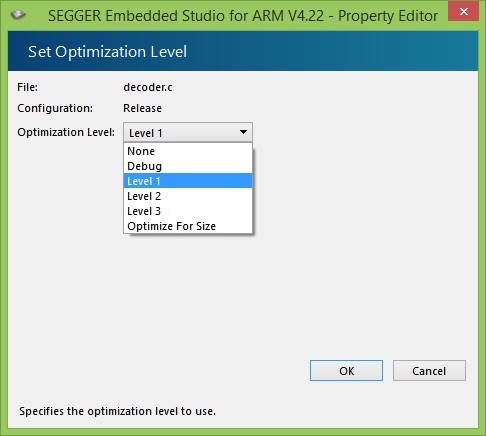
    Then select "code", then "code-generation", and then "optimization level", and you will get the following dialogue screen.
    Then select the desired optimization level override.
    Typically you will want to use "None" for debug, or "Level 1" for release.

Reply
  • Ah, of course!

    For anyone else reading this, here is some useful explanation of the different optimisation levels and what they do (assuming SEGGER and the GCC compiler).

    gcc offers four compilation levels, plus a size optimisation level.

    • O0. No optimization. This is the default. There is a clear relationship between each line of code and each resulting machine instruction. The compiler is actually slower at this level, as dead-code elimination and other unperformed optimizations minimize the amount of work the compiler needs to do. Moreover, some warnings are not available with optimization disabled as the compiler cannot detect certain issues without using its optimizer. The only use case for this level is debugging, but I try to debug in my standard level if at all possible.
    • O1. Enables basic optimizations. There generally isn't a reason to use this level over the next.
    • O2. Enables even more optimizations. This mode turns on nearly all optimizations that do not incur significant space-time tradeoffs. This is the default for many software projects, including the Linux kernel and all GNU projects. Because it is the default for so many (important) projects, it is the most tested option. This level is my recommendation.
    • O3. Enables yet more optimizations. This includes optimizations that incur a space-time tradeoff in favor of time, such as loop unrolling and automatic function inlining. Your binary will almost certainly be larger. Your program may be faster.
    • Os. Optimize for size. This mode is similar to O2, except a handful of optimizations are disabled and a handful of new ones are enabled. Your binary will almost certainly be smaller than with O2. It is also likely to be slower, although it may be faster, due to improved cache utilization.

    Right clicking on the file you want to modify in the project tree and selecting "options".
    Select the build type you want to modify the settings for, in the top left of the IDE. (release or debug).
    Then select "code", then "code-generation", and then "optimization level", and you will get the following dialogue screen.
    Then select the desired optimization level override.
    Typically you will want to use "None" for debug, or "Level 1" for release.

Children
No Data
Related