

Hello,
I am following a tutorial about writing a custom ble service on the NordicPlayground Github:
https://github.com/NordicPlayground/nRF5x-custom-ble-service-tutorial
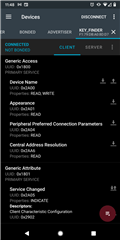
On Step 3 - Initializing the Service and advertising our 128-bit UUID, it mentions to add the 128bit UUID to the advertisement packet, from this line (1), to line (2). If I do this, part of the device name gets cut off when using nRF Connect. However, if I leave it the same (1), or if I keep BLE_UUID_TYPE_BLE, and change the BLE_UUID_DEVICE_INFORMATION_SERVICE to CUSTOM_SERVICE_UUID, I can see the full device name, as seen in the pictures. Is there a reason for this? or can I keep it default (1) or change it to (3).
(1) static ble_uuid_t m_adv_uuids[] = {{BLE_UUID_DEVICE_INFORMATION_SERVICE, BLE_UUID_TYPE_BLE}}; /**< Universally unique service identifiers. */
(2) static ble_uuid_t m_adv_uuids[] = {{CUSTOM_SERVICE_UUID, BLE_UUID_TYPE_VENDOR_BEGIN }}; /**< Universally unique service identifiers. */
(3) static ble_uuid_t m_adv_uuids[] = {CUSTOM_SERVICE_UUID, BLE_UUID_TYPE_BLE}}; /**< Universally unique service identifiers. */

On Step 4 - Adding a Custom Value Characteristic to the Custom Service, I've followed another tutorial to add custom services and I don't know what the difference is. In the NordicPlayground tutorial, the final code of adding characteristics to the custom service is shown below. In this multiple data types are used to set the characteristics, as well as it uses sd_ble_gatts_characteristic_add.
/* This code belongs in ble_cus.c*/

static uint32_t custom_value_char_add(ble_cus_t * p_cus, const ble_cus_init_t * p_cus_init)
{
    uint32_t            err_code;
    ble_gatts_char_md_t char_md;
    ble_gatts_attr_md_t cccd_md;
    ble_gatts_attr_t    attr_char_value;
    ble_uuid_t          ble_uuid;
    ble_gatts_attr_md_t attr_md;

    memset(&char_md, 0, sizeof(char_md));

    char_md.char_props.read   = 1;
    char_md.char_props.write  = 1;
    char_md.char_props.notify = 0;
    char_md.p_char_user_desc  = NULL;
    char_md.p_char_pf         = NULL;
    char_md.p_user_desc_md    = NULL;
    char_md.p_cccd_md         = NULL;
    char_md.p_sccd_md         = NULL;

    memset(&attr_md, 0, sizeof(attr_md));

    attr_md.read_perm  = p_cus_init->custom_value_char_attr_md.read_perm;
    attr_md.write_perm = p_cus_init->custom_value_char_attr_md.write_perm;
    attr_md.vloc       = BLE_GATTS_VLOC_STACK;
    attr_md.rd_auth    = 0;
    attr_md.wr_auth    = 0;
    attr_md.vlen       = 0;

    ble_uuid.type = p_cus->uuid_type;
    ble_uuid.uuid = CUSTOM_VALUE_CHAR_UUID;

    memset(&attr_char_value, 0, sizeof(attr_char_value));

    attr_char_value.p_uuid    = &ble_uuid;
    attr_char_value.p_attr_md = &attr_md;
    attr_char_value.init_len  = sizeof(uint8_t);
    attr_char_value.init_offs = 0;
    attr_char_value.max_len   = sizeof(uint8_t);

    err_code = sd_ble_gatts_characteristic_add(p_cus->service_handle, &char_md,
                                               &attr_char_value,
                                               &p_cus->custom_value_handles);
    if (err_code != NRF_SUCCESS)
    {
        return err_code;
    }

    return NRF_SUCCESS;
}
I have seen in another tutorial that it has been written like this (in this case it is to initialise the buttons). This example ble_add_char_params_t is used, and instead of sd_ble_gatts_characteristic_add, characteristic_add is used.
static uint32_t custom_value_char_add(ble_cus_t * p_cus, const ble_cus_init_t * p_cus_init)
{
  uint32_t                  err_code;
  ble_uuid_t                ble_uuid;
  ble_add_char_params_t     add_char_params;

  /* Adding the service  characteristics */

    // Add the buttons characteristics
    uint8_t buttons_char_init_value [4] = {0};

    memset(&add_char_params, 0, sizeof(add_char_params));
    add_char_params.uuid                = BUTTONS_STATES_CHAR_UUID;
    add_char_params.uuid_type           = p_cus->uuid_type;

    add_char_params.init_len            = 4;
    add_char_params.max_len             = 4;
    add_char_params.p_init_value        = buttons_char_init_value;

    add_char_params.char_props.read     = 1; // (in bytes)
    add_char_params.char_props.notify   = 1;

    add_char_params.read_access         = SEC_OPEN;
    add_char_params.cccd_write_access   = SEC_OPEN;

    err_code = characteristic_add(p_cus->service_handle,
                                  &add_char_params,
                                  &p_cus->buttons_states_char_handles);

  if (err_code != NRF_SUCCESS)
    {
      return err_code;
    }

    return  NRF_SUCCESS;
}
It seems like the second code uses ble_add_char_params_t and characteristic_add data types. Where in the first example it is using multiple data types to set the characteristics, and then using the function sd_ble_gatts_characteristic_add. Can I get further clarification on what method of creating the custom characteristics to use? The tutorial from Nordic is quite a few years old, so I'm not sure if new API's has been introduced, in addition the tutorial is using nRF sdk 15.
Kind regards,
JSC
