


Hello,
Please make sure to have DEBUG defined in your preprocessor defines, like shown in the included image: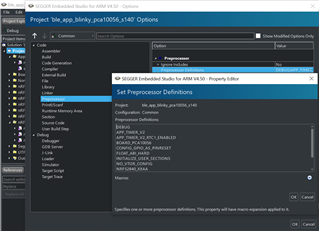
This will make your logger output a detailed error message whenever a non-NRF_SUCCESS error is passed to an APP_ERROR_CHECK.
Do this, and check the returned error code against the returning function's API Reference to see how you may rectify it.
Best regards,
Karl

same settings i have done

venkatesha kj said:OK but in any of the example clock was not initialised why?
Please elaborate. What clock, and what examples? None of the provided examples are missing anything in their configuration that I have ever heard of.
venkatesha kj said:How do i enable 64Mhz clock for all the pheripherals?
venkatesha kj said:what was the maximum frequency i can set for pheripherals in nrf52840 DK , they have used external clock of 12Mhz?
Please be more specific.
Which peripheral are you referring to?
The peripherals will use the frequency and source that they are configured to use in the sdk_config.h file.
Best regards,
Karl
i want to configure clock for the GPIO how do i do that?
/**
* Copyright (c) 2014 - 2021, Nordic Semiconductor ASA
*
* All rights reserved.
*
* Redistribution and use in source and binary forms, with or without modification,
* are permitted provided that the following conditions are met:
*
* 1. Redistributions of source code must retain the above copyright notice, this
* list of conditions and the following disclaimer.
*
* 2. Redistributions in binary form, except as embedded into a Nordic
* Semiconductor ASA integrated circuit in a product or a software update for
* such product, must reproduce the above copyright notice, this list of
* conditions and the following disclaimer in the documentation and/or other
* materials provided with the distribution.
*
* 3. Neither the name of Nordic Semiconductor ASA nor the names of its
* contributors may be used to endorse or promote products derived from this
* software without specific prior written permission.
*
* 4. This software, with or without modification, must only be used with a
* Nordic Semiconductor ASA integrated circuit.
*
* 5. Any software provided in binary form under this license must not be reverse
* engineered, decompiled, modified and/or disassembled.
*
* THIS SOFTWARE IS PROVIDED BY NORDIC SEMICONDUCTOR ASA "AS IS" AND ANY EXPRESS
* OR IMPLIED WARRANTIES, INCLUDING, BUT NOT LIMITED TO, THE IMPLIED WARRANTIES
* OF MERCHANTABILITY, NONINFRINGEMENT, AND FITNESS FOR A PARTICULAR PURPOSE ARE
* DISCLAIMED. IN NO EVENT SHALL NORDIC SEMICONDUCTOR ASA OR CONTRIBUTORS BE
* LIABLE FOR ANY DIRECT, INDIRECT, INCIDENTAL, SPECIAL, EXEMPLARY, OR
* CONSEQUENTIAL DAMAGES (INCLUDING, BUT NOT LIMITED TO, PROCUREMENT OF SUBSTITUTE
* GOODS OR SERVICES; LOSS OF USE, DATA, OR PROFITS; OR BUSINESS INTERRUPTION)
* HOWEVER CAUSED AND ON ANY THEORY OF LIABILITY, WHETHER IN CONTRACT, STRICT
* LIABILITY, OR TORT (INCLUDING NEGLIGENCE OR OTHERWISE) ARISING IN ANY WAY OUT
* OF THE USE OF THIS SOFTWARE, EVEN IF ADVISED OF THE POSSIBILITY OF SUCH DAMAGE.
*
*/
/** @file
* @defgroup uart_example_main main.c
* @{
* @ingroup uart_example
* @brief UART Example Application main file.
*
* This file contains the source code for a sample application using UART.
*
*/
#include <stdbool.h>
#include <stdint.h>
#include <stdio.h>
#include "app_uart.h"
#include "app_error.h"
#include "nrf_delay.h"
#include "nrf.h"
#include "bsp.h"
#if defined (UART_PRESENT)
#include "nrf_uart.h"
#endif
#if defined (UARTE_PRESENT)
#include "nrf_uarte.h"
#endif
//#define ENABLE_LOOPBACK_TEST /**< if defined, then this example will be a loopback test, which means that TX should be connected to RX to get data loopback. */
#define MAX_TEST_DATA_BYTES (15U) /**< max number of test bytes to be used for tx and rx. */
#define UART_TX_BUF_SIZE 256 /**< UART TX buffer size. */
#define UART_RX_BUF_SIZE 256 /**< UART RX buffer size. */
void uart_error_handle(app_uart_evt_t * p_event)
{
if (p_event->evt_type == APP_UART_COMMUNICATION_ERROR)
{
APP_ERROR_HANDLER(p_event->data.error_communication);
}
else if (p_event->evt_type == APP_UART_FIFO_ERROR)
{
APP_ERROR_HANDLER(p_event->data.error_code);
}
}
#ifdef ENABLE_LOOPBACK_TEST
/* Use flow control in loopback test. */
#define UART_HWFC APP_UART_FLOW_CONTROL_ENABLED
/** @brief Function for setting the @ref ERROR_PIN high, and then enter an infinite loop.
*/
static void show_error(void)
{
bsp_board_leds_on();
while (true)
{
// Do nothing.
}
}
/** @brief Function for testing UART loop back.
* @details Transmitts one character at a time to check if the data received from the loopback is same as the transmitted data.
* @note @ref TX_PIN_NUMBER must be connected to @ref RX_PIN_NUMBER)
*/
static void uart_loopback_test()
{
uint8_t * tx_data = (uint8_t *)("\r\nLOOPBACK_TEST\r\n");
uint8_t rx_data;
// Start sending one byte and see if you get the same
for (uint32_t i = 0; i < MAX_TEST_DATA_BYTES; i++)
{
uint32_t err_code;
while (app_uart_put(tx_data[i]) != NRF_SUCCESS);
nrf_delay_ms(10);
err_code = app_uart_get(&rx_data);
if ((rx_data != tx_data[i]) || (err_code != NRF_SUCCESS))
{
show_error();
}
}
return;
}
#else
/* When UART is used for communication with the host do not use flow control.*/
#define UART_HWFC APP_UART_FLOW_CONTROL_DISABLED
#endif
/**
* @brief Function for main application entry.
*/
int main(void)
{
uint32_t err_code;
bsp_board_init(BSP_INIT_LEDS);
const app_uart_comm_params_t comm_params =
{
RX_PIN_NUMBER,
TX_PIN_NUMBER,
RTS_PIN_NUMBER,
CTS_PIN_NUMBER,
UART_HWFC,
false,
#if defined (UART_PRESENT)
NRF_UART_BAUDRATE_115200
#else
NRF_UARTE_BAUDRATE_115200
#endif
};
APP_UART_FIFO_INIT(&comm_params,
UART_RX_BUF_SIZE,
UART_TX_BUF_SIZE,
uart_error_handle,
APP_IRQ_PRIORITY_LOWEST,
err_code);
APP_ERROR_CHECK(err_code);
#ifndef ENABLE_LOOPBACK_TEST
printf("\r\nUART example started.\r\n");
while (true)
{
uint8_t cr;
while (app_uart_get(&cr) != NRF_SUCCESS);
while (app_uart_put(cr) != NRF_SUCCESS);
if (cr == 'q' || cr == 'Q')
{
printf(" \r\nExit!\r\n");
while (true)
{
// Do nothing.
}
}
}
#else
// This part of the example is just for testing the loopback .
while (true)
{
uart_loopback_test();
}
#endif
}
/** @} */
where actually clock configuration was done for this example?
is there are any videos for creating the new project from scratch and importing neccessory files like SPI files ?
Please always use the Insert -> Code option when sharing code on DevZone.
Peripheral (And clock) configurations are done in the sdk_config.h file, as mentioned in my previous comment.
venkatesha kj said:i want to configure clock for the GPIO how do i do that?
Please elaborate, I am unsure what you mean by this. Do you wish to have a clock toggle a GPIO? If so, you may take a look at the timer peripheral example, which demonstrates how to set up a timer to do some action when its interrupt triggers.
Alternatively, you could use PPI to have the timer's CC event trigger the GPIO toggle/set/clear task without CPU involvement.
venkatesha kj said:is there are any videos for creating the new project from scratch and importing neccessory files like SPI files ?
We do not have a specific tutorial series for this, but there are many good third-party video guide series for this on youtube, for example.
In general, I would advice that you start out with an example that is close to what you are trying to implement, and then merge other functionality into this example project. This way you will not have to set up the entire project from scratch.
When you are adding new files to your project you will need to add their source files to the file explorer, and make sure their path is provided in the project options Preprocessor -> User Included Directories. If you are adding a peripheral driver or component from the SDK to your project you will also need to make sure that its required configurations are defined in your sdk_config.h file.
A common mistake with the sdk_config.h file is to have both legacy and nrfx_ definitions present. Please make sure to only use the nrfx_ configuration definitions, and do not include the legacy configuration at all, as this will cause the apply_old_config file to overwrite your nrfx_ configuration.
An example of this would be to have both TIMER_ENABLED and NRFX_TIMER_ENABLED present in the same sdk_config.h file.
Best regards,
Karl
Please always use the Insert -> Code option when sharing code on DevZone.
Peripheral (And clock) configurations are done in the sdk_config.h file, as mentioned in my previous comment.
venkatesha kj said:i want to configure clock for the GPIO how do i do that?
Please elaborate, I am unsure what you mean by this. Do you wish to have a clock toggle a GPIO? If so, you may take a look at the timer peripheral example, which demonstrates how to set up a timer to do some action when its interrupt triggers.
Alternatively, you could use PPI to have the timer's CC event trigger the GPIO toggle/set/clear task without CPU involvement.
venkatesha kj said:is there are any videos for creating the new project from scratch and importing neccessory files like SPI files ?
We do not have a specific tutorial series for this, but there are many good third-party video guide series for this on youtube, for example.
In general, I would advice that you start out with an example that is close to what you are trying to implement, and then merge other functionality into this example project. This way you will not have to set up the entire project from scratch.
When you are adding new files to your project you will need to add their source files to the file explorer, and make sure their path is provided in the project options Preprocessor -> User Included Directories. If you are adding a peripheral driver or component from the SDK to your project you will also need to make sure that its required configurations are defined in your sdk_config.h file.
A common mistake with the sdk_config.h file is to have both legacy and nrfx_ definitions present. Please make sure to only use the nrfx_ configuration definitions, and do not include the legacy configuration at all, as this will cause the apply_old_config file to overwrite your nrfx_ configuration.
An example of this would be to have both TIMER_ENABLED and NRFX_TIMER_ENABLED present in the same sdk_config.h file.
Best regards,
Karl