type of project : cpuapp, cpuapp_ns, cpu_net

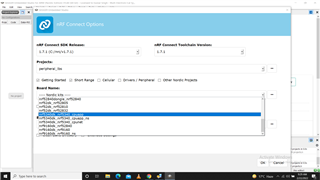
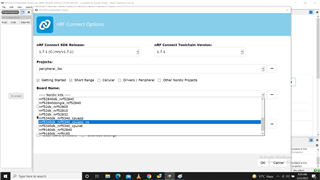
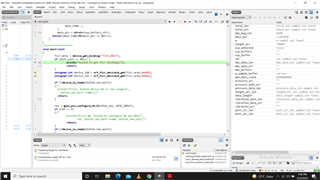
Hi, I want to know brief aboout difference and objective of different types of Zephyr projects. When using nRF Connect SDK, in SES a project is created, 3 options are available as shown in attached images. For me there are variuos options and combinations :

1. Project with cpuapp only

2. Project with cpuapp_ns only

3. Project with cpu_net ony

4. Project with cpuapp and cpuapp_ns in a single solution

5. Project wth cpuapp and cpu_net

6. Project with cpuapp_ns and cpu_net

7. Project with cpu_ns and cpu_net

8. Project with cpuapp, cpuapp_ns and cpu_net

Please, may some one explain, in what case which combination is prefered and how to create mixed project like options 4 to 8.

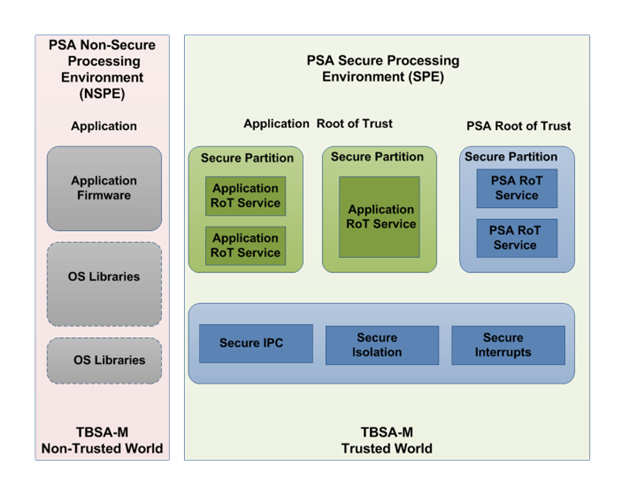
What difference berween cpuapp and cpu_ns ?? Is cpuapp secure type by default ?  


Parents
  • Hi

    The board you specify is for Zephyr to know which board to build for. See Supported Boards.
    When I explain this, i will use three different Development Kits(DK) as examples: the nRF52840DK, the nRF9160DK and the nRF5340DK.
    nRF52840DK "zephyr boards" : nrf52840dk_nrf52840
    nRF9160DK "zephyr boards" : nrf9160dk_nrf9160, nrf9160dk_nrf9160_ns
    nRF5340DK "zephyr boards"   : nrf5340dk_nrf5340_cpuapp, nrf5340dk_nrf5340_cpuapp_ns, nrf5340dk_nrf5340_cpunet

    To explain this, I will split it into two parts: Secure vs Non-Secure and Multiple cores in the nRF5340.

    Secure vs Non-secure (Security by Separation)

    Applications running on microcontrollers are made up of multiple different parts.
    These parts use different peripherals, modules and areas of flash/RAM.

    To increase security, the application can be separated into two different parts, with a "wall" between, referred to as Security by Separation.
    One side is called Secure and the other is called Non-Secure. See figure below, found under "Trusted Base System Architecture for M" from the Arm Developer site for Platform Security, Figure 2. You can also read more about the concept at this link, in chapter 3.1 Security by Separation and onward.

    To build with this separation, Secure Partition Manager (SPM) or TF-M needs to be added to the application.

    When building for boards with the postfix "_ns",  a SPM child image is automatically added.
    When building for boards with the postfix "_ns" and using "BUILD_WITH_TFM=y" configured,  a TF-M child image is added instead.

    (
    A common misunderstanding is from the naming of the builds. For example from Working with nRF9160 DK:

    nrf9160dk_nrf9160 for firmware in the secure domain

    nrf9160dk_nrf9160_ns for firmware in the non-secure domain

    If your firmware is in the secure domain, everything in your application will be in the same domain, and you will not have Security by Separation.
    If your firmware is in the non-secure domain, it will be separated from the secure domain, and you will have Security by Separation.
    Therefore, it is more secure to build for non-secure boards, such as nrf9160dk_nrf9160_ns.
    )

    The SPU is the hardware peripheral used for Security by separation. In the product specifications, you can see that the nRF9160 and the nRF5340 Application core has a SPU, while the nRF52840 does not have a SPU.
    This is the reason for nRF52840 does not have a "_ns" postfix option.

    nRF5340 has two cores, the Network Core and the Application Core

    See Working with the nRF5340 DK.

    The nRF52840 and the nRF9160 has only one core.
    On the other hand, the nRF5340 has two cores: the Application core, and the Network Core.
    In our samples, we generally provide firmware for the Network Core to go with multiple different samples. Therefore, you normally only need to write/edit code for the application core to do what you need. From the docs linked above:

    nRF5340 samples usually consist of two separate images: one that runs on the network core and one that runs on the application core. For specific use cases, you can use only one of the cores.

    The following sections describe the recommended architecture for using different protocols on the nRF5340 and list the provided samples.

    If you use Segger Embedded Studio, you need to set it up for the nRF5340 by following Using SEGGER Embedded Studio with the nRF5340 DK.

    I recommend that you do not use Segger Embedded Studio for working with the nRF5340. Use nRF Connect for VS Code instead The reason is twofold:
    1. nRF Connect for VS Code automatically handles the dual-core nature of the nRF5340. So you do not need to prepare it in the same way as for Segger Embedded Studio.
    2. In future releases, documentation on the setup and usage of Segger Embedded Studio Nordic Edition will no longer be available and all references to IDE support will instruct users with nRF Connect extensions for Visual Studio Code. . See v1.9.0 Release notes

    how to create mixed project

    You need to build and flash two different projects for the two different cores. As I mentioned, the nRF Connect SDK already have different sample firmware intended to run on the Network Core. By default, this is added automatically when you build using VS Code (or using west in the command line), as explained in Working with the nRF5340 DK, specifically the chapter on Default build configuration.

    Did this answer your questions?

    Regards,
    Sigurd Hellesvik

  • Dear Sigurd, I read al the above information. I have already created the project with board:

    nRF5340DK "zephyr boards"   : nrf5340dk_nrf5340_cpuapp

    Now, I want to access the Device ID from FICR. I made changes in overlay file as shown in attached image. The CMake compile and Build is successful. When, debug is run, the Device Binding fails as shown in attached second image. How to fetch FICR in the   above board configuration ?    

  • Hi

    This case is about the difference between Zephyr boards and build targets.
    If you have issues with reading FICR, it is a separate issue.

    Please create a new ticket for this, to keep DevZone tidy.

    Regards,
    Sigurd Hellesvik

Reply Children
Related