merging examples with DFU cause NRF_ERROR_NO_MEM

Windows 10, Segger Embedded Studio V5.60a

nRF52833-DK (also nRF52840-DK, along with custom boards for each for later purpose)

SDK 17.1.0 S140 

Hello, I'm trying to merge my project (NUS example, BAS, bonding, etc) with DFU bootloader OTA.

It's similar case with https://devzone.nordicsemi.com/f/nordic-q-a/48872/how-to-merge-one-application-with-dfu-feature

I did as instructed. It was built successfully but when executed, I get following errors:

<error> app: No bootloader was found
<error> app: ERROR 4 [NRF_ERROR_NO_MEM] at [my project address] files.c:1105
PC at: 0x000414C5
<error> app: End of error report

the error is pointing to following code:

err_code = ble_dfu_buttonless_async_svci_init();    //nrf_dfu_svci_vector_table_set(),   bootloader_addr != 0xFFFFFFFF problem
APP_ERROR_CHECK(err_code);//NRF_ERROR_NO_MEM

unlike the given link's, I don't get message related to how to reallocate RAM or ROM via debuggin message or Tera Term

my current allocation is as following:

FLASH_PH_START=0x0
FLASH_PH_SIZE=0x80000
RAM_PH_START=0x20000000
RAM_PH_SIZE=0x20000
FLASH_START=0x27000
FLASH_SIZE=0x59000
FCONFIG_START=0x10000
FCONFIG_SIZE=0x400
DEFAULT_CONFIG_START=0x10500
DEFAULT_CONFIG_SIZE=0x400
INIT_START=0x12000
RAM_START=0x20002be0
RAM_SIZE=0x1d420

macros:

c_preprocessor_definitions="APP_TIMER_V2;APP_TIMER_V2_RTC1_ENABLED;BL_SETTINGS_ACCESS_ONLY;BOARD_PCA10100;BLE_STACK_SUPPORT_REQD;CONFIG_GPIO_AS_PINRESET;FLOAT_ABI_HARD;INITIALIZE_USER_SECTIONS;NO_VTOR_CONFIG;NRF52833_XXAA;NRF_CRYPTO_MAX_INSTANCE_COUNT=1;NRF_SD_BLE_API_VERSION=7;S140;SOFTDEVICE_PRESENT;NRF_DFU_SVCI_ENABLED;NRF_DFU_TRANSPORT_BLE=1;"

What's causing NRF_ERROR_NO_MEM and how to resolve it? 

What is PC at number referring to? Nevermind, found out it was Program counter 

Do I need SW/config modification for custom board?

Thank you in advance

Parents
  • Hello,

    If ble_dfu_buttonless_async_svci_init() returns 4, it basically means that there are no bootloader programmed. The buttonless dfu service checks that there is actually a bootloader present by reading out some register addresses. If there isn't, it will fail. 

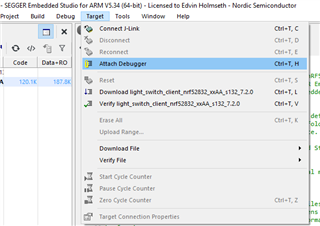
    So try flashing the bootloader as well. Unfortunately adding a bootloader makes it a bit more tricky to debug. What IDE are you using? If you are using Segger Embedded Studio, you can use "attach debugger" for the reasons I will explain now:

    When a bootloader is flashed it will check on startup that the application has the correct signature. If you just program the softdevice, application and bootloader, then the application doesn't have the correct signature. So what we need to do is to generate something called bootloader settings. You can generate this using nrfutil ("nrfutil settings generate --help"). 

    If you generate a DFU image using nrfutil, then this image is signed, and when the image is transferred to the DFU target, it will carry on that signature and CRC check and store it's own generated bootloader settings, so this is what we are essensially bypassing by generating and programming the bootloader settings directly. 

    The next obstacle when you want to debug is that when you start a debug session in an IDE, then the IDE will most likely program something other than the .hex file that you used for your bootloader settings. It will use some other file that is almost identical, but since changing a single bit will change the signature of the application, the bootloader will reject it, and enter DFU mode. This is why you need to use the "attach debugger" method. By doing so, you are telling your IDE that "I have already flashed the application. Just start debugging without uploading anything". If you follow this, you should be able to debug when a bootloader is flashed. If you are not using Segger Embedded Studio, look for a similar option. If your IDE doesn't provide one, you can use Segger's debugging tool Ozone, which does have this option, and it works with almost all build files (Keil, IAR, armgcc, etc...). 

    Since compiling, generating bootloader settings, flashing application and bootloader settings can be a bit tedious every single time you change a tiny piece of your code, I suggest that you write some sort of script (.bat scripts are easy to use on Windows). Just make it generate all the files from the .hex file that your compiler spits out, and then flash the application and bootloader settings (using nrfjprog:

    nrfutil settings generate -- ....
    nrfjprog --program <path_to_app.hex> --verify --sectorerase
    nrfjprog --program <path_to_bootloader_settings.hex> --verify --sectorerase
    nrfjprog --reset

    I hope this gave some clarity. Let me know if anything was unclear.

Reply
  • Hello,

    If ble_dfu_buttonless_async_svci_init() returns 4, it basically means that there are no bootloader programmed. The buttonless dfu service checks that there is actually a bootloader present by reading out some register addresses. If there isn't, it will fail. 

    So try flashing the bootloader as well. Unfortunately adding a bootloader makes it a bit more tricky to debug. What IDE are you using? If you are using Segger Embedded Studio, you can use "attach debugger" for the reasons I will explain now:

    When a bootloader is flashed it will check on startup that the application has the correct signature. If you just program the softdevice, application and bootloader, then the application doesn't have the correct signature. So what we need to do is to generate something called bootloader settings. You can generate this using nrfutil ("nrfutil settings generate --help"). 

    If you generate a DFU image using nrfutil, then this image is signed, and when the image is transferred to the DFU target, it will carry on that signature and CRC check and store it's own generated bootloader settings, so this is what we are essensially bypassing by generating and programming the bootloader settings directly. 

    The next obstacle when you want to debug is that when you start a debug session in an IDE, then the IDE will most likely program something other than the .hex file that you used for your bootloader settings. It will use some other file that is almost identical, but since changing a single bit will change the signature of the application, the bootloader will reject it, and enter DFU mode. This is why you need to use the "attach debugger" method. By doing so, you are telling your IDE that "I have already flashed the application. Just start debugging without uploading anything". If you follow this, you should be able to debug when a bootloader is flashed. If you are not using Segger Embedded Studio, look for a similar option. If your IDE doesn't provide one, you can use Segger's debugging tool Ozone, which does have this option, and it works with almost all build files (Keil, IAR, armgcc, etc...). 

    Since compiling, generating bootloader settings, flashing application and bootloader settings can be a bit tedious every single time you change a tiny piece of your code, I suggest that you write some sort of script (.bat scripts are easy to use on Windows). Just make it generate all the files from the .hex file that your compiler spits out, and then flash the application and bootloader settings (using nrfjprog:

    nrfutil settings generate -- ....
    nrfjprog --program <path_to_app.hex> --verify --sectorerase
    nrfjprog --program <path_to_bootloader_settings.hex> --verify --sectorerase
    nrfjprog --reset

    I hope this gave some clarity. Let me know if anything was unclear.

Children
No Data
Related