nRF Connect SDK Tutorial - Part 1 - 2.2.1 Build a BLE example (nRF5340)

Hello everyone,

in the last chapter of 

https://devzone.nordicsemi.com/guides/nrf-connect-sdk-guides/b/getting-started/posts/nrf-connect-sdk-tutorial---part-1-ncs-v1-4-0

its explained to program on different cores of the nRF5340 (network or application). I am using the VS Code nRF extension and lashing the example "peripheral_lbs" is working = my nRF5340DK LED 1 is blinking and on my iphone app nRF Connect Nordic_LBS is visible with the service Nordic LED and Button Service.

Next explanation in sdk-tutorial part 1 (link above)

Both files 

1. 

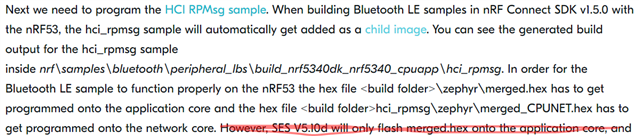
C:\nordicsemi\myapps\peripheral_lbs\build\zephyr\merged.hex

2.

C:\nordicsemi\myapps\peripheral_lbs\build\hci_rpmsg\zephyr\merged_CPUNET.hex

can be found in my project directory, but I dont know how to program the .hex files to different cores??

How is this be done in VS Code?

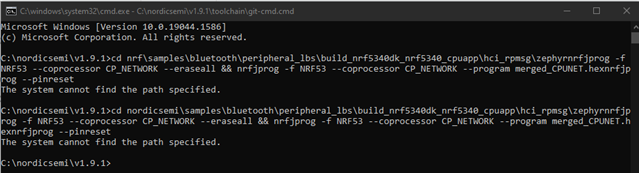
The "Open command promt" way gets the error 

So at the end I cant find the "Nordic_Blinky" advertising device through my mobile phone.

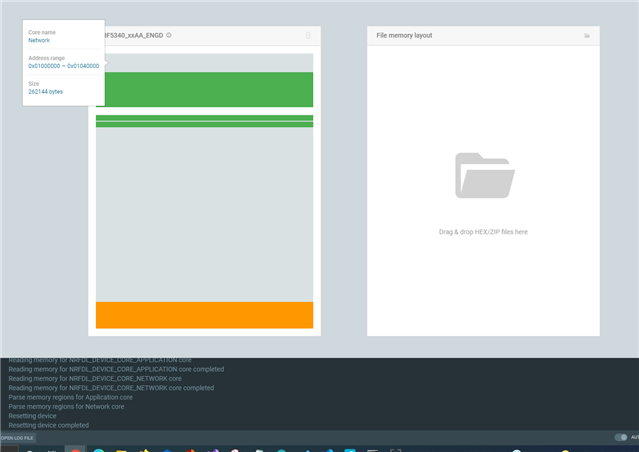
Is the network core empty in the screenshot?

Many thanks in advance for your help!!

Christoph

  • Hi Christoph,

    ChrtistophAT said:
    So just for rub out every mistake, programming example "peripheral_lbs" through VS Code is doing the more in depth explanation with the command prompt way ?

    Programming using the 'Flash' action in VS Code is the same as using west flash for a multi-image build on the command line. If you look at the output in VS Code when it is performing the 'Flash' action you can actually see this:

    west flash -d c:\ncs\nrf\samples\bluetooth\peripheral_lbs\build --skip-rebuild -r nrfjprog --snr 1050075853
    
    -- west flash: using runner nrfjprog
    -- runners.nrfjprog: Flashing file: C:\ncs\nrf\samples\bluetooth\peripheral_lbs\build\zephyr\merged_domains.hex
    -- runners.nrfjprog: C:\ncs\nrf\samples\bluetooth\peripheral_lbs\build\zephyr\merged_domains.hex targets both nRF53 coprocessors; splitting it into: C:\ncs\nrf\samples\bluetooth\peripheral_lbs\build\zephyr\GENERATED_CP_NETWORK_merged_domains.hex and C:\ncs\nrf\samples\bluetooth\peripheral_lbs\build\zephyr\GENERATED_CP_APPLICATION_merged_domains.hex
    Parsing image file.
    Parsing image file.
    Applying pin reset.
    -- runners.nrfjprog: Board with serial number 1050075853 flashed successfully.

    Here you only need to issue the west flash command once, and both cores will be flashed. This is only possible to do with west, and not nrfjprog, and is only possible for multi-image builds with child images.

    ChrtistophAT said:
    So for further projects, when I want to do somthing sophisticaded (network core application core), I only have to put the files for network core in the child_image folder and VS Code is doing the rest

    This is not the way to work with child images on the network core. I also think there is a misunderstanding. When you program the Peripheral LBS sample on nRF5340 DK using the 'Flash' action in VS Code you are still programming Bluetooth HCI RPMsg to the network core just as in the tutorial, in addition to programming Peripheral LBS on the application core. In order for Bluetooth to work on nRF5340 the network core must be programmed with a Bluetooth controller, which is what the Bluetooth HCI RPMsg is. The Bluetooth HCI RPMsg is a child image of the Peripheral LBS sample when the build target is nRF5340, and can therefore be programmed as a muilti-image build using simply west flash.

    This might be confusing as the only file in the child_image folder is a config file for the network core, and not the actual application that is to be programmed on the network core. However, this config file is used to set the Bluetooth HCI RPMsg as child image. This is explained in the "Configuration of the child image" section of Working with nRF5340 DK:

    When a network sample is built automatically as a child image in a multi-image build, you can define the relevant Kconfig options (if required) in a .conf file. Name the file network_sample.conf, where network_sample is the name of the child image (for example, hci_rpmsg.conf). Place the file in a child_image subfolder of the application sample directory.

    If you look at the output when you build the Peripheral LBS sample in VS Code you will actually see that the Bluetooth HCI RPMsg is being built as child image:

    === child image hci_rpmsg - CPUNET begin ===
    loading initial cache file C:/ncs/nrf/samples/bluetooth/peripheral_lbs/build/hci_rpmsg/child_image_preload.cmake
    Including boilerplate (Zephyr base): C:/ncs/zephyr/cmake/app/boilerplate.cmake
    -- Application: C:/ncs/zephyr/samples/bluetooth/hci_rpmsg
    -- Zephyr version: 2.7.99 (C:/ncs/zephyr), build: v2.7.99-ncs1-1
    -- Found Python3: C:/tm_ncs/v1.9.1/toolchain/opt/bin/python.exe (found suitable exact version "3.8.2") found components: Interpreter 
    -- Found west (found suitable version "0.12.0", minimum required is "0.7.1")
    -- Board: nrf5340dk_nrf5340_cpunet
    -- Cache files will be written to: C:/ncs/zephyr/.cache
    -- Found dtc: C:/tm_ncs/v1.9.1/toolchain/opt/bin/dtc.exe (found suitable version "1.4.7", minimum required is "1.4.6")
    -- Found toolchain: gnuarmemb (c:/tm_ncs/v1.9.1/toolchain/opt)
    -- Found BOARD.dts: C:/ncs/zephyr/boards/arm/nrf5340dk_nrf5340/nrf5340dk_nrf5340_cpunet.dts
    -- Generated zephyr.dts: C:/ncs/nrf/samples/bluetooth/peripheral_lbs/build/hci_rpmsg/zephyr/zephyr.dts
    -- Generated devicetree_unfixed.h: C:/ncs/nrf/samples/bluetooth/peripheral_lbs/build/hci_rpmsg/zephyr/include/generated/devicetree_unfixed.h
    -- Generated device_extern.h: C:/ncs/nrf/samples/bluetooth/peripheral_lbs/build/hci_rpmsg/zephyr/include/generated/device_extern.h
    -- Including generated dts.cmake file: C:/ncs/nrf/samples/bluetooth/peripheral_lbs/build/hci_rpmsg/zephyr/dts.cmake
    Parsing C:/ncs/zephyr/Kconfig
    Loaded configuration 'C:/ncs/zephyr/boards/arm/nrf5340dk_nrf5340/nrf5340dk_nrf5340_cpunet_defconfig'
    Merged configuration 'C:/ncs/zephyr/samples/bluetooth/hci_rpmsg/prj.conf'
    Merged configuration 'C:/ncs/nrf/subsys/partition_manager/partition_manager_enabled.conf'
    Configuration saved to 'C:/ncs/nrf/samples/bluetooth/peripheral_lbs/build/hci_rpmsg/zephyr/.config'
    Kconfig header saved to 'C:/ncs/nrf/samples/bluetooth/peripheral_lbs/build/hci_rpmsg/zephyr/include/generated/autoconf.h'
    
    ...
    
    -- Build files have been written to: C:/ncs/nrf/samples/bluetooth/peripheral_lbs/build/hci_rpmsg
    === child image hci_rpmsg - CPUNET end ===

    Please read our Working with nRF5340 DK guide to familiarize yourself with the chip and how it works when having two cores. You can disregard the parts about SEGGER Embedded Studio, as building and programming using either VS Code and/or command line is much simpler.

    ChrtistophAT said:
    the command prompt way cant be done because the cd nrf/samples/... directore can never be reached beacause its looking like in the image 

    The build directory is created when you configure or build the sample. You will not have a build directory before you do this.

    Best regards,

    Marte

Related