I am working with nRF connect SDK with nRF5340DK. I am compiling code using nRF connect (ncs-1.8.0) for VS code with nrf5340dk_nrf5340_cpuapp board.
prj.conf as below,
CONFIG_BOOTLOADER_MCUBOOT=y
CONFIG_MCUMGR=y
CONFIG_SECURE_BOOT=y
Using this I can enabling two-stage bootloader, here are the log,
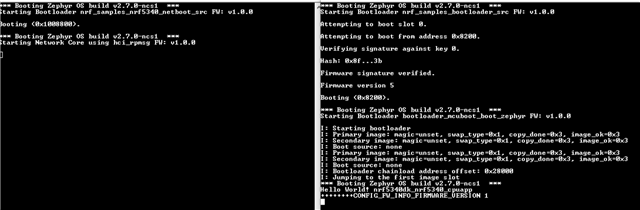
*** Booting Zephyr OS build v2.7.0-ncs1 ***
Attempting to boot slot 0.
Attempting to boot from address 0x8200.
Verifying signature against key 0.
Hash: 0x12...93
Firmware signature verified.
Firmware version 1
Booting (0x8200).
*** Booting Zephyr OS build v2.7.0-ncs1 ***
I: Starting bootloader
I: Primary image: magic=good, swap_type=0x3, copy_done=0x1, image_ok=0x1
I: Secondary image: magic=unset, swap_type=0x1, copy_done=0x3, image_ok=0x3
I: Boot source: none
I: Swap type: none
I: Primary image: magic=unset, swap_type=0x1, copy_done=0x3, image_ok=0x3
I: Secondary image: magic=unset, swap_type=0x1, copy_done=0x3, image_ok=0x3
I: Boot source: none
I: Bootloader chainload address offset: 0x28000
I: Jumping to the first image slot
*** Booting Zephyr OS build v2.7.0-ncs1 ***
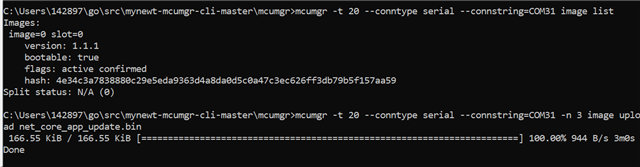
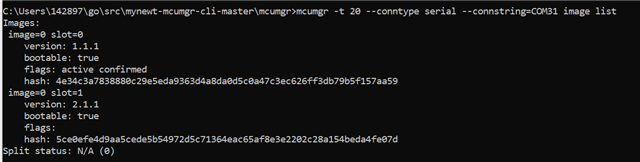
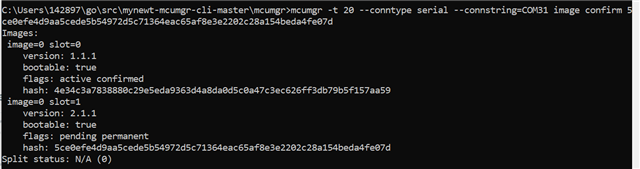
I can firmware upgrade over-the-air (FOTA) for application using app_update.bin file.
Question:
1) How can I upgrade the second stage bootloader(MCUBoot bootloader)?
2) Which bin file to upload for upgrade the second stage bootloader?