Flash code to thingy 53

I have a thingy 53 that I got from the HacksterIO competition, I'm trying to program it using the Programmer application from the NRF Connect Desktop application.
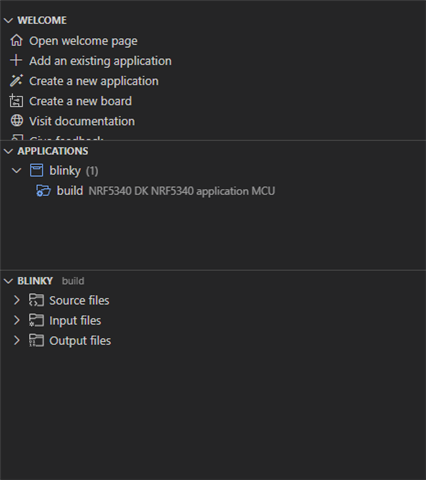
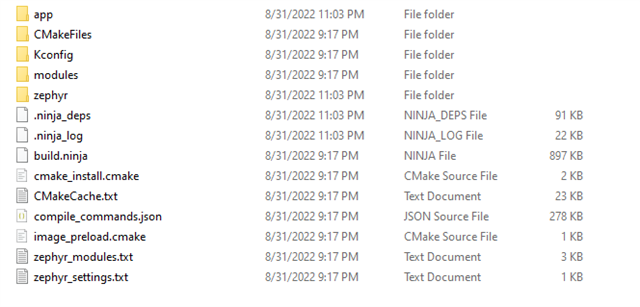
I open Toolchain Manager, boot VS code and build one of the examples (blinky) applications (I don't want to use prebuild). The build that VS code produces is not flash-able from the Programmer application. What can I do so I can write my own code and flash it using the Programmer application?

  • Hello,

    I am glad to hear that you are getting started with the Thingy:53! :) 
    The Thingy:53 does not have an on-board debugger, which is why it is not showing up in the 'connected devices' in the VSC.
    This also means that you are not able to flash the Thingy:53 through the VSC 'flash' action, as you would a regular nRF5340 DK.
    Instead, you will have to perform a DFU in order to flash your Thingy:53 - you could do so using any of these methods.

    When you want to proceed to creating a custom application you will have to use DFU for that application as well, to update your device. Luckily, you do not have to implement/add the DFU component 'from scratch', instead you can just start out from one of the examples that already have the DFU for the Thingy:53 added, and then trim it down to the minimal application before you start the development - this is the approach I recommend to quickly get started.
    I have taken the liberty of including a exempt from a blogpost I am currently writing on this topic, that describes this exact process, please see the following (the formatting is not preserved, unfortunately):

    ## **1. Setting up the project**
    Having installed the nRF Connect SDK v2.0.0 using the Toolchain Manager we begin by using the 'create a new application' option in Visual Studio Code (VSC) to create a _freestanding_ application based on the _peripheral LBS_ sample - the main reason for choosing the _peripheral LBS_ sample as our place to start is that it already is compatible with the Thingy:53, and so it already has the necessary DFU parts implemented, which lets us focus on the data collection.<br>
    The reason why we need our application to feature DFU right from the beginning is that the Thingy:53 does not have an onboard debugger, and we therefore need to implement a means of updating the application on the Thingy:53.
    For convenience we could of course have used a standalone debug-probe, or another DK's debugger, to perform the programming of the Thingy:53, but that would require additional hardware and it would in addition have robbed us of the opportunity to see how easy it is to add DFU to our application.<br>
    The DFU ready application can be found in the _YOUR/PATH/build/zephyr/dfu\_application.zip_ location.
    <br>
    The different ways to program the Thingy:53 is also described more thoroughly in [the Getting Started with the Thingy:53 documentation](https://developer.nordicsemi.com/nRF_Connect_SDK/doc/latest/nrf/ug_thingy53_gs.html#getting-started-with-precompiled-firmware-samples), in our case we will be using the [Updating through USB option](https://developer.nordicsemi.com/nRF_Connect_SDK/doc/latest/nrf/ug_thingy53_gs.html#updating-through-usb).<br>
    <br>
    If you already have an existing application that you would would like to add DFU to you could instead [follow this guide](https://devzone.nordicsemi.com/guides/nrf-connect-sdk-guides/b/software/posts/ncs-dfu).
    I chose the name 'thingy53_sensor_hub' for this project, and placed it in the 'C:\myapps\' location.
    It should look like this(minus the 'Folder already exists' notification) before we click _create application_:<br>
    
        ![create application from sample](./images/create_app_from_sample.png)
    
    Use the _add build configuration_ option in VSC to create a build configuration for the Thingy:53.
    Make sure to select the _prj.conf_ for the _configuration_, I have also chosen to name my build
    It should look like this before we click 'build':<br>
    
        ![build configuration](./images/build_config.png)
    
    ## **2. Trimming down to a minimal project**
    In order to highlight the necessary steps for the sensor hub implementation we will start out by trimming away the peripheral LBS specific functionality from our application. In this case, we do not need any of the LBS specific code, nor the button functionality - we can keep the generic Bluetooth parts, along with the LEDs.
    Removing all the LBS service specific code leaves us with the following, minial _main.c_:<br>
    
    ```c
        /*
        * Copyright (c) 2018 Nordic Semiconductor ASA
        *
        * SPDX-License-Identifier: LicenseRef-Nordic-5-Clause
        */
    
        #include <zephyr/types.h>
        #include <stddef.h>
        #include <string.h>
        #include <errno.h>
        #include <zephyr/sys/printk.h>
        #include <zephyr/sys/byteorder.h>
        #include <zephyr/kernel.h>
        #include <zephyr/drivers/gpio.h>
        #include <soc.h>
    
        #include <zephyr/bluetooth/bluetooth.h>
        #include <zephyr/bluetooth/hci.h>
        #include <zephyr/bluetooth/conn.h>
        #include <zephyr/bluetooth/uuid.h>
        #include <zephyr/bluetooth/gatt.h>
    
        #include <zephyr/settings/settings.h>
    
        #include <dk_buttons_and_leds.h>
    
        #define DEVICE_NAME             CONFIG_BT_DEVICE_NAME
        #define DEVICE_NAME_LEN         (sizeof(DEVICE_NAME) - 1)
    
    
        #define RUN_STATUS_LED          DK_LED1
        #define CON_STATUS_LED          DK_LED2
        #define RUN_LED_BLINK_INTERVAL  1000
    
        #define USER_LED                DK_LED3
    
        #define USER_BUTTON             DK_BTN1_MSK
    
        static const struct bt_data ad[] = {
            BT_DATA_BYTES(BT_DATA_FLAGS, (BT_LE_AD_GENERAL | BT_LE_AD_NO_BREDR)),
            BT_DATA(BT_DATA_NAME_COMPLETE, DEVICE_NAME, DEVICE_NAME_LEN),
        };
    
        static const struct bt_data sd[] = 
        {
        
        };
    
        static void connected(struct bt_conn *conn, uint8_t err)
        {
            if (err) {
                printk("Connection failed (err %u)\n", err);
                return;
            }
    
            printk("Connected\n");
    
            dk_set_led_on(CON_STATUS_LED);
        }
    
        static void disconnected(struct bt_conn *conn, uint8_t reason)
        {
            printk("Disconnected (reason %u)\n", reason);
    
            dk_set_led_off(CON_STATUS_LED);
        }
    
        BT_CONN_CB_DEFINE(conn_callbacks) = {
            .connected        = connected,
            .disconnected     = disconnected,
        };
    
        void main(void)
        {
            int blink_status = 0;
            int err;
    
            printk("Starting Sensor Hub application\n");
    
            err = dk_leds_init();
            if (err) 
            {
                printk("LEDs init failed (err %d)\n", err);
                return;
            }
    
            err = bt_enable(NULL);
            if (err) {
                printk("Bluetooth init failed (err %d)\n", err);
                return;
            }
    
            printk("Bluetooth initialized\n");
    
            if (IS_ENABLED(CONFIG_SETTINGS)) 
            {
                settings_load();
            }
    
            err = bt_le_adv_start(BT_LE_ADV_CONN, ad, ARRAY_SIZE(ad),
                        sd, ARRAY_SIZE(sd));
            if (err) 
            {
                printk("Advertising failed to start (err %d)\n", err);
                return;
            }
    
            printk("Advertising successfully started\n");
    
            for (;;) 
            {
                dk_set_led(RUN_STATUS_LED, (++blink_status) % 2);
                k_sleep(K_MSEC(RUN_LED_BLINK_INTERVAL));
            }
        }
    ```
    
    We will also need to make some changes to the _prj.conf_ - we'll keep the general Bluetooth parts, and remove the LBS specific parts. In addition, I have renamed the device to 'T53_sensor_hub' for convenience. The _prj.conf_ which should look like this afterwards:<br>
    
    ```c
        #
        # Copyright (c) 2018 Nordic Semiconductor
        #
        # SPDX-License-Identifier: LicenseRef-Nordic-5-Clause
        #
    
        # Enable Bluetooth
        CONFIG_BT=y
        CONFIG_BT_PERIPHERAL=y
        CONFIG_BT_DEVICE_NAME="T53_sensor_hub"
    
        # Enable buttons and LEDs
        CONFIG_DK_LIBRARY=y
    
        CONFIG_SYSTEM_WORKQUEUE_STACK_SIZE=2048
    ```
    
    Lastly, you can delete the _Kconfig_ file from the sample directory as well.


    Please do not hesitate to let me know if you have got any additional questions, or if any part of this should still be unclear! :) 

    Best regards,
    Karl

  • Please note that this minimal project still contains the BLE peripheral part (advertising as connectable), but you could remove this as well if it is not applicable to the application you would like to build.

    Best regards,
    Karl

  • Alright thanks,

    But after I build this code you posted, how can I flash it on my device using the NRF Programmer application from the NRF connect application?

  • Yes, after building the project based on the minimal project described in my previous comments you will find the DFU image at YOUR/PATH/build/zephyr/dfu_application.zip. You can update your Thingy:53 as described in the Updating over USB section of the documentation - inputting the dfu_application.zip in the nRF Connect for Desktop Programmer application.

    Best regards,
    Karl

Related